SAR Melrose Switches
From TrainzOnline
(Difference between revisions)
m |
m |
||
| (6 intermediate revisions by one user not shown) | |||
| Line 1: | Line 1: | ||
| − | + | <!-- V1.0 --> | |
| + | <table> | ||
<tr valign="top"> | <tr valign="top"> | ||
<td width=750> | <td width=750> | ||
| − | <table width=750 | + | <table width=750> |
<tr valign="top"> | <tr valign="top"> | ||
<td align="center">[[Image:line740.png|link=]]</td> | <td align="center">[[Image:line740.png|link=]]</td> | ||
</tr> | </tr> | ||
<tr valign="top"> | <tr valign="top"> | ||
| − | <td align="center">[[image:Tab_HM_Grey.png|link=SAR_Melrose]] [[image:Tab_IN_Grey.png|link=SAR_Melrose_Industry]] [[image:Tab_TM_Grey.png|link=SAR_Melrose_TrackMarks]] [[image: | + | <td align="center">[[image:Tab_HM_Grey.png|link=SAR_Melrose]] [[image:Tab_IN_Grey.png|link=SAR_Melrose_Industry]] [[image:Tab_TM_Grey.png|link=SAR_Melrose_TrackMarks]] [[image:Tab_SW_White.png|link=]] [[image:Tab_Blank_Grey.png|link=]]</td> |
</tr> | </tr> | ||
<tr valign="top"> | <tr valign="top"> | ||
<td align="center">[[Image:line740.png|link=]]</td> | <td align="center">[[Image:line740.png|link=]]</td> | ||
</tr> | </tr> | ||
| − | </table | + | </table> |
| − | <table bgcolor="lightgrey" bordercolor="lightgrey" width=750 | + | <table bgcolor="lightgrey" bordercolor="lightgrey" width=750> |
<tr valign="middle"> | <tr valign="middle"> | ||
| Line 25: | Line 26: | ||
</tr> | </tr> | ||
| − | </table | + | </table> |
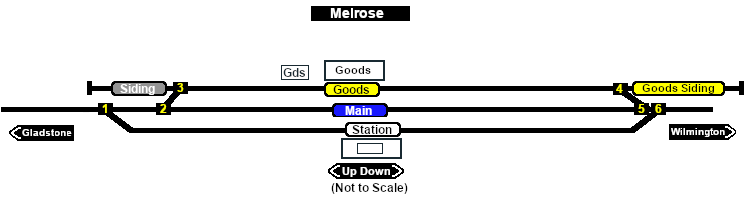
[[image:SAR_Melrose_Basic.png|link=|alt=Melrose Switches map]] | [[image:SAR_Melrose_Basic.png|link=|alt=Melrose Switches map]] | ||
| − | <table bgcolor="LightYellow" width=750 | + | <table bgcolor="LightYellow" width=750> |
<tr valign="top"> | <tr valign="top"> | ||
| Line 87: | Line 88: | ||
<td colspan=6> | <td colspan=6> | ||
| − | <table width=750 | + | <table width=750> |
<tr valign="top"> | <tr valign="top"> | ||
| Line 99: | Line 100: | ||
</tr> | </tr> | ||
| − | </table | + | </table> |
| − | + | <table> | |
| − | + | ||
<tr valign="top"> | <tr valign="top"> | ||
| Line 113: | Line 113: | ||
</tr> | </tr> | ||
| − | </table | + | </table> |
| − | <table | + | <table> |
<tr valign="top"> | <tr valign="top"> | ||
| Line 127: | Line 127: | ||
</tr> | </tr> | ||
| − | </table> | + | </table> |
| − | + | ||
<tr valign="top"> | <tr valign="top"> | ||
<td colspan=6 align="center">[[Image:line740.png|link=]]</td> | <td colspan=6 align="center">[[Image:line740.png|link=]]</td> | ||
</tr> | </tr> | ||
| − | </table | + | </table> |
</td> | </td> | ||
| Line 141: | Line 140: | ||
</td> | </td> | ||
</tr> | </tr> | ||
| − | </table | + | </table> |
Latest revision as of 20:17, 16 November 2022
|
|
||||||||||||||||||||||||||||||||||||||||||||||||||||||||||||||||||||||||||||||||||||||