|
|
| (10 intermediate revisions by one user not shown) |
| Line 1: |
Line 1: |
| | + | <!-- V1.0 --> |
| | + | <table> |
| | + | <tr valign="top"> |
| | + | <td width=750> |
| | | | |
| − | <table width=1000> <!-- BEGIN Title and summary table --> | + | <table width=750> |
| | <tr valign="top"> | | <tr valign="top"> |
| − | <td width=1000 align="center" colspan=2>[[image:Using EITs.png|link=|alt=EITs/AI]] <span style="font-size: 21px; font-weight: 700; background-color: black; color: white;"> SAR Enhanced Interlocking Towers and AI Driving Tutorial </span></td> | + | <td align="center">[[Image:line740.png|link=]]</td> |
| | </tr> | | </tr> |
| | <tr valign="top"> | | <tr valign="top"> |
| − | <td align="center" colspan=2>A part of the '''[[SAR Peterborough Base Session]]'''</td> | + | <td align="center">[[image:Tab_HM_Grey.png|link=SAR_Caltowie]] [[image:Tab_IN_Grey.png|link=SAR_Caltowie_Industry]] [[image:Tab_TM_White.png|link=]] [[image:Tab_SW_Grey.png|link=SAR_Caltowie_Switches]] [[image:Tab_Blank_Grey.png|link=]]</td> |
| | </tr> | | </tr> |
| | <tr valign="top"> | | <tr valign="top"> |
| − | <td> | + | <td align="center">[[Image:line740.png|link=]]</td> |
| − | <table> <!-- BEGIN EITs List -->
| + | </tr> |
| − | <tr valign="top">
| + | </table> |
| − | <td>'''Enhanced Interlocking Towers (EITs)''' are included in the '''SAR Peterborough Base Session''' (they are not part of the route or layout) to provide easier navigation in some of the more complex yards in the layout. The EITs provide paths into and out of the yards. In some cases they also provide direct paths through the yards.<br><br> | + | |
| | | | |
| − | <table cellpadding="4" bgcolor=#c1e7e7> <!-- BEGIN Dot Point --> | + | <table bgcolor="lightgrey" bordercolor="lightgrey" width=750> |
| − | <tr valign="top">
| + | |
| − | <td>[[file:DotPoint.JPG|link=]]</td>
| + | |
| − | <td>'''EITs''' are '''optional''', they do not have to be used</td>
| + | |
| − | </tr>
| + | |
| − | </table> <!-- END Dot Point -->
| + | |
| − | <br>
| + | |
| − | EITs are setup at the following locations:-
| + | |
| − | *'''Gladstone Down''' - to provide paths out of '''Gladstone''' in the directions of '''Jamestown''' and the '''Wilmington Line'''.
| + | |
| − | *'''Gladstone Up''' - to provide paths into '''Gladstone''' from the directions of '''Jamestown''' and the '''Wilmington Line'''.
| + | |
| − | *'''Caltowie''' - to provide paths into, out of and through '''Caltowie''' from the directions of '''Gladstone''' and '''Peterborough'''.
| + | |
| − | *'''Jamestown''' - to provide paths into, out of and through '''Jamestown''' from the directions of '''Gladstone''' and '''Peterborough'''.
| + | |
| − | *'''Peterborough West''' - to provide paths into and out of '''Peterborough''' from the directions of '''Gladstone''' and '''Quorn'''.
| + | |
| − | *'''Peterborough East''' - to provide paths into and out of '''Peterborough''' from the directions of '''Terowie''' and '''Paratoo'''.
| + | |
| − | *'''Paratoo''' - to provide paths into and out of '''Paratoo''' from the direction of '''Peterborough'''.
| + | |
| − | *'''Terowie''' - to provide paths into and out of '''Terowie''' from the direction of '''Peterborough'''.
| + | |
| − | *'''Orroroo''' - to provide paths into, out of and through '''Orroroo''' from the directions of '''Peterborough''' and '''Quorn'''.
| + | |
| − | *'''Carrieton''' - to provide paths into, out of and through '''Carrieton''' from the directions of '''Peterborough''' and '''Quorn'''.
| + | |
| − | *'''Quorn''' - to provide paths into and out of '''Quorn''' from the direction of '''Peterborough'''.
| + | |
| − | '''Gladstone''' and '''Peterborough''' have each been split into two '''EITs''' because of the large number of paths at each location.
| + | |
| − | </td>
| + | |
| − | <td align="right">[[image:SAR Nth Division Strip Map.png|link=|alt=SAR Northern Division Map]]</td>
| + | |
| − | </tr>
| + | |
| − | </table> <!-- END EITs List -->
| + | |
| − | </td>
| + | |
| − | </tr>
| + | |
| − | </table> <!-- END Title and Summary Table -->
| + | |
| − | <br>
| + | |
| − | '''Driver Commands''' are available for use in the session.<br>
| + | |
| | | | |
| − | <table cellpadding="4" bgcolor=#c1e7e7> <!-- BEGIN Dot Point --> | + | <tr valign="middle"> |
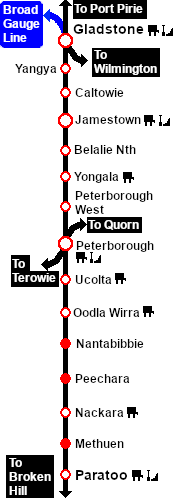
| − | <tr valign="top"> | + | <td width=220 align="right">[[Image:SAR_PortPirie-BrokenHill_Line.png|link=SAR_Port_Pirie-Broken_Hill|alt=PortPirie-BrokenHill|Show Port Pirie-Broken Hill]]</td> |
| − | <td>[[file:DotPoint.JPG|link=]]</td> | + | <td width=110 align="center">[[Image:Next Left.png|link=|alt=]]<br>[[Image:SAR_Yangya_Name.png|link=SAR Yangya|alt=Gladstone|Next Up Location]]</td> |
| − | <td>'''Driver Commands''' are '''optional''', they do not have to be used</td> | + | <td width=90 align="center">[[Image:Location Index.png|link=SAR Index|alt=Location Index|Location Index]]<br>[[image:Scenario Index.png|link=SAR Peterborough Base Session|alt=Scenarios|Scenario Index]]</td> |
| | + | <td width=110 align="center">[[Image:Next Right.png|link=|alt=]]<br>[[Image:SAR_Jamestown_Name.png|link=SAR Jamestown|alt=Caltowie|Next Down Location]]</td> |
| | + | <td width=220 align="left">[[Image:SAR_PortPirie-BrokenHill_Line.png|link=SAR_Port_Pirie-Broken_Hill|alt=PortPirie-BrokenHill|Show Port Pirie-Broken Hill]]</td> |
| | </tr> | | </tr> |
| − | </table> <!-- END Dot Point -->
| |
| − | <br>
| |
| | | | |
| − | Apart from the standard commands ('''Drive To''', '''Load''', '''Unload''', '''Couple''', '''Wait For''', etc), additional commands have been added. Specifically:-
| + | </table> |
| − | *'''IT SetPath (TANE SP4 and later)''' - to allow EIT paths to be set in the '''Driver Command Bar'''
| + | |
| − | *'''IT CancelEnhancedPath (TANE SP4 and later)''' - to cancel any set EIT path
| + | |
| − | *'''Instant Load Command''' - to instantly load all wagons (except locos) with the first item in their product queues
| + | |
| − | *'''InstantLoadLocos''' - to instantly load all locos (or their tenders) with '''water''' and either '''coal''' or '''bunker c oil'''
| + | |
| − | *'''InstantUnload''' - to instantly unload all wagons (except locos)
| + | |
| − | <br> | + | |
| | | | |
| − | <span style="font-weight: 700; font-size: 19px; background-color: black; color: white;"> The Tutorial Scenario </span><br>
| + | [[image:SAR_Caltowie_TM.png|link=|alt=Caltowie Track Marks map]] |
| | | | |
| − | The scenario used in this tutorial is [[image:No_1.png|link=|alt=1]] '''[[SAR Scenario Depot Fuel Run|Gladstone-Peterborough Depot Fuel]]''' which has the consist already fully assembled with its locomotive ('''T 258''') at the starting signal of the <span style="font-weight: 700;">Gladstone EIT <span style="background-color: yellow; color: black;"> Goods Loop to Broken Hill </span></span> path. This tutorial will follow the scenario until after the consist arrives at '''Jamestown'''.<br>
| + | <table bgcolor="Honeydew" width=750> |
| | | | |
| − | From the '''Gladstone-Peterborough Depot Fuel''' instructions page:-<br>
| |
| − |
| |
| − | <table cellpadding="2" bgcolor="black" width=1000> <!-- BEGIN Black border for Getting Started table -->
| |
| | <tr valign="top"> | | <tr valign="top"> |
| − | <td><span style="font-size: 15px; font-weight: 700; color: white">Getting Started:</span><br> | + | <td colspan=3 align="center">[[Image:line740.png|link=]]</td> |
| − | <table bgcolor="lightyellow" width=996> <!-- BEGIN Getting Started table -->
| + | |
| − | <tr valign="top">
| + | |
| − | <td>
| + | |
| − | Find your loco. '''Either''':-
| + | |
| − | # Open the '''Finder Tool''' (press '''CTRL-F''') and type, in the '''name''' field, the name of the loco, '''SAR T 258''' (or just '''T 258''' should be enough). Click the '''tick''' icon, '''OR'''
| + | |
| − | # Open the '''Driver List''' (bottom left of the screen) and select the loco from there - click the drivers '''Eye''' icon to jump to the loco.
| + | |
| − | </td> | + | |
| | </tr> | | </tr> |
| − | </table> <!-- END Getting Started table --> | + | |
| − | </td> | + | <tr valign="middle"> |
| | + | <td colspan=3 align="center"><span style="font-weight: 700;font-size: 17px; background-color: red; color: white;"> Track Marks </span></td> |
| | </tr> | | </tr> |
| − | </table> <!-- END Black border for Getting Started table -->
| + | <tr valign="middle"> |
| − | <br>
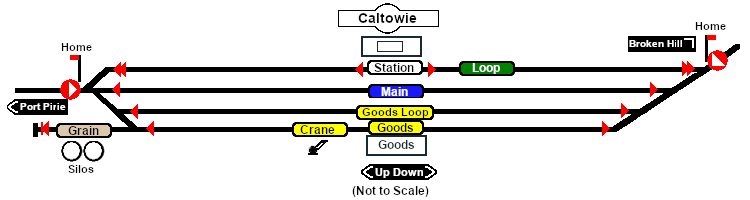
| + | <td colspan=3><span style="font-weight: 700;">Destinations for "Drive Via Trackmark <span style="background-color: yellow; color: black;"> NAME </span>" or "Drive To Trackmark <span style="background-color: yellow; color: black;"> NAME </span>" AI commands. The direction that a track mark points has no effect on its operation.</span></td> |
| − | <table> <!-- BEGIN Driver Command Bar -->
| + | |
| − | <tr valign="top"> | + | |
| − | <td colspan=6><span style="font-weight: 700; font-size: 17px; background-color: black; color: white;"> The Driver Command Bar </span><br><br></td> | + | |
| | </tr> | | </tr> |
| | <tr valign="top"> | | <tr valign="top"> |
| − | <td colspan=6>Make sure that the '''Driver Command Bar''' is visible on the screen. In '''Driver Mode''' the interactive driver controls are at the bottom right of the screen.<br></td> | + | <td colspan=3 align="center">[[Image:line740.png|link=]]</td> |
| | </tr> | | </tr> |
| − | <tr valign="top"> | + | |
| − | <td colspan=6 align="center"> | + | <tr valign="middle"> |
| − | [[image:Driver Command Control.png|link=|alt=Driver Commands Settings]]</td> | + | <td width=200><span style="font-weight: 700; background-color: black; color: white;"> Approach from Port Pirie </span> </td> |
| | + | <td> </td> |
| | + | <td>[[image:Trackmark_Invert_Right.png|link=|alt=TM|21px]] <span style="font-weight: 700;">Caltowie Main Approach Dn</span></td> |
| | </tr> | | </tr> |
| − | <tr valign="top"> | + | <tr valign="middle"> |
| − | <td>[[image:Steps.PNG|link=]]<br></td>
| + | <td width=200><span style="font-weight: 700; background-color: black; color: white;"> Approach from Broken Hill </span> </td> |
| − | <td>[[image:DotPoint1.JPG|link=]] </td>
| + | <td colspan=2>[[image:Trackmark_Invert_Down_Left.png|link=|alt=TM|21px]] <span style="font-weight: 700;">Caltowie Main Approach Up</span></td> |
| − | <td width=450><span style="font-size: 15px; font-weight: 700;">Cycle Through the Command States</span><br> | + | |
| − | Click the '''3 dots''' on the extreme bottom right of the screen to cycle the control display through to the '''Driver Command Bar''' - stop when the last of the 3 dots is highlighted.</td>
| + | |
| − | <td width=20> </td>
| + | |
| − | <td>[[image:DotPoint2.JPG|link=]] </td> | + | |
| − | <td width=450><span style="font-size: 15px; font-weight: 700;">Open the Driver Command Menu</span><br>
| + | |
| − | Click on the '''chevron''' icon to open the command menu.</td>
| + | |
| | </tr> | | </tr> |
| − | </table> <!-- END Driver Command Bar --> | + | <tr valign="middle"> |
| − | <br> | + | <td width=200>[[image:Station_Label.png|link=|alt=Station]] </td> |
| − | <table width=1000> <!-- BEGIN Instruction Set-->
| + | <td>[[image:Trackmark_Left.png|link=|alt=TM|10px]] <span style="font-weight: 700;">Caltowie Station Up</span></td> |
| − | <tr valign="top"> | + | <td>[[image:Trackmark_Right.png|link=|alt=TM|10px]] <span style="font-weight: 700;">Caltowie Station Dn</span></td> |
| − | <td colspan=3 bgcolor="lightcyan"> </td> | + | |
| | </tr> | | </tr> |
| − | <tr valign="top"> | + | <tr valign="middle"> |
| − | <td width=30 align="center" bgcolor="lightcyan">'''Step'''<br>[[image:DotPoint1Blue.JPG|link=]]</td> <!-- Instruction 1 --> | + | <td width=200>[[image:Station_Label.png|link=|alt=Station]] [[image:Loop_Label.png|link=|alt=Loop]] </td> |
| − | <td width=940>
| + | <td>[[image:Trackmark_Left_Double.png|link=|alt=TM|15px]] <span style="font-weight: 700;">Caltowie Station Loop Up</span></td> |
| − | <span style="font-weight: 700; font-size: 19px; background-color: black; color: white;"> Setting an EIT Path from a Starting Signal </span><br>
| + | <td>[[image:Trackmark_Right_Double.png|link=|alt=TM|15px]] <span style="font-weight: 700;">Caltowie Station Loop Dn</span></td> |
| − | <br>
| + | |
| − | The first path to be set in this tutorial is from the <span style="font-weight: 700;">Gladstone <span style="background-color: yellow; color: black;"> Goods Loop </span></span> to <span style="font-weight: 700;"><span style="background-color: black; color: white;"> Broken Hill </span></span>. On the '''Gladstone''' [[image:Tab_PH_Grey.png|link=|75px]] page (link via [[image:Line_Index_Label.png|link=SAR_Index|Location Index]] - link will open in this window) this is identified on that page as:-<br><br>
| + | |
| − | | + | |
| − | [[image:GS MtoB Path.png|link=|alt=M to P Path]]<br><br> | + | |
| − | | + | |
| − | From the open '''Driver Command Menu''', select the <span style="font-weight: 700;"><span style="color: white; background-color: black;"> IT SetPath (TANE SP4 and later) </span></span> option. This will open a list of all the '''EITs''' that have been placed in the Session. Because an '''EIT Starting Signal''', in this case invisible signal '''GSX G27D''', is directly in front of the loco, the signal will be included in the '''EIT''' list.<br>
| + | |
| − | | + | |
| − | <table> <!-- BEGIN Starting Signal Example Table -->
| + | |
| − | <tr valign="top">
| + | |
| − | <td align="center">[[image:GS to PTB Paths 1.png|link=|alt=Starting Paths]]</td> | + | |
| − | <td>
| + | |
| − | Select the starting signal <span style="font-weight: 700;"><span style="color: white; background-color: black;"> GSX G27D </span></span>. This will reveal that two different paths out of '''Gladstone''' start from this signal.<br>
| + | |
| − | | + | |
| − | * <span style="font-weight: 700;"><span style="color: white; background-color: black;"> Goods Loop to Broken Hill </span></span>, and
| + | |
| − | * <span style="font-weight: 700;"><span style="color: white; background-color: black;"> Goods Loop to Wilmington </span></span>
| + | |
| − | <br>
| + | |
| − | </td> | + | |
| | </tr> | | </tr> |
| − | </table> <!-- END Starting Signal Example Table --> | + | <tr valign="middle"> |
| − | | + | <td width=200>[[image:Main_Label.png|link=|alt=Main]] </td> |
| − | Select the path <span style="font-weight: 700;"><span style="color: white; background-color: black;"> Goods Loop to Broken Hill </span></span>.<br>
| + | <td>[[image:Trackmark_Left.png|link=|alt=TM|10px]] <span style="font-weight: 700;">Caltowie Main Up</span></td> |
| − | | + | <td>[[image:Trackmark_Right.png|link=|alt=TM|10px]] <span style="font-weight: 700;">Caltowie Main Dn</span></td> |
| − | Selecting this path will '''NOT''' set the entire path from '''Gladstone''' to '''Broken Hill'''. It will only set the path from the '''Starting Signal''' (in this case '''GSX G27D''') to the '''End Signal''' ('''Gladstone Home Up''' on the '''Broken Hill''' side of the yard). Every path is named according to its starting point (one of five locations or a track in the local yard) and its destination (one of five locations or a track in the local yard). The five locations are '''Port Pirie''', '''Broken Hill''', '''Terowie''', '''Quorn''' and '''Wilmington''' even if that location is not the destination or starting point of the consist. This is intended to indicate the direction of travel only.<br>
| + | |
| − | | + | |
| − | <table> <!-- BEGIN Path M to B Table -->
| + | |
| − | <tr valign="top">
| + | |
| − | <td width-475>[[image:Gladstone Map MtoB.png|link=|alt=Path on map]]</td> | + | |
| − | <td>The path has now been set.<br> | + | |
| − | | + | |
| − | All junction switches and signals along that path from the '''Start Signal''' ('''GSX G27D''') to the '''End Signal''' ('''Gladstone Home Up''') are set to give loco '''T 258''' the road out of '''Gladstone''' towards '''Broken Hill'''.<br>
| + | |
| − | | + | |
| − | '''Note:''' not all signals will automatically show '''Proceed''' once the path has been set. Some signals, semaphore signals for example, will only show '''Proceed''' when a train starts moving towards the signal.</td>
| + | |
| | </tr> | | </tr> |
| − | </table> <!-- END Path M to B Table --> | + | <tr valign="middle"> |
| − | <br> | + | <td width=200>[[image:GoodsLoop_Label.png|link=|alt=G.Loop]] </td> |
| − | <span style="font-weight: 700; font-size: 17px; background-color: black; color: white;"> Cancelling a Set EIT Path </span><br> | + | <td>[[image:Trackmark_Left.png|link=|alt=TM|10px]] <span style="font-weight: 700;">Caltowie Goods Loop Up</span></td> |
| − | | + | <td>[[image:Trackmark_Right.png|link=|alt=TM|10px]] <span style="font-weight: 700;">Caltowie Goods Loop Dn</span></td> |
| − | Paths that have been set can be cancelled so that their signals and junction switches will be returned to their previous states. They will be returned automatically after the consist has cleared the '''Exit Signal''' for a path but if you change your mind and decide to take a different path or not use the EITs then a set path can be cancelled.<br>
| + | |
| − | | + | |
| − | From the '''Driver Command Menu''' select the '''IT CancelEnhancedPath''' command.<br>
| + | |
| − | | + | |
| − | [[image:IT CancelEnhancedPath.png|link=|alt=Cancel Path]]<br> | + | |
| − |
| + | |
| − | You will have the option of cancelling '''ALL PATHS''' or selecting a particular '''EIT''' and path to cancel.<br>
| + | |
| − | </td>
| + | |
| − | <td width=30 bgcolor="lightcyan"> </td>
| + | |
| − | </tr> <!-- END Instruction 1 -->
| + | |
| − | <tr valign="top">
| + | |
| − | <td colspan=3 bgcolor="lightcyan"> </td> | + | |
| | </tr> | | </tr> |
| − | <tr valign="top"> | + | <tr valign="middle"> |
| − | <td colspan=3> </td> | + | <td width=200>[[image:Goods_Label.png|link=|alt=Goods]] </td> |
| | + | <td>[[image:Trackmark_Left.png|link=|alt=TM|10px]] <span style="font-weight: 700;">Caltowie Goods Up</span></td> |
| | + | <td>[[image:Trackmark_Right.png|link=|alt=TM|10px]] <span style="font-weight: 700;">Caltowie Goods Dn</span></td> |
| | </tr> | | </tr> |
| − | <tr valign="top"> | + | <tr valign="middle"> |
| − | <td colspan=3 bgcolor="lightcyan"> </td> | + | <td width=200>[[image:Grain_Label.png|link=|alt=Grain]] </td> |
| | + | <td>[[image:Trackmark_LeftDE.png|link=|alt=TM|10px]] <span style="font-weight: 700;">Caltowie Grain <span style="background-color: red; color: white;"> DE </span></span></td> |
| | + | <td> </td> |
| | </tr> | | </tr> |
| − | <tr valign="top">
| |
| − | <td align="center" bgcolor="lightcyan">'''Step'''<br>[[image:DotPoint2Blue.JPG|link=]]</td> <!-- Instruction 2 -->
| |
| − | <td>
| |
| − | <span style="font-weight: 700; font-size: 19px; background-color: black; color: white;"> Driving to the Next EIT Location </span><br>
| |
| | | | |
| − | You have several options for driving to '''Caltowie''', the next '''EIT''' location. There is a minor location, '''Yangya''', between '''Gladstone''' and '''Caltowie''' but it has no '''EIT''', minimal yard infrastructure, no signals and its switches are set for the main line through to '''Caltowie'''.
| |
| − |
| |
| − | [[image:DotPoint1.JPG|link=]] <span style="font-weight: 700; font-size: 17px; background-color: black; color: white;"> Manual Control </span><br>
| |
| − |
| |
| − | You can manually drive the train through to '''Caltowie''' without using the '''EIT''' as described in <span style="font-weight: 700;">Step <span style="color: white; background-color: blue; font-size: 18px;"> 1 </span></span> above. This would require that all the switches along the path be correctly set first. You can do this by manually setting all the switches yourself using the information on the '''Gladstone''' [[image:Tab_SW_Grey.png|link=|75px]] page (link via [[image:Line_Index_Label.png|link=SAR_Index|Location Index]] - link will open in this window).
| |
| − |
| |
| − | <table> <!-- BEGIN Switch Maps Table -->
| |
| | <tr valign="top"> | | <tr valign="top"> |
| − | <td width=465> | + | <td colspan=3 align="center">[[Image:line740.png|link=]]</td> |
| − | [[image:Gladstone Map Switches.png|link=|alt=Gladstone Switches]]<br>
| + | |
| − | [[image:Gladstone GStoBH Switch Set.png|link=|alt=Switch Set]]</td> | + | |
| − | <td>Part of this page is shown left with only those switches relevant to this tutorial scenario. The red dots indicate the yard '''Start''' and '''Exit''' positions for the train path.<br><br>
| + | |
| − | | + | |
| − | Also shown left below is the '''Switch Set''' data, taken from the same page, for the path <span style="font-weight: 700;">Gladstone <span style="background-color: yellow; color: black;"> Goods Loop </span></span> to <span style="font-weight: 700;"><span style="background-color: black; color: white;"> Broken Hill </span></span>. The switch directions, '''L''' or '''R''' are the directions when '''facing''' the junction fork i.e. the '''L''' and '''R''' that determine which direction a train will take when passing over the junction.<br>
| + | |
| − | | + | |
| − | Switch <span style="font-weight: 700; font-size: 18px; background-color: black; color: yellow;"> 20 </span> does not need to be set as it is already correctly set and occupied by the train.</td>
| + | |
| | </tr> | | </tr> |
| − | </table> <!-- END Switch Maps Table -->
| |
| − | <br>
| |
| − | You can now use the '''Driver Control Dial''' or the keyboard controls to drive the train out of '''Gladstone Yard''' to '''Caltowie'''. Alternatively, for those with advanced steam loco driving skills, you can take control of the throttle, brake and various valves wheels in the loco cab.<br>
| |
| | | | |
| − | [[image:DotPoint2.JPG|link=]] <span style="font-weight: 700; font-size: 17px; background-color: black; color: white;"> AI Control </span><br>
| + | </table> |
| | | | |
| − | You can also drive by adding '''Driver Commands''' directly into the '''Driver Command Bar''' on the bottom right of the screen. The '''Drive To''', '''Drive to Trackmark''', '''Drive via''' and other commands are available for use.<br>
| |
| − |
| |
| − | The approach to every location in the route has '''Trackmarks''' added to allow you to use this method to let the '''AI''' do most of the driving work. These trackmarks are placed a short distance ahead of the approach home signal, a semaphore signal, at those locations that have visible signals. Where the location has no visible signals (the majority of locations in the division were unsignalled) then a visible '''Caution''' track sign has been placed alongside the trackmark.<br>
| |
| − |
| |
| − | The '''Trackmarks''' are shown on the '''Caltowie''' [[image:Tab_TM_Grey.png|link=|75px]] page (link via [[image:Line_Index_Label.png|link=SAR_Index|Location Index]] - link will open in this window).<br>
| |
| − |
| |
| − | <table> <!-- BEGIN TM Table -->
| |
| − | <tr valign="top">
| |
| − | <td width=200>
| |
| − | [[image:Caltowie Approach Dn.png|link=|alt=Caltowie Approach]]
| |
| | </td> | | </td> |
| − | <td>Part of this page is shown left. The approach trackmark on the '''Port Pirie''' side is <span style="font-weight: 700;">Caltowie Main Approach Dn</span>. This is also identified in the data table, also copied from the same page, shown below.<br>
| |
| − |
| |
| − | [[image:Caltowie Approach TM.png|link=|alt=Caltowie TM]]<br>
| |
| − |
| |
| − | From the '''Driver Command Menu''' select the command <span style="font-weight: 700; background-color: black; color: white;"> Drive To Trackmark </span> then select the trackmark <span style="font-weight: 700; background-color: black; color: white;"> Caltowie Main Approach Dn </span>.
| |
| − | </td>
| |
| − | </tr>
| |
| − | </table> <!-- END TM Table -->
| |
| − |
| |
| − | <table cellpadding="4" bgcolor=#ffffb0> <!-- BEGIN Tip Table -->
| |
| − | <tr valign="top">
| |
| − | <td>[[file:PencilTips.PNG|link=]]</td>
| |
| − | <td>Using the '''Drive''' commands in yards with many switches, such as '''Gladstone''', will work but the consist will display a "stop-start" motion as it slowly navigates its way through the switches. If you use the '''EIT''' to set the path first then use the '''Drive''' commands, the consist will move without any delays.</td>
| |
| − | </tr>
| |
| − | </table> <!-- END Tip Table -->
| |
| − |
| |
| − |
| |
| − |
| |
| − | </td>
| |
| − | <td bgcolor="lightcyan"> </td>
| |
| − | </tr> <!-- END Instruction 2 -->
| |
| − | <tr valign="top">
| |
| − | <td colspan=3 bgcolor="lightcyan"> </td>
| |
| − | </tr>
| |
| − | <tr valign="top">
| |
| − | <td colspan=3> </td>
| |
| − | </tr>
| |
| − | <tr valign="top">
| |
| − | <td colspan=3 bgcolor="lightcyan"> </td>
| |
| − | </tr>
| |
| − | <tr valign="top">
| |
| − | <td align="center" bgcolor="lightcyan">'''Step'''<br>[[image:DotPoint3Blue.JPG|link=]]</td> <!-- Instruction 3 -->
| |
| | <td> | | <td> |
| − | <span style="font-weight: 700; font-size: 19px; background-color: black; color: white;"> Setting the Next EIT </span><br>
| + | [[Image:SAR_PortPirie-BrokenHill_Line.png|link=SAR_Port_Pirie-Broken_Hill|alt=PortPirie-BrokenHill|Show Port Pirie-Broken Hill]]<br> |
| − | | + | [[Image:SAR_Gladstone-Paratoo Strip Map.png|link=|alt=Gladstone-Paratoo Strip Map]]</td> |
| − | You can set an EIT path without having to be directly in front of a '''Starting Signal'''. For example, you can set all the EIT paths for the train through '''Caltowie''' and into '''Jamestown''' (the first stop in the scenario) before you leave '''Gladstone'''.<br>
| + | |
| − | | + | |
| − | </td>
| + | |
| − | <td bgcolor="lightcyan"> </td>
| + | |
| − | </tr> <!-- END Instruction 3 -->
| + | |
| − | <tr valign="top"> | + | |
| − | <td colspan=3 bgcolor="lightcyan"> </td>
| + | |
| − | </tr>
| + | |
| − | <tr valign="top">
| + | |
| − | <td colspan=3> </td>
| + | |
| | </tr> | | </tr> |
| − | </table> <!-- END Instruction Set--> | + | </table> |
| − | <br>
| + | |