How to Use Track Markers

From TrainzOnline
Revision as of 15:58, 19 September 2019 by Pware (Talk | contribs)

(diff) ← Older revision | Latest revision (diff) | Newer revision → (diff)
Jump to: navigation, search

The information in this Wiki Page applies to both TANE and TRS19.

Contents

What are Track Markers?

In Summary:
DotPoint.JPG Track Markers are red coloured track objects that are invisible in Driver Mode but visible in Surveyor Mode. They are used as destinations or waypoints for AI driver commands
DotPoint.JPG Track Markers only work on AI controlled trains. They have no effect on manually controlled trains
DotPoint.JPG The direction that a Track Marker faces has NO effect on its operation

Adding a Track Marker

NotePad.PNG 
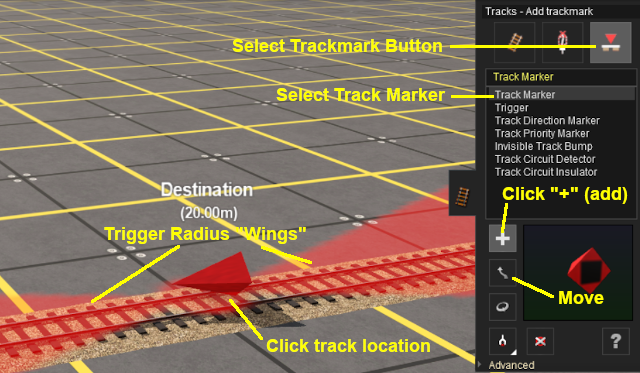
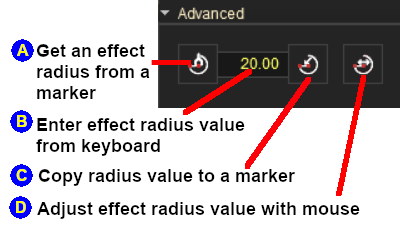
Notes:
A Track Marker has just one property, its Action Radius (the red "wings" shown in the image below). The radius value (in metres) is shown below the marker name. This controls how close an AI controlled train has to approach the marker
TrackMarkTools.png

Steps.PNG Steps:
  1. Open the Track Tool
  2. Select the Trackmark button
  3. Select the Track Marker
  4. Select the + (add) button - it may already be selected
  5. Click on the track location where the Track Marker is to be placed

When placed, the properties window for the Track Marker will appear.
TrackMarkProperties.png


PencilTips.PNG 
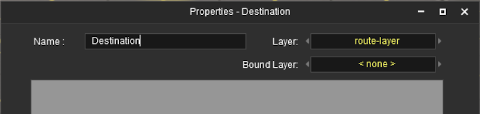
Enter a useful name for each Track Marker - the name will be needed for driver commands. Most creators base the name on the location (e.g. "Maintown Track 1 North")

Setting the Action Radius

At the bottom of the Track Tools flyout menu is an Advanced button. Click this button to open the Track Marker advanced tool set.

TrackMarkRadiusTools.png

Steps.PNG Steps:
  • Click the Advanced button

You then have a choice of methods to set and adjust the Action Radius of Track Markers

Ablue.png To copy the current Action Radius of an existing Track Marker

  1. Click the Get Radius icon
  2. Click the Track Marker whose radius you want to copy - the radius will be copied into the radius value box

Bblue.png To manually alter the Action Radius

  • Type the new value (in metres) into the radius value box

Cblue.png To apply a value in the radius value box (from methods Ablue.png or Bblue.png above) to another Track Marker

  1. Click the Apply Radius icon
  2. Click on the Track Marker that is to receive the new value (you can click on more than one)

Dblue.png To adjust the value up or down

  1. Select the Track Marker
  2. Hold down the left mouse button and move the mouse forward (to increase the value) or backwards (to reduce the value)
  3. The new value will be immediately applied to the selected Track Marker as the mouse moves (but only one marker at a time)


Track Marker Operation

The most common use for Track Markers is as destinations for driver commands or as "way points" to direct the train to a destination via one ot more intermediate places.


Trainz Wiki

TrainzWiki.png

More Tutorials and Guides to Using Trainz

Personal tools