How to Use Session Editor
(→Copying Rules Between Sessions: added Adding Rules section) |
m |
||
| (29 intermediate revisions by one user not shown) | |||
| Line 1: | Line 1: | ||
| − | The information in this Wiki Page applies to '''TANE''', '''TRS19''' | + | The information in this Wiki Page applies to '''TANE''', '''TRS19''', '''Trainz Plus''' and '''TRS22'''. |
| − | + | <table width=1000> | |
| + | <tr valign="top"> | ||
| + | <td> | ||
__TOC__ | __TOC__ | ||
| − | + | </td> | |
| − | + | <td> | |
| − | + | <table bgcolor="lightcyan" cellpadding=2> | |
| − | <table | + | <tr valign="top"> |
| − | <tr valign="top> | + | <td width=10>[[image:BlueDot10x10.png|link=]]</td> |
| − | <td>[[ | + | |
<td>The '''Session Editor''' allows you to add, delete and edit the '''Rules''' in a Session</td> | <td>The '''Session Editor''' allows you to add, delete and edit the '''Rules''' in a Session</td> | ||
</tr> | </tr> | ||
| − | <tr valign="top> | + | <tr valign="top"> |
| − | <td>[[ | + | <td>[[image:BlueDot10x10.png|link=]]</td> |
<td>The '''Rules''' control the operation of the Session</td> | <td>The '''Rules''' control the operation of the Session</td> | ||
</tr> | </tr> | ||
</table> | </table> | ||
| − | < | + | </td> |
| − | <table | + | </tr> |
| + | </table> | ||
| + | |||
| + | <table width=1000> <!-- BEGIN Nav Buttons Table NO SKIPS --> | ||
| + | <tr valign="top"> | ||
| + | <td width=629><span id="stepWhat"></span> | ||
| + | ='''What is the Session Editor'''= | ||
| + | </td> | ||
| + | <td width=50> </td> <!-- Skip Down --> | ||
| + | <td width=50> </td> <!-- Skip Up --> | ||
| + | <td width=46>[[image:BackToTop.png|link=#top|alt=Top|Top]]</td> | ||
| + | <td width=75> </td> | ||
| + | <td width=75>[[image:NextDown.png|link=#stepButton|alt=Next Down|Next Down]]</td> | ||
| + | <td width=75>[[image:BackToBottom.png|link=#bottom|alt=Bottom|Bottom]]</td> | ||
| + | </tr> | ||
| + | </table> <!-- END Nav Buttons Table --> | ||
| + | |||
| + | <table bgcolor=#000000> | ||
| + | <tr valign="top"> | ||
| + | <td> | ||
| + | <table bgcolor=#ffffb0> | ||
<tr valign="top"> | <tr valign="top"> | ||
| − | <td>[[ | + | <td>[[image:NotePad.PNG|link=]]</td> |
<td><span style="font-size: 17px; font-weight: 700;">Notes:'''</span><br> | <td><span style="font-size: 17px; font-weight: 700;">Notes:'''</span><br> | ||
| + | ---- | ||
The '''Rules''' added and edited by the '''Session Editor''' control:- | The '''Rules''' added and edited by the '''Session Editor''' control:- | ||
| − | + | <table> | |
| − | + | <tr valign="top"> | |
| − | + | <td>[[image:DotPoint.JPG|10px|link=]]</td> | |
| − | + | <td>behaviour of drivers (and their trains)</td> | |
| − | + | </tr> | |
| − | + | <tr valign="top"> | |
| − | + | <td>[[image:DotPoint.JPG|10px|link=]]</td> | |
| − | + | <td>weather conditions</td> | |
| + | </tr> | ||
| + | <tr valign="top"> | ||
| + | <td>[[image:DotPoint.JPG|10px|link=]]</td> | ||
| + | <td>time of day</td> | ||
| + | </tr> | ||
| + | <tr valign="top"> | ||
| + | <td>[[image:DotPoint.JPG|10px|link=]]</td> | ||
| + | <td>signals and switches</td> | ||
| + | </tr> | ||
| + | <tr valign="top"> | ||
| + | <td>[[image:DotPoint.JPG|10px|link=]]</td> | ||
| + | <td>display of information and instructions to the player</td> | ||
| + | </tr> | ||
| + | <tr valign="top"> | ||
| + | <td>[[image:DotPoint.JPG|10px|link=]]</td> | ||
| + | <td>train timetables</td> | ||
| + | </tr> | ||
| + | <tr valign="top"> | ||
| + | <td>[[image:DotPoint.JPG|10px|link=]]</td> | ||
| + | <td>responses to events (time, triggers, load levels, other trains, etc)</td> | ||
| + | </tr> | ||
| + | <tr valign="top"> | ||
| + | <td>[[image:DotPoint.JPG|10px|link=]]</td> | ||
| + | <td>decisions on what happens next</td> | ||
| + | </tr> | ||
| + | </table> | ||
to name just a few. | to name just a few. | ||
| + | </td> | ||
| + | </tr> | ||
| + | </table> | ||
</td> | </td> | ||
</tr> | </tr> | ||
</table> | </table> | ||
<br> | <br> | ||
| − | In '''TANE''' the Session Editor is found in the '''Surveyor Main Menu'''. In '''TRS19''' and | + | <table width=1000> |
| − | [[ | + | <tr valign="top"> |
| + | <td>In '''TANE''' the Session Editor is found in the '''Surveyor Main Menu'''. In '''TRS19''' and later versions it is in the '''Surveyor Edit Menu'''. In either case select the <span style="color: white; background-color: black; font-weight: 700; font-size: 15px;"> Edit Session </span> option from the menu.<br><br> | ||
| + | [[image:SessionEditMenuTANE.png|link=]] [[image:SessionEditMenuSP1.png|link=]]<br><br> | ||
| − | When loaded, the '''Session Editor''' will show all the Rules that have been added to the Session. If you have just opened the Editor on a Route without a Session then it will show a very basic set of Rules. The Editor will allow you to add additional Rules, and delete or edit those shown. Links to extensive lists of Rules that are built into '''Trainz''' or available on the '''DLS''' can be found at the end of this document.< | + | When loaded, the '''Session Editor''' will show all the Rules that have been added to the Session. If you have just opened the Editor on a Route without a Session then it will show a very basic set of Rules. The Editor will allow you to add additional Rules, and delete or edit those shown. Links to extensive lists of Rules that are built into '''Trainz''' or available on the '''DLS''' can be found at the end of this document.</td> |
| + | </tr> | ||
| + | </table> | ||
| + | <br> | ||
| − | <table> <!-- BEGIN Main table --> | + | <table width=1000> <!-- BEGIN Main table --> |
<tr valign="top"> | <tr valign="top"> | ||
| − | <td>[[ | + | <td width=480>[[image:SessionEditRulesSP1.png|480px|link=]]</td> |
<td> | <td> | ||
| − | <table | + | <table bgcolor=#000000 cellpadding=2> |
<tr valign="top"> | <tr valign="top"> | ||
| − | <td>[[ | + | <td> |
| − | <td><span style="font-size: 17px | + | <table bgcolor=#ffffb0 cellpadding=2> |
| − | + | <tr valign="top"> | |
| − | + | <td width=25>[[image:NotePad.PNG|link=]]</td> | |
| − | + | <td><span style="font-size: 17px;">'''Notes:'''</span><br> | |
| + | ---- | ||
</td> | </td> | ||
</tr> | </tr> | ||
| − | |||
| − | |||
| − | |||
<tr valign="top"> | <tr valign="top"> | ||
| − | <td>[[ | + | <td width=10>[[image:DotPoint.JPG|10px|link=]]</td> |
| − | <td> | + | <td>the <span style="text-decoration: underline; font-weight: 700;">Name</span> of the Session is the '''Username''' tag entry in the '''config.txt''' file</td> |
</tr> | </tr> | ||
| − | </ | + | <tr valign="top"> |
| + | <td>[[image:DotPoint.JPG|10px|link=]]</td> | ||
| + | <td>the <span style="text-decoration: underline; font-weight: 700;">Description</span> of the Session is the '''Description''' tag entry in the '''config.txt''' file</td> | ||
| + | </tr> | ||
| + | <tr valign="top"> | ||
| + | <td colspan=2>Both can be directly edited in the '''Session Editor''', or in the '''config.txt''' file using a text editor. The session asset will be updated when you save the Session and exit Surveyor.</td> | ||
| + | </tr> | ||
| + | </table> | ||
| + | </td> | ||
| + | </tr> | ||
| + | </table> | ||
<br> | <br> | ||
| − | <table | + | <table bgcolor=#000000 cellpadding=2> |
<tr valign="top"> | <tr valign="top"> | ||
| − | <td>[[ | + | <td> |
| − | <td> | + | <table bgcolor=#ffffb0 cellpadding=2> |
| + | <tr valign="top"> | ||
| + | <td width=25>[[image:NotePad.PNG|link=]]</td> | ||
| + | <td><span style="font-size: 17px; font-weight: 700;">Notes:'''</span><br> | ||
| + | ---- | ||
| + | '''The order of the Rules in the Editor list is <span style="text-decoration: underline;">usually</span> not important.''' All the rules will be executed '''simultaneously''' although some rules will take longer to complete than others</td> | ||
</tr> | </tr> | ||
| − | < | + | <tr valign="top"> |
| + | <td colspan=2> | ||
| + | <table bgcolor=#ffffe0 width=496> | ||
| + | <tr valign="top"> | ||
| + | <td>[[image:PencilTips.PNG|link=]]</td> | ||
| + | <td>If the order in which some of the Rules are executed is important, then group them together in a '''Ordered List Rule''' (examples are shown in the image) in the order you want them to be executed. Information on using '''Ordered Lists''' can be found at [[image:WikiLink.PNG|link=]] '''[[How to Use Parent and Child Rules#Ordered Lists|Using Ordered Lists]]''' | ||
</td> | </td> | ||
</tr> | </tr> | ||
| − | </table> | + | </table> |
| + | </td> | ||
| + | </tr> | ||
| + | </table> | ||
| + | </td> | ||
| + | </tr> | ||
| + | </table> | ||
| + | </td> | ||
| + | </tr> | ||
| + | </table> | ||
<br> | <br> | ||
| − | Rules can be grouped together into lists for convenience (e.g. all the Rules that set signals at the start of the Session) or because they depend on a particular event (e.g. a time, a train arriving at a set point, a wagon being loaded, etc). These form '''Nested Rules''' and are indicated by ''arrow heads'' as shown in the image | + | <table width=1000> |
| − | + | <tr valign="top"> | |
| − | + | <td width=480>[[image:SessionEditOpenLayerSP1.png|480px|link=]]</td> | |
| − | + | <td>Rules can be grouped together into lists for convenience (e.g. all the Rules that set signals at the start of the Session) or because they depend on a particular event (e.g. a time, a train arriving at a set point, a wagon being loaded, etc). | |
| − | Each of the Rules that have been nested under the '''Ordered List Rule''' in the image | + | <br> |
| − | + | These form '''Nested Rules''' and are indicated by '''arrow heads''' as shown in the image on the left. <span style="font-weight: 700; font-size: 15px; background-color: lightcyan;">Left Click</span> on an arrow head to open up its nested list of child Rules as shown in the image. | |
| − | <table cellpadding= | + | <br> |
| + | Each of the Rules that have been nested under the '''Ordered List Rule''' in the image have been '''indented''' one level to the right. <span style="font-weight: 700; font-size: 15px; background-color: lightcyan;">Left Click</span> on the ''arrow head'' again to close the list. | ||
| + | <br> | ||
| + | <table cellpadding=2 bgcolor="Aquamarine"> | ||
<tr valign="top"> | <tr valign="top"> | ||
| − | <td>[[ | + | <td>[[image:LinkWiki.PNG|link=]]</td> |
<td> | <td> | ||
More information on the various types of '''List Rules''' and how to create '''Nested Rules''' can be found on the '''Trainz Wiki Page''' at:-<br> | More information on the various types of '''List Rules''' and how to create '''Nested Rules''' can be found on the '''Trainz Wiki Page''' at:-<br> | ||
*'''[[How to Use Parent and Child Rules]]'''<br> | *'''[[How to Use Parent and Child Rules]]'''<br> | ||
| + | </td> | ||
| + | </tr> | ||
| + | </table> | ||
</td> | </td> | ||
</tr> | </tr> | ||
</table> | </table> | ||
<br> | <br> | ||
| − | <table width= | + | <table width=1000> <!-- BEGIN Nav Buttons Table NO SKIPS --> |
<tr valign="top"> | <tr valign="top"> | ||
| − | <td | + | <td width=629><span id="stepButton"></span> |
| + | ='''The "Button Bar"'''= | ||
| + | </td> | ||
| + | <td width=50> </td> <!-- Skip Down --> | ||
| + | <td width=50> </td> <!-- Skip Up --> | ||
| + | <td width=46>[[image:BackToTop.png|link=#top|alt=Top|Top]]</td> | ||
| + | <td width=75>[[image:NextUp.png|link=#stepWhat|alt=Next Up|Top]]</td> | ||
| + | <td width=75>[[image:NextDown.png|link=#stepAdding|alt=Next Down|Next Down]]</td> | ||
| + | <td width=75>[[image:BackToBottom.png|link=#bottom|alt=Bottom|Bottom]]</td> | ||
</tr> | </tr> | ||
| − | </table> | + | </table> <!-- END Nav Buttons Table --> |
| − | |||
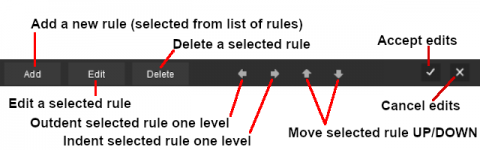
At the bottom of the Session Editor is the "button Bar".<br> | At the bottom of the Session Editor is the "button Bar".<br> | ||
| + | <table width=1000> | ||
| + | <tr valign="top"> | ||
| + | <td width=480>[[image:SessionEditButtonsSP1.png|480px|link=]]</td> | ||
| + | <td> | ||
<table> | <table> | ||
<tr valign="top"> | <tr valign="top"> | ||
| − | <td>[[ | + | <td width=10>[[image:DotPoint.JPG|10px|link=]]</td> |
| + | <td>the <span style="background-color: black; color: white; font-weight: 700; font-size: 15px;"> Add </span> button will insert a new Rule below the selected (highlighted) Rule or at the end of the list if no Rule has been selected</td> | ||
| + | </tr> | ||
| + | <tr valign="top"> | ||
| + | <td colspan=2>To use the other buttons, first select a '''Rule''' with a <span style="font-weight: 700; font-size: 15px; background-color: lightcyan;">Left Click</span></td> | ||
| + | </tr> | ||
| + | <tr valign="top"> | ||
| + | <td>[[image:DotPoint.JPG|10px|link=]]</td> | ||
| + | <td>the <span style="background-color: black; color: white; font-weight: 700; font-size: 15px;"> Edit </span> button will open the selected (highlighted) Rule for editing</td> | ||
| + | </tr> | ||
| + | <tr valign="top"> | ||
| + | <td>[[image:DotPoint.JPG|10px|link=]]</td> | ||
| + | <td>the <span style="background-color: black; color: white; font-weight: 700; font-size: 15px;"> Delete </span> button will delete the selected Rule</td> | ||
| + | </tr> | ||
| + | <tr valign="top"> | ||
| + | <td>[[image:DotPoint.JPG|10px|link=]]</td> | ||
| + | <td>the <span style="background-color: black; color: white; font-weight: 700; font-size: 15px;"> Indent/Outdent </span> buttons will move the selected Rule right or left</td> | ||
| + | </tr> | ||
| + | <tr valign="top"> | ||
| + | <td>[[image:DotPoint.JPG|10px|link=]]</td> | ||
| + | <td>the <span style="background-color: black; color: white; font-weight: 700; font-size: 15px;"> Up/Down </span> buttons will move the selected Rule Up or Down</td> | ||
| + | </tr> | ||
| + | </table> | ||
| + | </td> | ||
| + | </tr> | ||
| + | </table> | ||
| + | <br> | ||
| + | <table width=1000 bgcolor=#000000 cellpadding=2> | ||
| + | <tr valign="top"> | ||
<td> | <td> | ||
| − | + | <table bgcolor=#ffffb0 cellpadding=2> | |
| − | + | <tr valign="top"> | |
| − | + | <td width=25>[[image:NotePad.PNG|link=]]</td> | |
| − | + | <td><span style="font-size: 17px;">'''Notes:'''</span><br> | |
| − | + | ---- | |
| − | + | </td> | |
| + | </tr> | ||
| + | <tr valign="top"> | ||
| + | <td>[[image:DotPoint.JPG|10px|link=]]</td> | ||
| + | <td>The above operations, and more, can also be found by using a <span style="font-weight: 700; font-size: 15px; background-color: lightcyan;">Right Click</span> on a '''Rule''' to open its menu as shown below</td> | ||
| + | </tr> | ||
| + | <tr valign="top"> | ||
| + | <td>[[image:DotPoint.JPG|10px|link=]]</td> | ||
| + | <td>In '''TRS19 Platinum Edition''' and later versions, including '''Trainz Plus''', an addititional button <span style="font-weight: 700; font-size: 15px; color: white; background-color: black;"> Restart All Rules </span> will appear after the <span style="font-weight: 700; font-size: 15px; color: white; background-color: black;"> Delete </span> button. This is for the '''UDS''' feature found in those versions and is explained on the '''Wiki Page [[image:WikiLink.PNG|link=]] [[How to Use the UDS Interface]]'''</td> | ||
| + | </tr> | ||
| + | </table> | ||
| + | </td> | ||
</tr> | </tr> | ||
</table> | </table> | ||
<br> | <br> | ||
| − | <table> | + | <table width=1000> |
<tr valign="top"> | <tr valign="top"> | ||
| − | <td>[[ | + | <td>[[image:Tick.PNG|link=]]</td> |
| − | <td>Click to '''Accept''' your edits and close the Session Editor</td> | + | <td><span style="font-weight: 700; font-size: 15px; background-color: lightcyan;">Left Click</span> to '''Accept''' your edits and close the Session Editor</td> |
| − | <td>& | + | <td>  </td> |
| − | <td>[[ | + | <td>[[image:Cross.PNG|link=]]</td> |
| − | <td>Click to '''Cancel''' your edits and close the Session Editor</td> | + | <td><span style="font-weight: 700; font-size: 15px; background-color: lightcyan;">Left Click</span> to '''Cancel''' your edits and close the Session Editor</td> |
</tr> | </tr> | ||
</table> | </table> | ||
<br> | <br> | ||
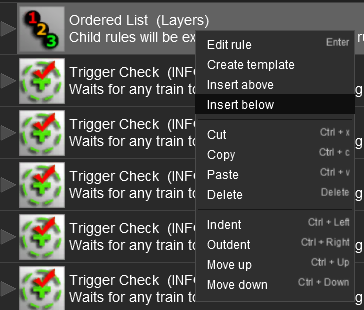
| + | <span style="font-weight: 700; font-size: 17px;">Rule Popup Menu</span><br> | ||
| − | <table | + | <table width=1000> |
<tr valign="top"> | <tr valign="top"> | ||
| − | <td> | + | <td>As an alternative to using the '''Button Bar''' <span style="font-weight: 700; font-size: 15px; background-color: lightcyan;">Right Click</span> on a '''Rule''' in the '''Session Editor''' to open its options menu. Some of the options are the same as those found on the '''Button Bar'''</td> |
| − | + | ||
</tr> | </tr> | ||
</table> | </table> | ||
| − | <table> | + | <table width=1000> |
<tr valign="top"> | <tr valign="top"> | ||
| − | <td>[[ | + | <td width=370>[[image:SessionEditPopupMenu.png|link=]]</td> |
<td> | <td> | ||
| − | + | <table width=630> | |
| − | + | <tr valign="top"> | |
| − | + | <td colspan=2><span style="font-weight: 700; font-size: 15px;">Options:</span></td> | |
| − | + | </tr> | |
| − | + | <tr valign="top"> | |
| − | + | <td width=10>[[image:DotPoint.JPG|10px|link=]]</td> | |
| − | + | <td><span style="background-color: black; color: white; font-weight: 700; font-size: 15px;"> Edit rule </span> is the same as the <span style="background-color: black; color: white; font-weight: 700; font-size: 15px;"> Edit </span> button</td> | |
| − | + | </tr> | |
| − | + | <tr valign="top"> | |
| + | <td>[[image:DotPoint.JPG|10px|link=]]</td> | ||
| + | <td><span style="background-color: black; color: white; font-weight: 700; font-size: 15px;"> Insert above </span> is the same as the <span style="background-color: black; color: white; font-weight: 700; font-size: 15px;"> Add </span> button but inserts the new Rule '''above''' the selected Rule</td> | ||
| + | </tr> | ||
| + | <tr valign="top"> | ||
| + | <td>[[image:DotPoint.JPG|10px|link=]]</td> | ||
| + | <td><span style="background-color: black; color: white; font-weight: 700; font-size: 15px;"> Insert below </span> is the same as the <span style="background-color: black; color: white; font-weight: 700; font-size: 15px;"> Add </span> button (inserts the new rule '''below''' the selected Rule)</td> | ||
| + | </tr> | ||
| + | <tr valign="top"> | ||
| + | <td>[[image:DotPoint.JPG|10px|link=]]</td> | ||
| + | <td><span style="background-color: black; color: white; font-weight: 700; font-size: 15px;"> Cut  Copy  Paste </span> will move/copy the rule (and its nested child rules if it has any) between the '''Session Editor''' and the '''Clipboard'''</td> | ||
| + | </tr> | ||
| + | <tr valign="top"> | ||
| + | <td>[[image:DotPoint.JPG|10px|link=]]</td> | ||
| + | <td><span style="background-color: black; color: white; font-weight: 700; font-size: 15px;"> Delete </span> is the same as the <span style="background-color: black; color: white; font-weight: 700; font-size: 15px;"> Delete </span> button</td> | ||
| + | </tr> | ||
| + | <tr valign="top"> | ||
| + | <td>[[image:DotPoint.JPG|10px|link=]]</td> | ||
| + | <td><span style="background-color: black; color: white; font-weight: 700; font-size: 15px;"> Indent </span> is the same as the <span style="background-color: black; color: white; font-weight: 700; font-size: 15px;"> Indent </span> button</td> | ||
| + | </tr> | ||
| + | <tr valign="top"> | ||
| + | <td>[[image:DotPoint.JPG|10px|link=]]</td> | ||
| + | <td><span style="background-color: black; color: white; font-weight: 700; font-size: 15px;"> Outdent </span> is the same as the <span style="background-color: black; color: white; font-weight: 700; font-size: 15px;"> Outdent </span> button</td> | ||
| + | </tr> | ||
| + | <tr valign="top"> | ||
| + | <td>[[image:DotPoint.JPG|10px|link=]]</td> | ||
| + | <td><span style="background-color: black; color: white; font-weight: 700; font-size: 15px;"> Move up </span> is the same as the <span style="background-color: black; color: white; font-weight: 700; font-size: 15px;"> Up </span> button</td> | ||
| + | </tr> | ||
| + | <tr valign="top"> | ||
| + | <td>[[image:DotPoint.JPG|10px|link=]]</td> | ||
| + | <td><span style="background-color: black; color: white; font-weight: 700; font-size: 15px;"> Move down </span> is the same as the <span style="background-color: black; color: white; font-weight: 700; font-size: 15px;"> Down </span> button</td> | ||
| + | </tr> | ||
| + | </table> | ||
| + | </td> | ||
| + | </tr> | ||
| + | </table> | ||
<br> | <br> | ||
| − | <table | + | <table bgcolor=#ff0000 width=630> |
| + | <tr valign="top"> | ||
| + | <td> | ||
| + | <table bgcolor=#fcbcbc width=626> | ||
<tr valign="top"> | <tr valign="top"> | ||
<td colspan=2><span style="font-size: 17px; font-weight: 700;">Warning:</span></td> | <td colspan=2><span style="font-size: 17px; font-weight: 700;">Warning:</span></td> | ||
</tr> | </tr> | ||
<tr valign="top"> | <tr valign="top"> | ||
| − | <td>[[ | + | <td>[[image:Stop.PNG|link=]]</td> |
| − | <td>The <span style="background-color: black; color: white; font-weight: 700;">& | + | <td>The <span style="background-color: black; color: white; font-weight: 700;"> Cut </span>, <span style="background-color: black; color: white; font-weight: 700;"> Copy </span> and <span style="background-color: black; color: white; font-weight: 700;"> Paste </span> operations will '''NOT''' correctly copy '''ALL''' the settings in some rules, for example the '''Navigation Display Rule'''. It is a good idea to check the settings of each rule that you paste into the '''Session Editor'''. |
| + | </td> | ||
</tr> | </tr> | ||
</table> | </table> | ||
| Line 153: | Line 331: | ||
</tr> | </tr> | ||
</table> | </table> | ||
| − | <table width= | + | <br> |
| + | <table width=1000> <!-- BEGIN Nav Buttons Table NO SKIPS --> | ||
<tr valign="top"> | <tr valign="top"> | ||
| − | <td | + | <td width=629><span id="stepAdding"></span> |
| + | ='''Adding Rules to Sessions'''= | ||
| + | </td> | ||
| + | <td width=50> </td> <!-- Skip Down --> | ||
| + | <td width=50> </td> <!-- Skip Up --> | ||
| + | <td width=46>[[image:BackToTop.png|link=#top|alt=Top|Top]]</td> | ||
| + | <td width=75>[[image:NextUp.png|link=#stepButton|alt=Next Up|Top]]</td> | ||
| + | <td width=75>[[image:NextDown.png|link=#stepCopying|alt=Next Down|Next Down]]</td> | ||
| + | <td width=75>[[image:BackToBottom.png|link=#bottom|alt=Bottom|Bottom]]</td> | ||
</tr> | </tr> | ||
| − | </table> | + | </table> <!-- END Nav Buttons Table --> |
| − | + | <table width=1000 bgcolor="lightcyan" cellpadding=2> | |
| − | <table | + | |
<tr valign="top"> | <tr valign="top"> | ||
| − | <td>[[ | + | <td width=10>[[image:BlueDot10x10.png|link=]]</td> |
| − | <td>''' | + | <td>Only rules that have been installed in your copy of '''Trainz''' can be added to a Session. Many rules are available on the '''DLS''' for downloading.</td> |
| + | </tr> | ||
| + | <tr valign="top"> | ||
| + | <td>[[image:BlueDot10x10.png|link=]]</td> | ||
| + | <td>There is a extensive (but incomplete) catalogue of rules, built-in and available for download, at [[image:WikiLink.PNG|link=]] '''[[Session Rule List with Parameters|Session Rules List (Alphabetical)]]'''</td> | ||
</tr> | </tr> | ||
</table> | </table> | ||
| − | + | <br> | |
| − | + | <table width=1000 cellpadding=2> | |
| − | [[ | + | <tr valign="top"> |
| − | + | <td colspan=2><span style="font-weight: 700; font-size: 15px;">Steps:</span> To add a Rule to the Session Editor:-</td> | |
| + | </tr> | ||
| + | <tr valign="top"> | ||
| + | <td width=25>[[image:DotPoint1.JPG|link=]]</td> | ||
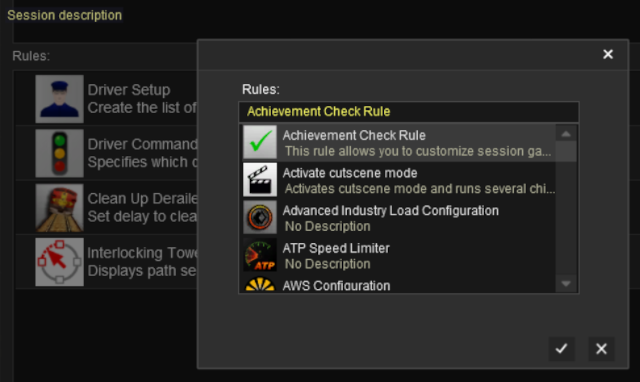
| + | <td><span style="font-weight: 700; font-size: 15px; background-color: lightcyan;">Left Click</span> on the <span style="color: white; background-color: black; font-weight: 700; font-size: 15px;"> Add </span> button. The rule will be inserted below any currently selected (highlighted) rule or at the end of the list if there is no selected rule | ||
| − | + | <table bgcolor=#000000 cellpadding=2>> | |
| − | <table | + | |
<tr valign="top"> | <tr valign="top"> | ||
| − | <td>[[ | + | <td> |
| − | <td> | + | <table bgcolor=#ffffe0 cellpadding=2> |
| + | <tr valign="top"> | ||
| + | <td>[[image:PencilTips.PNG|link=]]</td> | ||
| + | <td>Alternatively, <span style="font-weight: 700; font-size: 15px; background-color: lightcyan;">Right Click</span> on a rule that is already in the Session Editor and select either:- | ||
| + | <table> | ||
| + | <tr valign="top"> | ||
| + | <td width=25>[[image:Ablue.png|link=]]</td> | ||
| + | <td><span style="background-color: black; color: white; font-weight: 700; font-size: 15px;"> Insert above </span>, <span style="font-weight: 700; font-size: 15px;">OR</span></td> | ||
| + | </tr> | ||
| + | <tr valign="top"> | ||
| + | <td width=25>[[image:Bblue.png|link=]]</td> | ||
| + | <td><span style="background-color: black; color: white; font-weight: 700; font-size: 15px;"> Insert below </span></td> | ||
| + | </tr> | ||
| + | <tr valign="top"> | ||
| + | <td colspan=2>to position the new rule above or below the selected rule.</td> | ||
</tr> | </tr> | ||
</table> | </table> | ||
| − | <table | + | </td> |
| + | </tr> | ||
| + | </table> | ||
| + | </td> | ||
| + | </tr> | ||
| + | </table> | ||
| + | </td> | ||
| + | </tr> | ||
<tr valign="top"> | <tr valign="top"> | ||
| − | <td>[[ | + | <td>[[image:DotPoint2.JPG|link=]]</td> |
| + | <td>A new window showing all the installed and available rules will appear. | ||
| + | <table> | ||
| + | <tr valign="top"> | ||
| + | <td width=640>[[image:SessionEditAddRule.png|link=|alt=Add a new rule]]</td> | ||
<td> | <td> | ||
| − | < | + | <table bgcolor=#000000 cellpadding=2>> |
| + | <tr valign="top"> | ||
| + | <td> | ||
| + | <table bgcolor=#ffffe0 cellpadding=2> | ||
| + | <tr valign="top"> | ||
| + | <td>[[image:PencilTips.PNG|link=]]</td> | ||
| + | <td>If a rule that you want to use does not appear in the list, then check in '''Content Manager''' that it has been installed and is free of errors.</td> | ||
| + | </tr> | ||
| + | </table> | ||
</td> | </td> | ||
</tr> | </tr> | ||
</table> | </table> | ||
| + | <br> | ||
| + | <table> | ||
| + | <tr valign="top"> | ||
| + | <td>[[image:DotPoint3.JPG|link=]]</td> | ||
| + | <td><span style="font-weight: 700; font-size: 15px; background-color: lightcyan;">Left Click</span> on rule you want add and <span style="font-weight: 700; font-size: 15px; background-color: lightcyan;">Left Click</span> on the [[image:Tick.PNG|link=]] icon.</td> | ||
| + | </tr> | ||
| + | </table> | ||
| + | </td> | ||
| + | </tr> | ||
| + | </table> | ||
| + | </td> | ||
| + | </tr> | ||
| + | </table> | ||
| + | <br> | ||
| + | <table width=1000> <!-- BEGIN Nav Buttons Table NO SKIPS --> | ||
| + | <tr valign="top"> | ||
| + | <td width=629><span id="stepCopying"></span> | ||
| + | ='''Copying Rules Between Sessions'''= | ||
| + | </td> | ||
| + | <td width=50> </td> <!-- Skip Down --> | ||
| + | <td width=50> </td> <!-- Skip Up --> | ||
| + | <td width=46>[[image:BackToTop.png|link=#top|alt=Top|Top]]</td> | ||
| + | <td width=75>[[image:NextUp.png|link=#stepAdding|alt=Next Up|Top]]</td> | ||
| + | <td width=75>[[image:NextDown.png|link=#stepUDS|alt=Next Down|Next Down]]</td> | ||
| + | <td width=75>[[image:BackToBottom.png|link=#bottom|alt=Bottom|Bottom]]</td> | ||
| + | </tr> | ||
| + | </table> <!-- END Nav Buttons Table --> | ||
| − | + | <table width=1000 bgcolor="lightcyan" cellpadding=2> | |
| − | + | <tr valign="top"> | |
| − | < | + | <td width=10>[[image:BlueDot10x10.png|link=]]</td> |
| − | <td | + | <td>Rules can be copied between Sessions (with some restrictions)</td> |
| − | + | ||
</tr> | </tr> | ||
| + | </table> | ||
| + | |||
| + | <table width=1000> | ||
<tr valign="top"> | <tr valign="top"> | ||
| − | <td> | + | <td>The <span style="background-color: black; color: white; font-weight: 700; font-size: 15px;"> Copy </span> and <span style="background-color: black; color: white; font-weight: 700; font-size: 15px;"> Paste </span> commands can be used to copy configured rules from one session to another. This saves you having to reenter the same data sets, such as driver commands, in each session.</td> |
| − | + | ||
| − | + | ||
| − | + | ||
| − | + | ||
| − | + | ||
| − | + | ||
</tr> | </tr> | ||
| − | <tr> | + | </table> |
| − | <td | + | <br> |
| − | ----</td> | + | <table bgcolor=#000000 cellpadding=2> |
| + | <tr valign="top"> | ||
| + | <td> | ||
| + | <table bgcolor=#ffffff cellpadding=2> | ||
| + | <tr valign="top"> | ||
| + | <td colspan=2><span style="font-weight: 700; font-size: 15px;">Steps:</span> To copy a rule between two sessions:-</td> | ||
| + | </tr> | ||
| + | <tr valign="top"> | ||
| + | <td width=25>[[image:DotPoint1.JPG|link=]]</td> | ||
| + | <td>in the Session Editor <span style="font-weight: 700; font-size: 15px; background-color: lightcyan;">Right Click</span> on the rule to be copied (more than one rule can be selected)</td> | ||
| + | </tr> | ||
| + | <tr valign="top"> | ||
| + | <td>[[image:DotPoint2.JPG|link=]]</td> | ||
| + | <td>select <span style="font-weight: 700; font-size: 15px; color: white; background-color: black;"> Copy </span> from the popup menu</td> | ||
| + | </tr> | ||
| + | <tr valign="top"> | ||
| + | <td>[[image:DotPoint3.JPG|link=]]</td> | ||
| + | <td>exit the Session back to the '''Load Route/Session''' screen</td> | ||
| + | </tr> | ||
| + | <tr valign="top"> | ||
| + | <td>[[image:DotPoint4.JPG|link=]]</td> | ||
| + | <td>load the Route and the second Session (where the Rules are to be copied to) into Surveyor and open the '''Session Editor'''</td> | ||
| + | </tr> | ||
| + | <tr valign="top"> | ||
| + | <td>[[image:DotPoint5.JPG|link=]]</td> | ||
| + | <td><span style="font-weight: 700; font-size: 15px; background-color: lightcyan;">Right Click</span> after the last rule entry and select <span style="font-weight: 700; font-size: 15px; color: white; background-color: black;"> Paste </span> from the popup menu</td> | ||
| + | </tr> | ||
| + | </table> | ||
| + | </td> | ||
</tr> | </tr> | ||
</table> | </table> | ||
<br> | <br> | ||
| − | <table | + | <table width=1000 bgcolor=#ff0000> |
| + | <tr valign="top"> | ||
| + | <td> | ||
| + | <table bgcolor=#fcbcbc> | ||
<tr valign="top"> | <tr valign="top"> | ||
<td colspan=2><span style="font-size: 17px; font-weight: 700;">Warning:</span></td> | <td colspan=2><span style="font-size: 17px; font-weight: 700;">Warning:</span></td> | ||
</tr> | </tr> | ||
<tr valign="top"> | <tr valign="top"> | ||
| − | <td>[[ | + | <td>[[image:Stop.PNG|link=]]</td> |
| − | <td>The <span style="background-color: black; color: white; font-weight: 700;">& | + | <td>The <span style="background-color: black; color: white; font-weight: 700;"> Cut </span>, <span style="background-color: black; color: white; font-weight: 700;"> Copy </span> and <span style="background-color: black; color: white; font-weight: 700;"> Paste </span> operations will '''NOT''' correctly copy '''ALL''' the settings in some rules, for example the '''Navigation Display Rule'''. It is a good idea to check the settings of each rule that you paste into the '''Session Editor'''. |
| + | </td> | ||
| + | </tr> | ||
| + | </table> | ||
| + | </td> | ||
</tr> | </tr> | ||
</table> | </table> | ||
<br> | <br> | ||
| − | + | <table width=1000 bgcolor=#000000> | |
| − | <table | + | |
<tr valign="top"> | <tr valign="top"> | ||
| − | <td>[[ | + | <td> |
| + | <table bgcolor=#ffffb0> | ||
| + | <tr valign="top"> | ||
| + | <td>[[image:NotePad.PNG|link=]]</td> | ||
<td><span style="font-size: 17px; font-weight: 700;">Copying the Driver Setup Rule:'''</span><br> | <td><span style="font-size: 17px; font-weight: 700;">Copying the Driver Setup Rule:'''</span><br> | ||
| + | ---- | ||
The '''Driver Setup Rule''' can be copied from one Session to another using the method described above, but there are some conditions that must be met for this to work. | The '''Driver Setup Rule''' can be copied from one Session to another using the method described above, but there are some conditions that must be met for this to work. | ||
<br> | <br> | ||
| − | <table cellpadding= | + | <table cellpadding=2> |
<tr valign="top"> | <tr valign="top"> | ||
| − | <td>[[ | + | <td>[[image:DotPoint1.JPG|link=]]</td> |
<td>'''Drivers, Driver Assignments and Driver Commands ONLY are Copied'''<br> | <td>'''Drivers, Driver Assignments and Driver Commands ONLY are Copied'''<br> | ||
Copying the '''Driver Setup Rule''' will '''NOT''' copy the actual locomotives and consists that the drivers are assigned to. These must be copied or recreated separately</td> | Copying the '''Driver Setup Rule''' will '''NOT''' copy the actual locomotives and consists that the drivers are assigned to. These must be copied or recreated separately</td> | ||
</tr> | </tr> | ||
<tr valign="top"> | <tr valign="top"> | ||
| − | <td>[[ | + | <td>[[image:DotPoint2.JPG|link=]]</td> |
<td>'''No Duplicate Locos Allowed''' - this is only an issue if you keep both the original and the copied '''Driver Setup Rule''' in the Session<br> | <td>'''No Duplicate Locos Allowed''' - this is only an issue if you keep both the original and the copied '''Driver Setup Rule''' in the Session<br> | ||
If the same loco is present in both '''Driver Setup Rules''' then only the first loco (in the top copy of the rule) will be active. The duplicate loco in the second copy of the rule will be ignored</td> | If the same loco is present in both '''Driver Setup Rules''' then only the first loco (in the top copy of the rule) will be active. The duplicate loco in the second copy of the rule will be ignored</td> | ||
</tr> | </tr> | ||
<tr valign="top"> | <tr valign="top"> | ||
| − | <td>[[ | + | <td>[[image:DotPoint3.JPG|link=]]</td> |
<td>'''Missing Locos will be Ignored'''<br> | <td>'''Missing Locos will be Ignored'''<br> | ||
| − | If a loco is listed in the copied '''Driver Setup Rule''' but does not exist in the new Session because it was not copied across then it will be ignored</td> | + | If a loco is listed in the copied '''Driver Setup Rule''' but does not exist in the new Session because it was not copied across then it will be ignored |
| + | </td> | ||
</tr> | </tr> | ||
| − | </table></td> | + | </table> |
| + | </td> | ||
| + | </tr> | ||
| + | </table> | ||
| + | </td> | ||
</tr> | </tr> | ||
</table> | </table> | ||
<br> | <br> | ||
| + | <table width=1000> <!-- BEGIN Nav Buttons Table NO SKIPS --> | ||
| + | <tr valign="top"> | ||
| + | <td width=629><span id="stepUDS"></span> | ||
| + | ='''Unified Driver Surveyor Interface (UDS)'''= | ||
| + | </td> | ||
| + | <td width=50> </td> <!-- Skip Down --> | ||
| + | <td width=50> </td> <!-- Skip Up --> | ||
| + | <td width=46>[[image:BackToTop.png|link=#top|alt=Top|Top]]</td> | ||
| + | <td width=75>[[image:NextUp.png|link=#stepCopying|alt=Next Up|Next Up]]</td> | ||
| + | <td width=75>[[image:NextDown.png|link=#stepExamples|alt=Next Down|Next Down]]</td> | ||
| + | <td width=75>[[image:BackToBottom.png|link=#bottom|alt=Bottom|Bottom]]</td> | ||
| + | </tr> | ||
| + | </table> <!-- END Nav Buttons Table --> | ||
| − | =''' | + | <table width=1000> |
| + | <tr valign="top"> | ||
| + | <td colspan=2>'''TRS19 Platinum Edition''' and later '''Trainz''' versions including '''Trainz Plus''' have a '''Unified Driver Surveyor (UDS)''' which allows you to switch seamlessly between '''Driver''' and '''Surveyor''' modes. The '''UDS''' allows an edited '''Session''' to be continued without having to restart it from the beginning. This includes editing the '''Session Editor''' on an active '''Session''' where some of the Rules may have already been completed or others have started. To allow for this additional features have been added to the '''Trainz''' versions with the '''UDS''' interface.<br> | ||
| − | + | [[image:UDS-SessionRules.png|link=]]</td> | |
| − | + | </tr> | |
| − | < | + | <tr valign="top"> |
| − | + | <td>[[image:SessionEditMenuRestartRules.png|link=]]</td> | |
| − | + | <td>At the bottom of the '''Session Editor''' is a new button, <span style="color: white; background-color: black; font-weight: 700; font-size: 15px;"> Restart All Rules </span>. This will reset or restart '''ALL''' rules in the Session.<br></td> | |
| − | + | </tr> | |
| − | + | <tr valign="top"> | |
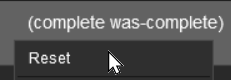
| − | + | <td>[[image:UDS-CompleteWasComplete.png|link=]]</td> | |
| − | + | <td>Some rules, as shown in the screen shot above, have the label '''(complete was-complete)''' after the rule name. This indicates that the rule has already been completed. These rules can be individually restarted by a <span style="font-weight: 700; font-size: 15px; background-color: lightcyan;">Right Click</span> on the rule and selecting the <span style="color: white; background-color: black; font-weight: 700; font-size: 15px;"> Reset </span> option from the pop up menu. This will change the rule status to '''(paused)'''.</td> | |
| − | </ | + | </tr> |
| + | <tr valign="top"> | ||
| + | <td colspan=2>When the '''Driver Mode''' is selected again, all the reset or '''(paused)''' rules will be restarted.</td> | ||
| + | </tr> | ||
| + | </table> | ||
<br> | <br> | ||
| + | <table cellpadding=2 bgcolor="Aquamarine"> | ||
| + | <tr valign="top"> | ||
| + | <td>[[image:LinkWiki.PNG|link=]]</td> | ||
| + | <td> | ||
| + | A detailed description of the '''UDS''' can be found on the '''Trainz Wiki Page''' at:-<br> | ||
| + | '''[[How to Use the UDS Interface]]'''<br> | ||
| + | </td> | ||
| + | </tr> | ||
| + | </table> | ||
| − | =''' | + | <table width=1000> <!-- BEGIN Nav Buttons Table NO SKIPS --> |
| + | <tr valign="top"> | ||
| + | <td width=629><span id="stepExamples"></span> | ||
| + | ='''Examples of Using the Session Editor'''= | ||
| + | </td> | ||
| + | <td width=50> </td> <!-- Skip Down --> | ||
| + | <td width=50> </td> <!-- Skip Up --> | ||
| + | <td width=46>[[image:BackToTop.png|link=#top|alt=Top|Top]]</td> | ||
| + | <td width=75>[[image:NextUp.png|link=#stepUDS|alt=Next Up|Top]]</td> | ||
| + | <td width=75> </td> | ||
| + | <td width=75>[[image:BackToBottom.png|link=#bottom|alt=Bottom|Bottom]]</td> | ||
| + | </tr> | ||
| + | </table> <!-- END Nav Buttons Table --> | ||
| − | + | Wiki pages that show examples of using the Session Editor to solve particular problems or to carry out particular tasks can be found at the following links:-<br> | |
| − | + | <table width=1000> | |
| − | + | ||
| − | + | ||
| − | + | ||
| − | + | ||
| − | + | ||
| − | <table | + | |
<tr valign="top"> | <tr valign="top"> | ||
| − | |||
<td> | <td> | ||
| − | * '''[[How to Use | + | <div style="column-count:2;-moz-column-count:2;-webkit-column-count:2"> |
| + | * '''[[How to Use Message Popup Rule (Applications)|Adding Message Popups - Sample Applications]]''' | ||
| + | * '''[[How to Use Navigation Point Rules (Applications)|Adding Navigation Points - Sample Applications]]''' | ||
| + | * '''[[How to Control Junctions in Sessions|Controlling Junctions in Sessions]]''' | ||
| + | * '''[[How to Control Signals in Sessions|Controlling Signals in Sessions]]''' | ||
| + | * '''[[How to Use Track Triggers|Using Track Triggers]]''' | ||
| + | * '''[[How to Use Variables in Sessions (Examples)|Using Variables in Sessions - Sample Applications]] | ||
| + | </div> | ||
</td> | </td> | ||
</tr> | </tr> | ||
</table> | </table> | ||
| − | + | <br> | |
| − | <table | + | <table> <!-- BEGIN Nav Buttons Table --> |
<tr valign="top"> | <tr valign="top"> | ||
| − | <td | + | <td width=729><span id="bottom"></span> </td> |
| + | <td width=46>[[image:BackToTop.png|link=#top|alt=Top|Top]]</td> | ||
| + | <td width=75>[[image:NextUp.png|link=#stepExamples|alt=Next Up|Top]]</td> | ||
| + | <td width=75> </td> | ||
| + | <td width=75> </td> | ||
</tr> | </tr> | ||
| − | </table> | + | </table> <!-- END Nav Buttons Table --> |
---- | ---- | ||
---- | ---- | ||
| − | |||
='''Trainz Wiki'''= | ='''Trainz Wiki'''= | ||
| − | <table | + | <table width=1000> |
<tr valign="top"> | <tr valign="top"> | ||
| − | |||
<td> | <td> | ||
| − | <span style="font-size: 17px | + | <table width=500 cellpadding=2 bgcolor=#ffffff> |
| − | *'''<span class="plainlinks | + | <tr valign="top"> |
| + | <td width=80>[[image:TrainzWiki.png|link=]]</td> | ||
| + | <td> | ||
| + | <span style="font-size: 17px;">'''More Tutorials and Guides to Using Trainz'''</span><br> | ||
| + | *'''<span class="plainlinks">[http://online.ts2009.com/mediaWiki/index.php/HowTo How to Guides]</span>''' | ||
*'''[[Driver Commands List]]''' | *'''[[Driver Commands List]]''' | ||
*'''[[Session Rule List with Parameters|Session Rules List (Alphabetical) with Parameters]]''' | *'''[[Session Rule List with Parameters|Session Rules List (Alphabetical) with Parameters]]''' | ||
*'''[[Session Rules By Categories With Properties|Session Rules List (Categories) With Parameters]]''' | *'''[[Session Rules By Categories With Properties|Session Rules List (Categories) With Parameters]]''' | ||
| + | </td> | ||
| + | </tr> | ||
| + | </table> | ||
| + | </td> | ||
| + | <td> | ||
| + | <table width=500 cellpadding=4 bgcolor="aquamarine"> | ||
| + | <tr valign="top"> | ||
| + | <td width=50>[[image:LinkWiki.PNG|link=]]</td> | ||
| + | <td> | ||
| + | <span style="font-size: 17px;">'''Related Links'''</span><br> | ||
| + | *'''[[How to Use Parent and Child Rules]]'''<br> | ||
| + | </td> | ||
| + | </tr> | ||
| + | </table> | ||
</td> | </td> | ||
</tr> | </tr> | ||
Latest revision as of 20:39, 22 November 2023
The information in this Wiki Page applies to TANE, TRS19, Trainz Plus and TRS22.
|
|
[edit] What is the Session Editor |
|
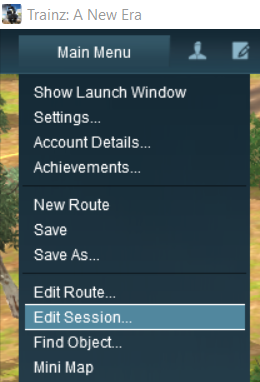
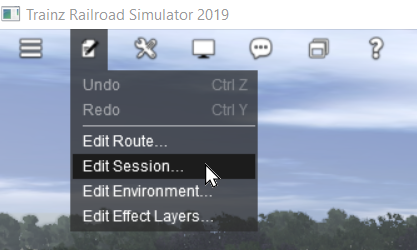
| In TANE the Session Editor is found in the Surveyor Main Menu. In TRS19 and later versions it is in the Surveyor Edit Menu. In either case select the Edit Session option from the menu.
|
 |
|
||||||||||||||||
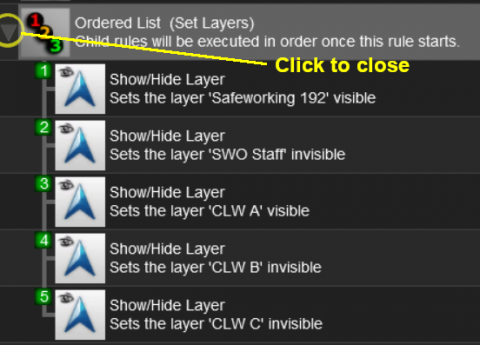 |
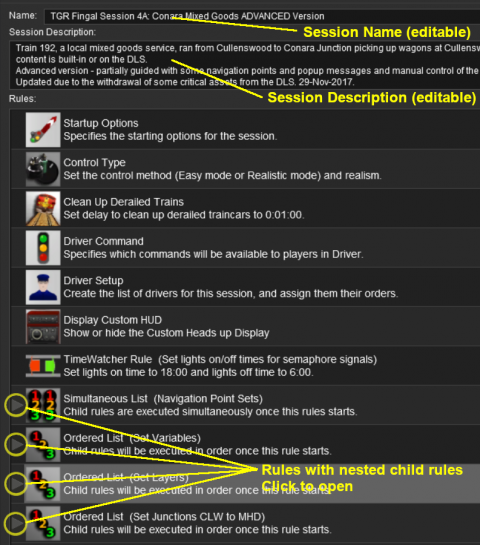
Rules can be grouped together into lists for convenience (e.g. all the Rules that set signals at the start of the Session) or because they depend on a particular event (e.g. a time, a train arriving at a set point, a wagon being loaded, etc).
|
[edit] The "Button Bar" |
At the bottom of the Session Editor is the "button Bar".
 |
|
||||||||||||
|
| Left Click to Accept your edits and close the Session Editor | Left Click to Cancel your edits and close the Session Editor |
Rule Popup Menu
| As an alternative to using the Button Bar Right Click on a Rule in the Session Editor to open its options menu. Some of the options are the same as those found on the Button Bar |
 |
|
||||||||||||||||||||
|
||||
[edit] Adding Rules to Sessions |
| Only rules that have been installed in your copy of Trainz can be added to a Session. Many rules are available on the DLS for downloading. | |
| There is a extensive (but incomplete) catalogue of rules, built-in and available for download, at |
| Steps: To add a Rule to the Session Editor:- | ||||||||||
Left Click on the Add button. The rule will be inserted below any currently selected (highlighted) rule or at the end of the list if there is no selected rule
|
||||||||||
A new window showing all the installed and available rules will appear.
|
||||||||||
[edit] Copying Rules Between Sessions |
| Rules can be copied between Sessions (with some restrictions) |
| The Copy and Paste commands can be used to copy configured rules from one session to another. This saves you having to reenter the same data sets, such as driver commands, in each session. |
|
||||||||||||
|
||||
|
[edit] Unified Driver Surveyor Interface (UDS) |
TRS19 Platinum Edition and later Trainz versions including Trainz Plus have a Unified Driver Surveyor (UDS) which allows you to switch seamlessly between Driver and Surveyor modes. The UDS allows an edited Session to be continued without having to restart it from the beginning. This includes editing the Session Editor on an active Session where some of the Rules may have already been completed or others have started. To allow for this additional features have been added to the Trainz versions with the UDS interface.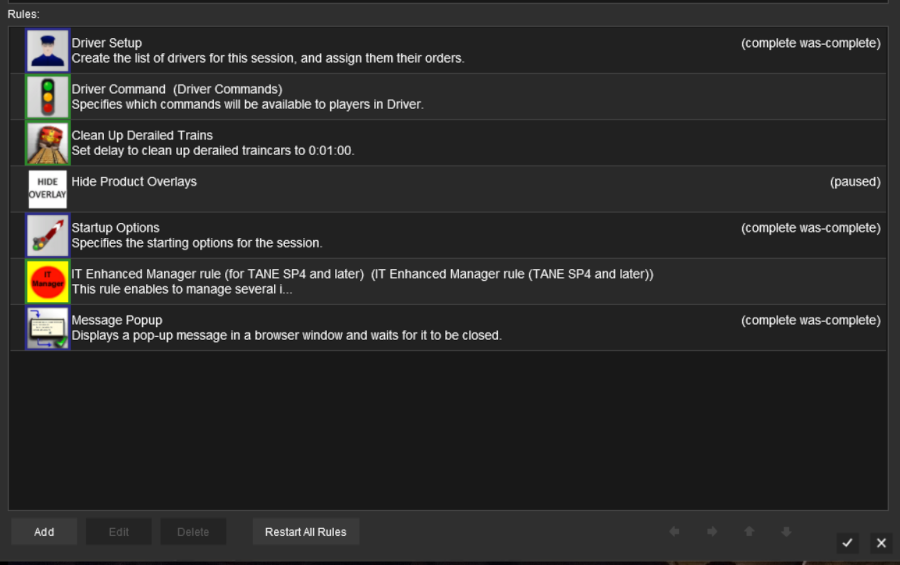 |
|
| At the bottom of the Session Editor is a new button, Restart All Rules . This will reset or restart ALL rules in the Session. |
|
 |
Some rules, as shown in the screen shot above, have the label (complete was-complete) after the rule name. This indicates that the rule has already been completed. These rules can be individually restarted by a Right Click on the rule and selecting the Reset option from the pop up menu. This will change the rule status to (paused). |
| When the Driver Mode is selected again, all the reset or (paused) rules will be restarted. | |
 |
A detailed description of the UDS can be found on the Trainz Wiki Page at:- |
[edit] Examples of Using the Session Editor |
Wiki pages that show examples of using the Session Editor to solve particular problems or to carry out particular tasks can be found at the following links:-
[edit] Trainz Wiki
|
|

This page was created by Trainz user pware in October 2019 and was last updated as shown below.