How to Use Navigation Point Rules
m |
|||
| Line 14: | Line 14: | ||
__TOC__ | __TOC__ | ||
<br> | <br> | ||
| − | <table | + | <table width=1000 bgcolor="lightcyan" cellpadding=2> |
<tr valign="top"> | <tr valign="top"> | ||
| − | <td>[[ | + | <td width=10>[[image:BlueDot10x10.png|link=]]</td> |
<td>'''Navigation Points''' are icons that appear at set track locations or on set rail vehicles that indicate destinations for user driven trains and tasks to be performed</td> | <td>'''Navigation Points''' are icons that appear at set track locations or on set rail vehicles that indicate destinations for user driven trains and tasks to be performed</td> | ||
</tr> | </tr> | ||
| Line 34: | Line 34: | ||
='''Navigation Display Rule'''= | ='''Navigation Display Rule'''= | ||
| − | + | <table width=1000 bgcolor="lightcyan" cellpadding=2> | |
| − | The [[file:WikiLink.PNG|link=]] '''[[Session_Rule_List_with_Parameters#Navigation Display Rule|Navigation Display Rule]]''' settings shown in this example will direct '''Trainz''' to create a '''set of Navigation Points''' | + | <tr valign="top"> |
| − | <table cellpadding= | + | <td width=10>[[image:BlueDot10x10.png|link=]]</td> |
| + | <td>The [[file:WikiLink.PNG|link=]] '''[[Session_Rule_List_with_Parameters#Navigation Display Rule|Navigation Display Rule]]''' settings shown in this example will direct '''Trainz''' to create a '''set of Navigation Points'''</td> | ||
| + | </tr> | ||
| + | </table> | ||
| + | <br> | ||
| + | <table width=1000 bgcolor=#000000 cellpadding=2> | ||
| + | <tr valign="top"> | ||
| + | <td> | ||
| + | <table width=996 bgcolor=#ffffb0 cellpadding=2> | ||
| + | <tr valign="top"> | ||
| + | <td width=25>[[image:NotePad.PNG|link=]]</td> | ||
| + | <td><span style="font-size: 17px;">'''Notes:'''</span><br> | ||
| + | ---- | ||
| + | </td> | ||
| + | </tr> | ||
<tr valign="top"> | <tr valign="top"> | ||
| − | <td>[[ | + | <td>[[image:DotPoint.JPG|10px|link=]]</td> |
<td>A navigation set must be created by the '''Navigation Display Rule''' before it can be used by the other navigation rules</td> | <td>A navigation set must be created by the '''Navigation Display Rule''' before it can be used by the other navigation rules</td> | ||
</tr> | </tr> | ||
<tr valign="top"> | <tr valign="top"> | ||
| − | <td>[[ | + | <td>[[image:DotPoint.JPG|10px|link=]]</td> |
<td>Multiple sets can be created by adding additional copies of this rule - one copy for each set</td> | <td>Multiple sets can be created by adding additional copies of this rule - one copy for each set</td> | ||
</tr> | </tr> | ||
<tr valign="top"> | <tr valign="top"> | ||
| − | <td>[[ | + | <td>[[image:DotPoint.JPG|10px|link=]]</td> |
<td>This rule creates the navigation set and displays it. If you have created multiple sets then all of them will be displayed unless you use the '''Navigation Set Hide/Show Rule''' to hide those sets you do not want to be seen immediately</td> | <td>This rule creates the navigation set and displays it. If you have created multiple sets then all of them will be displayed unless you use the '''Navigation Set Hide/Show Rule''' to hide those sets you do not want to be seen immediately</td> | ||
| + | </tr> | ||
| + | </table> | ||
| + | </td> | ||
</tr> | </tr> | ||
</table> | </table> | ||
| Line 53: | Line 70: | ||
The '''Navigation Display Rule''' is added to a Session and configured using the [[file:WikiLink.PNG|link=]] '''[[How to Use Session Editor|Session Editor]]''' in Surveyor. | The '''Navigation Display Rule''' is added to a Session and configured using the [[file:WikiLink.PNG|link=]] '''[[How to Use Session Editor|Session Editor]]''' in Surveyor. | ||
<br> | <br> | ||
| − | <table> | + | <table width=1000> |
<tr valign="top"> | <tr valign="top"> | ||
| − | <td>[[file: | + | <td width=640>[[file:NavDisplaySetDialogUpper.JPG|link=]]</td> |
<td> | <td> | ||
| − | <table cellpadding=4 bgcolor=#eeeeee> | + | <table width=360 bgcolor=#000000 cellpadding=2> |
| + | <tr valign="top"> | ||
| + | <td> | ||
| + | <table width=356 bgcolor=#ffffb0 cellpadding=2> | ||
| + | <tr valign="top"> | ||
| + | <td width=25>[[image:NotePad.PNG|link=]]</td> | ||
| + | <td><span style="font-size: 17px; font-weight: 700;">Notes:'''</span><br> | ||
| + | ---- | ||
| + | The '''Upper''' section of the Rule Dialogue Box identifies the '''Navigation Display Set''' and how it will operate</td> | ||
| + | </tr> | ||
| + | </table> | ||
| + | </td> | ||
| + | </tr> | ||
| + | </table> | ||
| + | </td> | ||
| + | </tr> | ||
| + | </table> | ||
| + | |||
| + | <table width=1000 cellpadding=4 bgcolor=#eeeeee> | ||
<tr> | <tr> | ||
<td colspan="2"> | <td colspan="2"> | ||
| Line 64: | Line 99: | ||
<tr valign="top"> | <tr valign="top"> | ||
<td>[[file:Gears.PNG|link=]]</td> | <td>[[file:Gears.PNG|link=]]</td> | ||
| − | <td><span style="font-size: 17px;">'''Settings:'''</span>< | + | <td><span style="font-size: 17px;">'''Settings:'''</span> |
| − | '''For the Navigation Set:'''< | + | <table> |
| − | + | <tr valign="top"> | |
| − | + | <td colspan=2>'''For the Navigation Set:'''</td> | |
| − | + | </tr> | |
| − | + | <tr valign="top"> | |
| − | + | <td width=10>[[image:BlackDot10x10.png|link=]]</td> | |
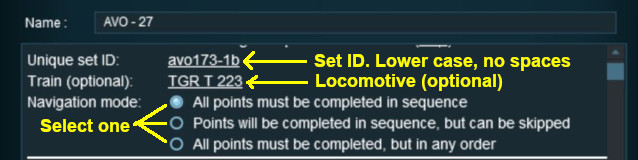
| − | + | <td>'''Set ID:''' Each Navigation Point Set must have a '''unique ID code'''. This consists of any text characters <span style="background-color: red; color: white; font-weight: 700; font-size: 15px"> EXCEPT </span> the '''SPACE''' character and '''UPPER CASE''' characters</td> | |
| + | </tr> | ||
| + | <tr valign="top"> | ||
| + | <td>[[image:BlackDot10x10.png|link=]]</td> | ||
| + | <td>'''Train (optional):''' You can add a specific locomotive that this Navigation Point set will be applied to</td> | ||
| + | </tr> | ||
| + | <tr valign="top"> | ||
| + | <td>[[image:BlackDot10x10.png|link=]]</td> | ||
| + | <td>'''Navigation mode:''' Select '''one''' of three options:- | ||
| + | <table> | ||
| + | <tr valign="top"> | ||
| + | <td>[[file:PortalOptionButtonEmpty.PNG|link=]] '''All points must be completed in sequence''' - the order of the points listed below is the order in which they must be executed. No exceptions</td> | ||
| + | </tr> | ||
| + | <tr valign="top"> | ||
| + | <td>[[file:PortalOptionButtonEmpty.PNG|link=]] '''Points will be completed in sequence, but can be skipped''' - the order of the points below is the order in which they must be executed but points can be skipped. You cannot go back to complete a missed point</td> | ||
| + | </tr> | ||
| + | <tr valign="top"> | ||
| + | <td>[[file:PortalOptionButtonEmpty.PNG|link=]] '''All points must be completed but in any order''' - the order is not important but no points can be missed. All the Navigation Points in the set will be displayed when this option is selected</td> | ||
| + | </tr> | ||
| + | </table> | ||
| + | </td> | ||
| + | </tr> | ||
| + | </table> | ||
</td> | </td> | ||
</tr> | </tr> | ||
| Line 80: | Line 137: | ||
</table> | </table> | ||
| − | <table cellpadding=4 bgcolor=#eeeeee> | + | <table width=1000> |
| + | <tr valign="top"> | ||
| + | <td width=640>[[file:NavDisplaySetDialogLower.JPG|link=]]</td> | ||
| + | <td> | ||
| + | <table width=360 bgcolor=#000000 cellpadding=2> | ||
| + | <tr valign="top"> | ||
| + | <td> | ||
| + | <table width=356 bgcolor=#ffffb0 cellpadding=2> | ||
| + | <tr valign="top"> | ||
| + | <td width=25>[[image:NotePad.PNG|link=]]</td> | ||
| + | <td><span style="font-size: 17px; font-weight: 700;">Notes:'''</span><br> | ||
| + | ---- | ||
| + | The '''lower''' section of the Rule Dialogue Box defines the individual '''Navigation Points''' in this '''Navigation Display Set'''</td> | ||
| + | </tr> | ||
| + | </table> | ||
| + | </td> | ||
| + | </tr> | ||
| + | </table> | ||
| + | </td> | ||
| + | </tr> | ||
| + | </table> | ||
| + | |||
| + | <table width=1000> | ||
| + | <tr valign="top"> | ||
| + | <td> | ||
| + | <table width=1000 cellpadding=4 bgcolor=#eeeeee> | ||
<tr> | <tr> | ||
<td colspan="2"> | <td colspan="2"> | ||
| Line 87: | Line 169: | ||
<tr valign="top"> | <tr valign="top"> | ||
<td>[[file:Gears.PNG|link=]]</td> | <td>[[file:Gears.PNG|link=]]</td> | ||
| − | <td><span style="font-size: 17px;">'''Settings:'''</span>< | + | <td><span style="font-size: 17px;">'''Settings:'''</span> |
| − | '''For each Navigation Point:'''< | + | <table> |
| − | + | <tr valign="top"> | |
| − | + | <td colspan=2>'''For each Navigation Point:'''</td> | |
| − | + | </tr> | |
| − | + | <tr valign="top"> | |
| − | + | <td width=10>[[image:BlackDot10x10.png|link=]]</td> | |
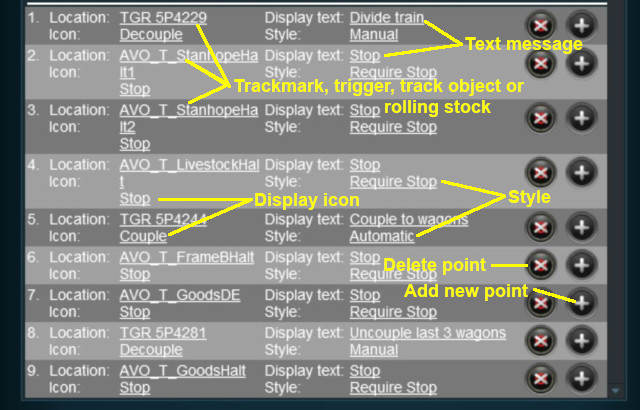
| − | + | <td>'''Location:''' - this can be a trackmark, a trigger, track object or a rolling stock vehicle</td> | |
| − | + | </tr> | |
| − | Navigation points can be added and deleted, but their order cannot be changed. | + | <tr valign="top"> |
| − | + | <td>[[image:BlackDot10x10.png|link=]]</td> | |
| − | + | <td>'''Icon:''' - a graphic icon to be displayed representing the Navigation point. Icons are selected from a preset list</td> | |
| + | </tr> | ||
| + | <tr valign="top"> | ||
| + | <td>[[image:BlackDot10x10.png|link=]]</td> | ||
| + | <td>'''Display text:''' - a short message up to 25 characters long</td> | ||
| + | </tr> | ||
| + | <tr valign="top"> | ||
| + | <td>[[image:BlackDot10x10.png|link=]]</td> | ||
| + | <td>'''Style:''' - the operational style of the Navigation Point. Select '''one''' of:- | ||
| + | <table> | ||
| + | <tr valign="top"> | ||
| + | <td>[[image:BlackDot10x10.png|link=]]</td> | ||
| + | <td>'''Automatic''' - the Navigation Point will be completed and disappear when the consist reaches its location</td> | ||
| + | </tr> | ||
| + | <tr valign="top"> | ||
| + | <td>[[image:BlackDot10x10.png|link=]]</td> | ||
| + | <td>'''Manual''' - the Navigation Point must be completed by another rule</td> | ||
| + | </tr> | ||
| + | <tr valign="top"> | ||
| + | <td>[[image:BlackDot10x10.png|link=]]</td> | ||
| + | <td>'''Require Stop''' - the Navigation Point will be completed and disappear when the consist stops at its location</td> | ||
| + | </tr> | ||
| + | </table> | ||
| + | </td> | ||
| + | </tr> | ||
| + | <tr valign="top"> | ||
| + | <td colspan=2>Navigation points can be added and deleted, but their order cannot be changed | ||
| + | <table> | ||
| + | <tr valign="top"> | ||
| + | <td width=10>[[image:BlackDot10x10.png|link=]]</td> | ||
| + | <td>'''Add Navigation Point''' - new points are added by a <span style="font-weight: 700; font-size: 15px; background-color: lightcyan;">Left Click</span> on the '''+''' icon. The new point will be inserted in the line below</td> | ||
| + | </tr> | ||
| + | <tr valign="top"> | ||
| + | <td>[[image:BlackDot10x10.png|link=]]</td> | ||
| + | <td>'''Delete Navigation Point''' - existing points can be deleted by <span style="font-weight: 700; font-size: 15px; background-color: lightcyan;">Left Click</span> on the '''x''' icon</td> | ||
| + | </tr> | ||
| + | </table> | ||
| + | </td> | ||
| + | </tr> | ||
| + | </table> | ||
</td> | </td> | ||
</tr> | </tr> | ||
| Line 105: | Line 226: | ||
----</td> | ----</td> | ||
</tr> | </tr> | ||
| − | </table></td> | + | </table> |
| + | </td> | ||
</tr> | </tr> | ||
</table> | </table> | ||
Revision as of 17:21, 20 September 2023
The information in this Wiki Page applies to TANE, TRS19, Trainz Plus and TRS22. It describes how to configure the various Navigation Point Rules.
 |
For examples of how to use these rules in Trainz Sessions, see the Trainz Wiki Page at:- |
Contents |
| Navigation Points are icons that appear at set track locations or on set rail vehicles that indicate destinations for user driven trains and tasks to be performed |
The navigation points are created and controlled by the set of Session rules that are described in this document.
| The |
|
The Navigation Display Rule is added to a Session and configured using the ![]() Session Editor in Surveyor.
Session Editor in Surveyor.
 |
|
|
|
||||||||||||
Settings:
|
||||||||||||
|
|
||||||||||||
 |
|
|
||||||||||||||||||||||||||||
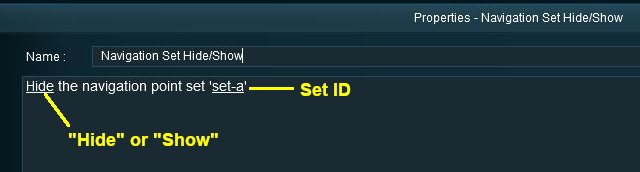
The ![]() Navigation Set Hide/Show Rule hides and displays the navigation sets created by the Navigation Display Rule.
Navigation Set Hide/Show Rule hides and displays the navigation sets created by the Navigation Display Rule.
The Navigation Set Hide/Show Rule is added to a Session and configured using the ![]() Session Editor in Surveyor.
Session Editor in Surveyor.
 |
|
||||||
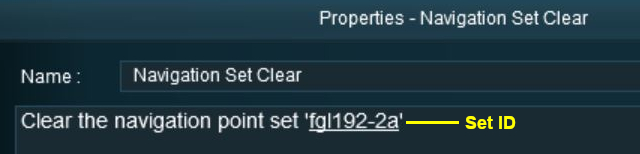
The ![]() Navigation Set Clear Rule clears or completes any uncompleted Navigation Points in a set created by the Navigation Display Rule.
Navigation Set Clear Rule clears or completes any uncompleted Navigation Points in a set created by the Navigation Display Rule.
The Navigation Set Clear Rule is added to a Session and configured using the ![]() Session Editor in Surveyor.
Session Editor in Surveyor.
 |
|
||||||
The ![]() Navigation Point Complete Rule clears or completes the selected Navigation Point in a set created by the Navigation Display Rule. This rule is used to complete Navigation Points with their Style property set to manual.
Navigation Point Complete Rule clears or completes the selected Navigation Point in a set created by the Navigation Display Rule. This rule is used to complete Navigation Points with their Style property set to manual.
The Navigation Point Complete Rule is added to a Session and configured using the ![]() Session Editor in Surveyor.
Session Editor in Surveyor.
 |
|
||||||
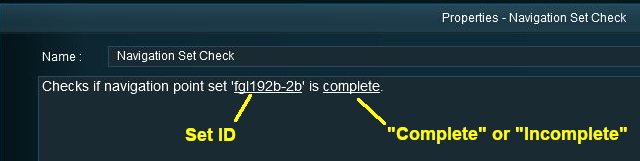
The ![]() Navigation Set Check Rule checks if the specified Navigation set has been completed or not completed then executes any following child rules.
Navigation Set Check Rule checks if the specified Navigation set has been completed or not completed then executes any following child rules.
The Navigation Set Check Rule is added to a Session and configured using the ![]() Session Editor in Surveyor. It is a
Session Editor in Surveyor. It is a ![]() Parent Rule.
Parent Rule.
 |
|
||||||
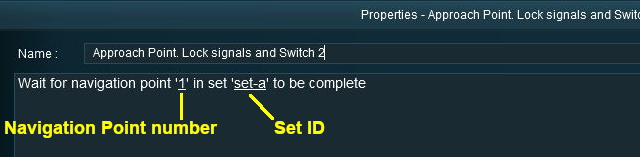
The ![]() Wait on Navigation Point Rule waits until the specified Navigation Point in the specified set has been completed then executes any following child rules.
Wait on Navigation Point Rule waits until the specified Navigation Point in the specified set has been completed then executes any following child rules.
The Wait on Navigation Point Rule is added to a Session and configured using the ![]() Session Editor in Surveyor. It is a
Session Editor in Surveyor. It is a ![]() Parent Rule.
Parent Rule.
 |
|
||||||
Trainz Wiki
 |
More Tutorials and Guides to Using Trainz |
This page was created by Trainz user pware in May 2018 and was last updated as shown below.