|
|
| Line 737: |
Line 737: |
| | </tr> | | </tr> |
| | </table> | | </table> |
| | + | |
| | + | [[Category:How-to guides]] |
Revision as of 20:58, 20 July 2018
 |
The World Origin and Date settings are used to set the current season e.g. January = Summer in the Southern Hemisphere and Winter in the Northern Hemisphere |
The Environment Tool
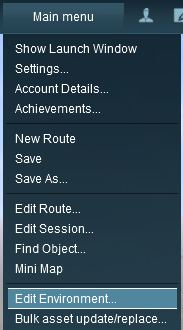 |
Open the Environment Tools Editor from the Surveyor Main Menu as shown on the left.
This will open the Environment Properties Window as shown below.
|
Lighting
The Lighting Tools control the ambient, sun and water colours. This tool tab is opened by default whenever the Environmental Editor is opened.
Light and Time
Setting the Lighting Conditions
The ring around the dial contains a number of green dots. Each dot is a lighting control point. It sets the specific Red Green and Blue colour values for the light at that particular time.
|
Each colour value can be altered by dragging its needle point to a new position around the dial. Each new position will change the balance between the 3 colours and will alter the lighting displayed in the scene at that particular time. |
 |
Notes:
Each control point stores the RGB values for three different types of lighting in the scene.
- The Ambient Colour which is the directional lighting and mostly affects the hue of buildings and other scenery objects
- The Sun Colour which affects the colour of the sunlight and mostly affects the hue of the terrain
- The Water Colour which affects the colours reflected by water surfaces
|
The 3 boxes below the colour wheels and next to the Sky box show the colour effects created for each type of lighting at the selected time.
 |
|
 |
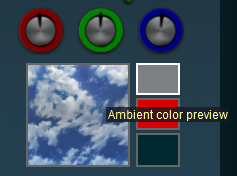
Steps:
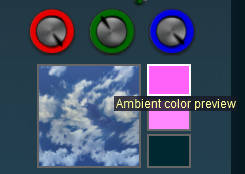
- Click on the top box of the three. This is the Ambient Colour
- The dials will show the RGB values for the Ambient Colour at the selected time
- The Ambient color preview box will show the colour produced by the RGB settings
|
|
|
 |
|
|
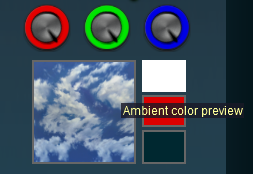
Steps:
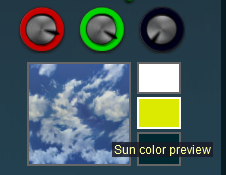
- Click on the middle box of the three. This is the Sun Colour
- The dials will show the RGB values for the Sun Colour at the selected time
- The Sun color preview box will show the colour produced by the RGB settings
|
|
|
 |
|
|
Steps:
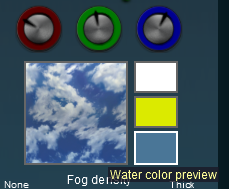
- Click on the bottom box of the three. This is the Water Colour
- The dials will show the RGB values for the Water Colour at the selected time
- The Water color preview box will show the colour produced by the RGB settings
|
|
|
|
Notes:
Getting the "right colours" can be more of an art than a science. To set the exact colour you want means mixing the correct quantities of Red, Green and Blue. Each of these colours has 256 different values from 0 to 255 and, when combined, that produces over 16 million different possible colours - but many monitors and most eyeballs will not be able to tell the differences between many of those colours. |
 |
Setting all three colours to the same values will produce monotones from Black to White with 254 different shades of gray between those two tones. Note that in the examples below, the "tyre" around each wheel shows the exact quantity of colour that is being added. |
| R = 0; G = 0; B = 0 |
R = 128; G = 128; B = 128 |
R = 255; G = 255; B = 255 |
 |
 |
 |
| Black |
50% Gray |
White |
|
All other colours are made by mixing different quantities of the three colours. |
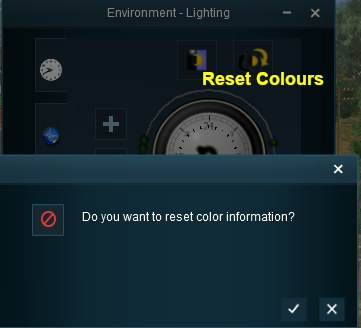
Resetting the Lighting Conditions
|
All the lighting colour settings can be reset back to the TANE default colours. |
 |
|
|
Steps:
- Click the Color Reset button
- Click the Tick icon to confirm the reset
- Click the Cross icon to cancel the reset
|
|
|
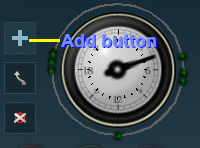
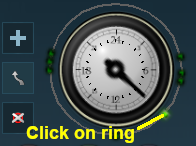
Adding a New Control Point
New control points can be added to the clock dial.
 |
|
|
Steps:
- Click the Add button (the + symbol)
- Click on the ring at the place where the new control point is to be located
|
|
|
Notes:
During the running of a Session the lighting will "morph" or "transform" at a steady rate from the set of colour values at one control point to the set of colour values at the next control point. Click the Diurnal Cycle button for a demonstration of this.
- If the control points are far apart then the transition will be slow and gradual
- If the control points are close together then the transition will be faster
- If there are many control points grouped closely together then the transition will be faster and more dramatic
The places where you would need fast and dramatic transitions would be at dawn (around 06:00) and dusk (around 18:00)
|
|
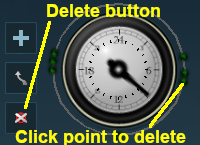
Deleting a Control point
Existing control points can be deleted.
 |
|
|
Steps:
- Click the Delete button
- Click on the control point to be deleted
|
|
|
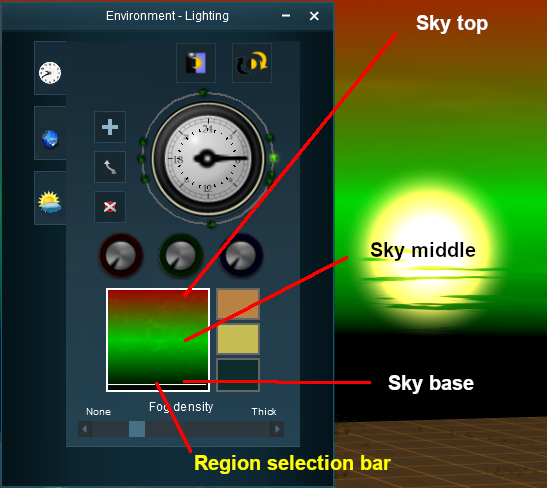
The Skybox
The skybox sets the sky colours in three different regions of the sky at the selected time of day, as shown in the extreme example below.
 |
|
|
Steps:
- Select a control point for a specific time of day
- Click in a region of the Skybox (top, middle, bottom) - a while line or bar will appear across the selected region
- Set the RGB color wheels for the selected region
- Repeat for the other two regions and for other times of the day/night as needed
|
|
In the areas between the three regions the colours will be blended to create a smooth transition. |
Fog Control
This is a simple slide control that will adjust the level of "fog" in a scene at the selected time of day.
Location
The Location Tools control the geographic and date (season) data for the session.
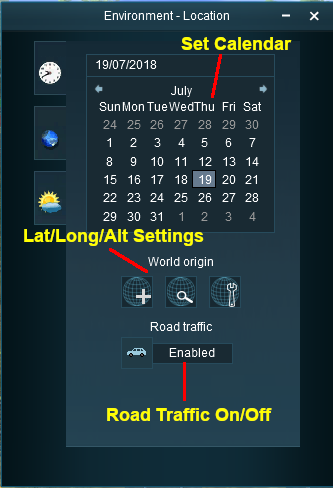 |
The top section is a standard calendar selection tool that allows you to set the month and the day of the month. The only effect this has in TANE is to set, with the geographic coordinates, the season of the year.
|
If you are creating a session that is based on a different season of the year, then set a date that would be appropriate for that season in your (or the simulated) hemisphere. |
The middle section is the World Origin Tool and sets the geographic location, including the altitude, of the route using a World Origin marker that is only visible in Surveyor.
|
Setting the World Origin does NOT set regional features such as which side of the road the cars drive on. Use the Route Editor - Region setting for that |
Once it has been placed, the marker can be moved by dragging or clicking with the mouse. After adding the marker it should be edited to add geographic data. |
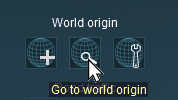 |
Click the Go to world origin icon to move the Surveyor screen so that it is centred on the World Origin marker. |
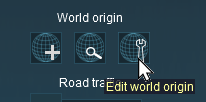 |
Click the Edit world origin icon to set or edit the World Origin data. See Editing the World Origin below. |
Editing the World Origin
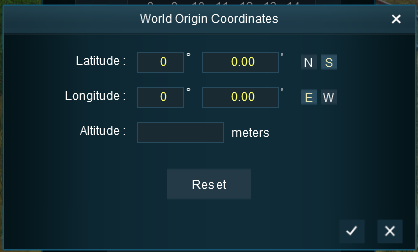 |
Enter the geographic data for the world origin.
- Latitude and Longitude in dergree and minutes (with seconds added as the decimal fraction of the minutes - 10'30" would be entered as 10.50)
- Hemispheres - North/South and East/West
- Altitude in metres
The Reset button sets all values to their defaults as shown on the left.
Click the Tick icon to accept the entered data.
Click the Cross icon to cancel the data entry.
|
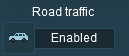
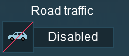
Traffic Control
|
This tool simply turns the road traffic ON and OFF |
|
Notes:
This road traffic tool:-
- only works on roads that have been designed to use road traffic (not all roads support traffic)
- does not set the road traffic characteristics - number and types of vehicles, which side of the road is used. These features are set in the Route Editor - Region setting
|
 |
|
|
Steps:
- Click the car icon to enable and disable traffic
|
|
|
Weather and Water
To set the water colour, refer to the  Setting the Lighting Conditions section above.
Wind Strength
|
This setting only effects SpeedTrees |
|
|
Steps:
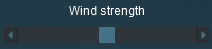
Move the slider to set the wind strength between zero (left) and maximum (right)
|
|
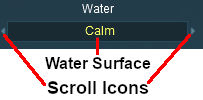
Set the Water Surface
|
This sets the water surface effects |
 |
|
|
Steps:
- Click the Water Surface to select from a drop down list of surface effects, or
- Scroll through the list by using the Scroll icons
|
|
|
Set the Snow Altitude
|
This sets the altitude at which objects with snow effects will display those effects. It has no effect on objects created without this feature |
|
|
Steps:
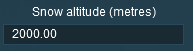
Enter the altitude, in metres, at which snow can appear. |
|
Trainz Wiki
 |
More Tutorials and Guides to Using Trainz
|


