How to Use Driver Setup Rule
m |
m (→Trainz Wiki) |
||
| (21 intermediate revisions by one user not shown) | |||
| Line 1: | Line 1: | ||
| − | The information in this Wiki Page applies to ''' | + | The information in this Wiki Page applies to '''T:ANE''', '''TRS19''', '''Trainz Plus''' and '''TRS22'''. |
| − | + | <table> | |
| + | <tr valign="top"> | ||
| + | <td> | ||
__TOC__ | __TOC__ | ||
| − | < | + | </td> |
| + | <td> | ||
| + | <table width=800 bgcolor="lightcyan" cellpadding=2> | ||
<tr valign="top"> | <tr valign="top"> | ||
| − | <td width= | + | <td width=10>[[image:BlueDot10x10.png|link=]]</td> |
| − | + | <td>The '''Driver Setup Rule''' assigns drivers to consists and issues them with '''Driver Commands'''</td> | |
| − | <td | + | |
| − | + | ||
| − | + | ||
</tr> | </tr> | ||
| − | |||
| − | |||
| − | |||
| − | |||
<tr valign="top"> | <tr valign="top"> | ||
| − | <td | + | <td width=10>[[image:BlueDot10x10.png|link=]]</td> |
| + | <td>'''Driver Commands''' are lists of instructions or "orders" that drivers are tasked to complete under the control of the Trainz '''AI''' system</td> | ||
</tr> | </tr> | ||
| − | + | </table> | |
| − | + | </td> | |
| − | + | ||
| − | + | ||
| − | + | ||
| − | + | ||
| − | + | ||
</tr> | </tr> | ||
</table> | </table> | ||
<br> | <br> | ||
| − | <table | + | <table width=1000> <!-- BEGIN Nav Buttons Table --> |
<tr valign="top"> | <tr valign="top"> | ||
| − | <td rowspan=2>[[ | + | <td width=629><span id="stepSetup"></span> |
| + | ='''Driver Setup Rule'''= | ||
| + | </td> | ||
| + | <td width=50>[[image:SkipDown.png|link=#skipAddDrivers|Skip Down]]</td> <!-- skip Down --> | ||
| + | <td width=50> </td> <!-- skip Up --> | ||
| + | <td width=46>[[image:BackToTop.png|link=#top|alt=Top|Top]]</td> | ||
| + | <td width=75> </td> | ||
| + | <td width=75>[[image:NextDown.png|link=#stepCopying|alt=Next Down|Next Down]]</td> | ||
| + | <td width=75>[[image:BackToBottom.png|link=#bottom|alt=Bottom|Bottom]]</td> | ||
| + | </tr> | ||
| + | </table> <!-- END Nav Buttons Table --> | ||
| + | |||
| + | <table cellpadding=4 bgcolor="Aquamarine"> | ||
| + | <tr valign="top"> | ||
| + | <td rowspan=2>[[image:LinkWiki.PNG|link=]]</td> | ||
<td> | <td> | ||
A list of available '''Driver Commands''' can be found on the '''Trainz Wiki Page''' at:-<br> | A list of available '''Driver Commands''' can be found on the '''Trainz Wiki Page''' at:-<br> | ||
| Line 37: | Line 44: | ||
</table> | </table> | ||
<br> | <br> | ||
| − | The [[ | + | The [[image:WikiLink.PNG|link=]] '''[[Session Rule List with Parameters#Driver Setup Rule|Driver Setup Rule]]''' is automatically added to the Session Editor of every Session. |
<br> | <br> | ||
| − | <table> | + | <table width=1000> |
<tr valign="top"> | <tr valign="top"> | ||
| − | <td>[[ | + | <td>[[image:EditSessionWindow.JPG|480px|link=]]</td> |
<td> | <td> | ||
| − | <table cellpadding=" | + | <table bgcolor=#000000 cellpadding=2> |
| − | <tr> | + | <tr valign="top"> |
| − | <td colspan= | + | <td> |
| − | + | <table bgcolor=#ffffff cellpadding=2> | |
| + | <tr valign="top"> | ||
| + | <td colspan=2><span style="font-weight: 700; font-size: 15px;">Steps:</span> To open the '''driver Setup Rule''':-</td> | ||
</tr> | </tr> | ||
<tr valign="top"> | <tr valign="top"> | ||
| − | <td>[[ | + | <td width=25>[[image:DotPoint1.JPG|link=]]</td> |
| − | <td> | + | <td>Open the [[image:WikiLink.PNG|link=]] '''[[How to Use Session Editor|Session Editor]]''' by selecting '''Edit Session''' from the '''Surveyor Main Menu''' in '''T:ANE''' or the '''Surveyor Edit Menu''' in '''TRS19''' and later versions</td> |
| − | + | ||
| − | + | ||
| − | + | ||
</tr> | </tr> | ||
| − | <tr> | + | <tr valign="top"> |
| − | <td | + | <td>[[image:DotPoint2.JPG|link=]]</td> |
| − | --- | + | <td>Select the '''Driver Setup Rule''' shown left (it is usually the rule at the top of the list)</td> |
| + | </tr> | ||
| + | <tr valign="top"> | ||
| + | <td>[[image:DotPoint3.JPG|link=]]</td> | ||
| + | <td><span style="font-weight: 700; font-size: 15px; background-color: lightcyan;">Left Click</span> the '''Edit''' button at the bottom of the '''Session Editor''' window</td> | ||
| + | </tr> | ||
| + | </table> | ||
| + | </td> | ||
</tr> | </tr> | ||
</table> | </table> | ||
<br> | <br> | ||
| − | <table | + | <table bgcolor=#ff0000> |
<tr valign="top"> | <tr valign="top"> | ||
| − | <td>[[ | + | <td> |
| − | <td>If the '''Driver Setup Rule''' is not shown in the list then... | + | <table bgcolor=#fcbcbc> |
| − | # | + | <tr valign="top"> |
| − | + | <td>[[image:Stop.PNG|link=]]</td> | |
| − | + | <td>If the '''Driver Setup Rule''' is not shown in the list then...<br><br> | |
| + | <table bgcolor=#ffffff> | ||
| + | <tr valign="top"> | ||
| + | <td colspan=2><span style="font-weight: 700; font-size: 15px;">Steps:</span> To add the '''Driver Setup Rule:-</td> | ||
</tr> | </tr> | ||
| − | |||
| − | |||
<tr valign="top"> | <tr valign="top"> | ||
| − | <td rowspan=2>[[ | + | <td width=25>[[image:DotPoint1.JPG|link=]]</td> |
| + | <td><span style="font-weight: 700; font-size: 15px; background-color: lightcyan;">Left Click</span> the <span style="font-weight: 700; font-size: 15px; color: white; background-color: black;"> Add </span> button at the bottom of the '''Session Editor''' window</td> | ||
| + | </tr> | ||
| + | <tr valign="top"> | ||
| + | <td>[[image:DotPoint2.JPG|link=]]</td> | ||
| + | <td>Scroll through the list of rules to locate and select the '''Driver Setup Rule'''</td> | ||
| + | </tr> | ||
| + | <tr valign="top"> | ||
| + | <td>[[image:DotPoint3.JPG|link=]]</td> | ||
| + | <td><span style="font-weight: 700; font-size: 15px; background-color: lightcyan;">Left Click</span> the [[image:Tick.PNG|link=]] icon on the rule list window</td> | ||
| + | </tr> | ||
| + | </table> | ||
| + | </td> | ||
| + | </tr> | ||
| + | </table> | ||
| + | </td> | ||
| + | </tr> | ||
| + | </table> | ||
| + | <br> | ||
| + | <table cellpadding=4 bgcolor="Aquamarine"> | ||
| + | <tr valign="top"> | ||
| + | <td rowspan=2>[[image:LinkWiki.PNG|link=]]</td> | ||
<td> | <td> | ||
More information on the '''Session Editor''' can be found on the '''Trainz Wiki Page''' at:-<br> | More information on the '''Session Editor''' can be found on the '''Trainz Wiki Page''' at:-<br> | ||
| Line 81: | Line 116: | ||
</tr> | </tr> | ||
</table> | </table> | ||
| + | <br> | ||
| + | <table width=1000> <!-- BEGIN Nav Buttons Table SKIPS NO SECTIONS --> | ||
| + | <tr valign="top"> | ||
| + | <td width=629><span id="skipAddDrivers"></span> | ||
| + | =='''Adding New Drivers'''== | ||
| + | </td> | ||
| + | <td width=50>[[image:SkipDown.png|link=#skipEditDrivers|Skip Down]]</td> <!-- skip Down --> | ||
| + | <td width=50>[[image:SkipUp.png|link=#stepSetup|Skip Up]]</td> <!-- skip Up --> | ||
| + | <td width=46> </td> | ||
| + | <td width=75> </td> | ||
| + | <td width=75> </td> | ||
| + | <td width=75> </td> | ||
| + | </tr> | ||
| + | </table> <!-- END Nav Buttons Table --> | ||
| − | + | <table width=1000> | |
| − | <table | + | |
<tr valign="top"> | <tr valign="top"> | ||
| − | <td> | + | <td>After opening the '''Driver Setup Rule''' <span style="font-weight: 700; font-size: 15px; background-color: lightcyan;">Left Click</span> the link:- <br> |
| − | + | [[image:DriverSetupAddAnotherDriver.JPG|link=]]<br> | |
| − | <table | + | <table bgcolor=#000000> |
<tr valign="top"> | <tr valign="top"> | ||
| − | <td>[[ | + | <td> |
| − | <td> | + | <table bgcolor=#ffffb0> |
| + | <tr valign="top"> | ||
| + | <td>[[image:NotePad.PNG|link=]]</td> | ||
| + | <td>If there is a list of drivers already present then scroll down to the bottom of the list to see the link | ||
| + | </td> | ||
</tr> | </tr> | ||
| − | </table> | + | </table> |
| − | + | </td> | |
| − | <table | + | </tr> |
| + | </table> | ||
| + | <br> | ||
| + | |||
| + | The image on the right shows the properties window if it is opened with no drivers placed in the layout.<br> | ||
| + | |||
| + | This will open the '''Add New Driver''' window.<br> | ||
| + | |||
| + | Select a driver from the list and <span style="font-weight: 700; font-size: 15px; background-color: lightcyan;">Left Click</span> the '''Tick''' button. | ||
| + | </td> | ||
| + | <td>[[image:DriverSetupAddDriver.JPG|link=|alt=Add Driver]]</td> | ||
| + | </tr> | ||
| + | </table> | ||
| + | <br> | ||
| + | <table width=1000 bgcolor=#fcbcbc> | ||
<tr valign="top"> | <tr valign="top"> | ||
| − | <td>[[ | + | <td>[[image:Stop.PNG|link=]]</td> |
| − | <td>If '''Driver Setup Timeout''' errors are reported, then split the drivers between two copies of the '''Driver Setup Rule''' and place the second copy as a child of a [[ | + | <td><span style="font-weight: 700; font-size: 17px;">Timeout Problem in T:ANE</span> This is an issue in '''T:ANE'''. It has been '''FIXED''' in '''TRS19''' and later versions.<br> |
| − | This gives '''Trainz''' enough time to process all the drivers in the first '''Driver Setup''' rule before starting on the second '''Driver Setup''' rule.<br> | + | <br> |
| − | Information on how to use Parent and Child rules can be found at [[ | + | Adding a large number of drivers to the Driver Setup can cause '''Timeout''' errors particularly if certain driver script libraries are being used. Exactly how many is a "large number" will depend on other factors.<br> |
| − | + | ||
| + | <table bgcolor=#ffffe0> <!-- BEGIN Tips Table --> | ||
| + | <tr valign="top"> | ||
| + | <td>[[image:PencilTips.PNG|link=]]</td> | ||
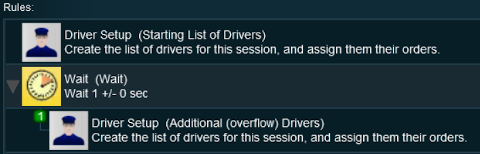
| + | <td>If '''Driver Setup Timeout''' errors are reported, then split the drivers between two copies of the '''Driver Setup Rule''' and place the second copy as a child of a [[image:WikiLink.PNG|link=]] '''[[Session Rule List with Parameters#Wait Rule|Wait Rule]]''' set for a delay of just a few seconds, as shown on the right.<br> | ||
| + | |||
| + | [[image:DriverSetupWait.png|link=]]<br> | ||
| + | |||
| + | This gives '''Trainz''' enough time to process all the drivers in the first '''Driver Setup''' rule before starting on the second '''Driver Setup''' rule.<br> | ||
| + | |||
| + | Information on how to use Parent and Child rules can be found at [[image:WikiLink.PNG|link=]] '''[[Parent and Child Rules]]''' | ||
| + | </td> | ||
</tr> | </tr> | ||
| − | </table | + | </table> |
</td> | </td> | ||
</tr> | </tr> | ||
| − | </table> <!-- END | + | </table> <!-- END Tips --> |
<br> | <br> | ||
===Remove Existing Drivers First=== | ===Remove Existing Drivers First=== | ||
| − | After selecting the '''Driver Setup Rule''' | + | |
| − | <table> | + | <table width=1000> |
| + | <tr valign="top"> | ||
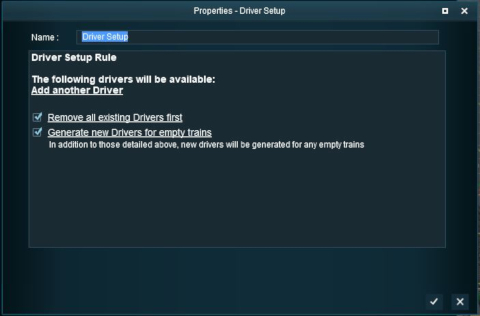
| + | <td>After selecting the '''Driver Setup Rule''' <span style="font-weight: 700; font-size: 15px; background-color: lightcyan;">Left Click</span> the '''Edit''' button, the Driver Setup Properties Window will be shown. The image below shows the properties window if it is opened with no drivers placed in the layout.</td> | ||
| + | </tr> | ||
| + | </table> | ||
| + | |||
| + | <table width=1000> | ||
<tr valign="top"> | <tr valign="top"> | ||
| − | <td>[[ | + | <td>[[image:DriverSetupStartWindow.JPG|link=]]</td> |
<td><br> | <td><br> | ||
| − | [[ | + | [[image:DriverSetupRemoveExisting.JPG|link=]] |
| − | <table cellpadding= | + | <table cellpadding=4 bgcolor=#eeeeee> |
<tr> | <tr> | ||
<td colspan="2"> | <td colspan="2"> | ||
| Line 120: | Line 203: | ||
</tr> | </tr> | ||
<tr valign="top"> | <tr valign="top"> | ||
| − | <td>[[ | + | <td>[[image:Gears.PNG|link=]]</td> |
| − | <td><span style="font-size: 17px;">'''TRS19/Trainz Plus Settings:'''</span>< | + | <td><span style="font-size: 17px;">'''TRS19/Trainz Plus/TRS22 Settings:'''</span> |
| − | + | <table> | |
| − | + | <tr valign="top"> | |
| + | <td width=10>[[image:BlackDot10x10.png|link=]]</td> | ||
| + | <td>If '''Checked [[image:CheckBox.PNG|link=]]''' All existing drivers will be removed so all trains will become "empty" (no drivers). When used with the '''Generate new Drivers for empty trains''' option, it will produce a new list of randomly selected drivers for all trains</td> | ||
| + | </tr> | ||
| + | <tr valign="top"> | ||
| + | <td>[[image:BlackDot10x10.png|link=]]</td> | ||
| + | <td>If '''Unchecked [[image:CheckBoxOff.PNG|link=]]''' All existing drivers will remain with their previously assigned trains</td> | ||
| + | </tr> | ||
| + | </table> | ||
| + | </td> | ||
</tr> | </tr> | ||
<tr> | <tr> | ||
| Line 131: | Line 223: | ||
</table> | </table> | ||
| − | <table cellpadding= | + | <table cellpadding=4 bgcolor=#ff0000> |
<tr valign="top"> | <tr valign="top"> | ||
<td> | <td> | ||
<table cellpading="4" bgcolor=#ffffff> | <table cellpading="4" bgcolor=#ffffff> | ||
<tr valign="top"> | <tr valign="top"> | ||
| − | <td>[[ | + | <td>[[image:Bug.png|link=]]</td> |
| − | <td><span style="font-size: 17px;">''' | + | <td><span style="font-size: 17px;">'''T:ANE Known Issues:'''</span><br> |
| − | [[ | + | [[image:DriverSetupRemoveExisting.JPG|link=]] '''This does not appear to have any effect in T:ANE'''</td> |
</tr> | </tr> | ||
</table></td> | </table></td> | ||
| Line 145: | Line 237: | ||
</tr> | </tr> | ||
</table> | </table> | ||
| − | <table | + | <br> |
| + | <table bgcolor=#ff0000 width=1000> | ||
<tr valign="top"> | <tr valign="top"> | ||
| − | <td>[[ | + | <td> |
| − | <td>If your session uses a rule that will expect to find a particular driver in charge of a train (e.g. driver '''Charlie''' in the '''Trigger Check Rule''') then manually assign '''Charlie''' as the driver of a train and do not select the option '''Remove all existing Drivers first'''.</td> | + | <table bgcolor=#fcbcbc> |
| + | <tr valign="top"> | ||
| + | <td>[[image:Stop.PNG|link=]]</td> | ||
| + | <td>If your session uses a rule that will expect to find a particular driver in charge of a train (e.g. driver '''Charlie''' in the '''Trigger Check Rule''') then manually assign '''Charlie''' as the driver of a train and do not select the option '''Remove all existing Drivers first'''. | ||
| + | </td> | ||
</tr> | </tr> | ||
</table> | </table> | ||
| − | + | </td> | |
| − | + | ||
| − | + | ||
| − | + | ||
| − | + | ||
| − | + | ||
| − | + | ||
</tr> | </tr> | ||
</table> | </table> | ||
| + | <br> | ||
| + | ===Generate New Drivers for Empty Trains=== | ||
| − | <table | + | [[image:DriverSetupGenerateNew.JPG|link=]]<br> |
| + | |||
| + | <table width=1000> | ||
| + | <tr valign="top"> | ||
| + | <td> | ||
| + | <table width=500 cellpadding=4 bgcolor=#eeeeee> | ||
<tr> | <tr> | ||
<td colspan="2"> | <td colspan="2"> | ||
| Line 167: | Line 265: | ||
</tr> | </tr> | ||
<tr valign="top"> | <tr valign="top"> | ||
| − | <td>[[ | + | <td>[[image:Gears.PNG|link=]]</td> |
| − | <td><span style="font-size: 17px;">'''Settings:'''</span>< | + | <td><span style="font-size: 17px;">'''Settings:'''</span> |
| − | + | <table> | |
| − | + | <tr valign="top"> | |
| + | <td width=10>[[image:BlackDot10x10.png|link=]]</td> | ||
| + | <td>If '''Checked [[image:CheckBox.PNG|link=]]''' randomly selected drivers will be assigned to all newly added ''driveable'' trains. Existing drivers will not be affected unless the '''Remove all existing Drivers first''' option has been selected</td> | ||
| + | </tr> | ||
| + | <tr valign="top"> | ||
| + | <td>[[image:BlackDot10x10.png|link=]]</td> | ||
| + | <td>If '''Unchecked [[image:CheckBoxOff.PNG|link=]]''' then you will have to manually assign drivers to trains by a <span style="font-weight: 700; font-size: 15px; background-color: lightcyan;">Left Click</span> on the '''<span style="text-decoration: underline;">Add another Driver</span>''' link</td> | ||
| + | </tr> | ||
| + | </table> | ||
| + | </td> | ||
</tr> | </tr> | ||
<tr> | <tr> | ||
<td colspan="2"> | <td colspan="2"> | ||
----</td> | ----</td> | ||
| + | </tr> | ||
| + | </table> | ||
| + | </td> | ||
| + | <td> | ||
| + | <table width=500 bgcolor=#000000 cellpadding=2> | ||
| + | <tr valign="top"> | ||
| + | <td> | ||
| + | <table width=496 bgcolor=#ffffb0 cellpadding=2> | ||
| + | <tr valign="top"> | ||
| + | <td width=25>[[image:NotePad.PNG|link=]]</td> | ||
| + | <td><span style="font-size: 17px; font-weight: 700;">Notes:'''</span><br> | ||
| + | ---- | ||
| + | When using the '''Driver Setup Rule''' for the first time with no drivers assigned to existing trains, the '''Generate new Drivers for empty trains''' option will immediately assign drivers to each train. Each time a new train is added to the layout, it will be automatically assigned a driver.</td> | ||
| + | </tr> | ||
| + | </table> | ||
| + | </td> | ||
| + | </tr> | ||
| + | </table> | ||
| + | </td> | ||
</tr> | </tr> | ||
</table> | </table> | ||
| Line 180: | Line 306: | ||
===Wait For Schedule Completion=== | ===Wait For Schedule Completion=== | ||
[[image:DriverSetupWaitSchedule.png|link=]] | [[image:DriverSetupWaitSchedule.png|link=]] | ||
| − | <table cellpadding= | + | <table cellpadding=4 bgcolor=#eeeeee> |
<tr> | <tr> | ||
<td colspan="2"> | <td colspan="2"> | ||
| Line 186: | Line 312: | ||
</tr> | </tr> | ||
<tr valign="top"> | <tr valign="top"> | ||
| − | <td>[[ | + | <td>[[image:Gears.PNG|link=]]</td> |
| − | <td><span style="font-size: 17px;">'''Settings:'''</span>< | + | <td><span style="font-size: 17px;">'''Settings:'''</span> |
| − | + | <table> | |
| − | + | <tr valign="top"> | |
| + | <td width=10>[[image:BlackDot10x10.png|link=]]</td> | ||
| + | <td>If '''Checked [[image:CheckBox.PNG|link=]]''' then this '''Driver Setup Rule''' will not complete until all '''Schedule Rules''' (if any) have been completed</td> | ||
| + | </tr> | ||
| + | <tr valign="top"> | ||
| + | <td>[[image:BlackDot10x10.png|link=]]</td> | ||
| + | <td>If '''Unchecked [[image:CheckBoxOff.PNG|link=]]''' then this '''Driver Setup Rule''' will complete as soon as all its drivers have been assigned locos and commands (if any)</td> | ||
| + | </tr> | ||
| + | </table> | ||
| + | </td> | ||
</tr> | </tr> | ||
<tr> | <tr> | ||
| Line 199: | Line 334: | ||
===Focus Camera on First Driver=== | ===Focus Camera on First Driver=== | ||
[[image:DriverSetupFocus.png|link=]] | [[image:DriverSetupFocus.png|link=]] | ||
| − | <table cellpadding= | + | <table cellpadding=4 bgcolor=#eeeeee> |
<tr> | <tr> | ||
<td colspan="2"> | <td colspan="2"> | ||
| Line 205: | Line 340: | ||
</tr> | </tr> | ||
<tr valign="top"> | <tr valign="top"> | ||
| − | <td>[[ | + | <td>[[image:Gears.PNG|link=]]</td> |
| − | <td><span style="font-size: 17px;">'''Settings:'''</span>< | + | <td><span style="font-size: 17px;">'''Settings:'''</span> |
| − | + | <table> | |
| − | + | <tr valign="top"> | |
| + | <td width=10>[[image:BlackDot10x10.png|link=]]</td> | ||
| + | <td>If '''Checked [[image:CheckBox.PNG|link=]]''' then the Session will start with the camera focussed on the first driver in the list</td> | ||
| + | </tr> | ||
| + | <tr valign="top"> | ||
| + | <td>[[image:BlackDot10x10.png|link=]]</td> | ||
| + | <td>If '''Unchecked [[image:CheckBoxOff.PNG|link=]]''' then the Session will start with the camera focussed on the scene that last had the camera focus in Surveyor</td> | ||
| + | </tr> | ||
| + | </table> | ||
| + | </td> | ||
</tr> | </tr> | ||
<tr> | <tr> | ||
| Line 216: | Line 360: | ||
</table> | </table> | ||
<br> | <br> | ||
| − | ==Editing the Driver List== | + | <table width=1000> <!-- BEGIN Nav Buttons Table SKIPS NO SECTIONS --> |
| + | <tr valign="top"> | ||
| + | <td width=629><span id="skipEditDrivers"></span> | ||
| + | =='''Editing the Driver List'''== | ||
| + | </td> | ||
| + | <td width=50>[[image:SkipDown.png|link=#skipAddCommands|Skip Down]]</td> <!-- skip Down --> | ||
| + | <td width=50>[[image:SkipUp.png|link=#skipAddDrivers|Skip Up]]</td> <!-- skip Up --> | ||
| + | <td width=46> </td> | ||
| + | <td width=75> </td> | ||
| + | <td width=75> </td> | ||
| + | <td width=75> </td> | ||
| + | </tr> | ||
| + | </table> <!-- END Nav Buttons Table --> | ||
| + | |||
When drivers and trains have been added to the rule, it will appear as shown below. | When drivers and trains have been added to the rule, it will appear as shown below. | ||
| − | <table> | + | <table width=1000> |
<tr valign="top"> | <tr valign="top"> | ||
| − | <td>[[ | + | <td>[[image:DriverSetupDriverCommandList.JPG|link=]]</td> |
<td> | <td> | ||
| − | <table | + | <table bgcolor=#000000 cellpadding=2> |
<tr valign="top"> | <tr valign="top"> | ||
| − | < | + | <td> |
| − | < | + | <table bgcolor=#ffffb0 cellpadding=2> |
| − | + | ||
<tr valign="top"> | <tr valign="top"> | ||
| − | <td>[[ | + | <td width=25>[[image:NotePad.PNG|link=]]</td> |
| − | <td> | + | <td>If a loco name appears in '''<span style="color: red;">red</span>''' then it has been removed from the layout</td> |
</tr> | </tr> | ||
</table> | </table> | ||
| − | + | </td> | |
| − | + | ||
| − | + | ||
| − | + | ||
</tr> | </tr> | ||
| + | </table> | ||
| + | </td> | ||
| + | </tr> | ||
| + | </table> | ||
| + | <br> | ||
| + | <table bgcolor=#000000 cellpadding=2> | ||
<tr valign="top"> | <tr valign="top"> | ||
| − | <td>[[ | + | <td> |
| − | <td><span style="font-size: | + | <table bgcolor=#ffffff cellpadding=2> |
| − | + | <tr valign="top"> | |
| − | + | <td colspan=2><span style="font-weight: 700; font-size: 15px;">Steps:</span> To edit the driver list:-</td> | |
| − | + | </tr> | |
| − | + | <tr valign="top"> | |
| − | + | <td width=25>[[image:DotPoint1.JPG|link=]]</td> | |
| − | + | <td><span style="font-weight: 700; font-size: 15px; background-color: lightcyan;">Left Click</span> on the driver <span style="font-weight: 700; font-size: 15px;">icon</span> to select a different driver from the Session list</td> | |
| − | + | </tr> | |
| − | + | <tr valign="top"> | |
| − | + | <td>[[image:DotPoint2.JPG|link=]]</td> | |
| − | + | <td><span style="font-weight: 700; font-size: 15px; background-color: lightcyan;">Left Click</span> on the <span style="font-weight: 700; font-size: 15px; text-decoration: underline;">loco name</span> to select a different loco from the Session list (an empty loco list means no unassigned locos are available)</td> | |
| + | </tr> | ||
| + | <tr valign="top"> | ||
| + | <td>[[image:DotPoint3.JPG|link=]]</td> | ||
| + | <td><span style="font-weight: 700; font-size: 15px; background-color: lightcyan;">Left Click</span> on the <span style="font-weight: 700; font-size: 15px; text-decoration: underline;">driver name</span> to type in a new name for this driver (this will '''not''' change the driver icon)</td> | ||
| + | </tr> | ||
| + | <tr valign="top"> | ||
| + | <td>[[image:DotPoint4.JPG|link=]]</td> | ||
| + | <td><span style="font-weight: 700; font-size: 15px; background-color: lightcyan;">Left Click</span> on <span style="font-weight: 700; font-size: 15px; text-decoration: underline;">Autodetect</span> to select a new owner for this driver and loco. There are four "owner" options:- | ||
| + | |||
| + | <table> | ||
| + | <tr valign="top"> | ||
| + | <td colspan=2>Choose one of the following options:-</td> | ||
| + | </tr> | ||
| + | <tr valign="top"> | ||
| + | <td width=25>[[image:Ablue.png|link=]]</td> | ||
| + | <td>'''AI driver''' - this train will be under AI control even if it has no '''Driver Command Bar''' orders to follow. This can be used to prevent a user from taking control of the train</td> | ||
| + | </tr> | ||
| + | <tr valign="top"> | ||
| + | <td>[[image:Bblue.png|link=]]</td> | ||
| + | <td>'''Autodetect''' - if the train has '''Driver Command Bar''' orders then it will be under AI control. If it has no '''Driver Command Bar''' orders then it will be under user control</td> | ||
| + | </tr> | ||
| + | <tr valign="top"> | ||
| + | <td>[[image:Cblue.png|link=]]</td> | ||
| + | <td>'''First Human Player''' - the train will be assigned to the user or a multiplayer, whoever selects it first</td> | ||
| + | </tr> | ||
| + | <tr valign="top"> | ||
| + | <td>[[image:Dblue.png|link=]]</td> | ||
| + | <td>'''Multiplayer Driver''' - the train will be assigned to a multiplayer</td> | ||
| + | </tr> | ||
| + | </table> | ||
| + | |||
</td> | </td> | ||
</tr> | </tr> | ||
| − | <tr> | + | <tr valign="top"> |
| − | <td colspan= | + | <td colspan=2>If you need to remove a driver:-</td> |
| − | ----</td> | + | </tr> |
| + | <tr valign="top"> | ||
| + | <td>[[image:DotPoint5.JPG|link=]]</td> | ||
| + | <td><span style="font-weight: 700; font-size: 15px; background-color: lightcyan;">Left Click</span> <span style="font-weight: 700; font-size: 15px; text-decoration: underline;">remove</span> to delete this driver from the rule</td> | ||
</tr> | </tr> | ||
</table> | </table> | ||
| Line 260: | Line 453: | ||
</tr> | </tr> | ||
</table> | </table> | ||
| + | <br> | ||
| + | <table width=1000> <!-- BEGIN Nav Buttons Table SKIPS NO SECTIONS --> | ||
| + | <tr valign="top"> | ||
| + | <td width=629><span id="skipAddCommands"></span> | ||
| + | =='''Adding Driver Commands'''== | ||
| + | </td> | ||
| + | <td width=50>[[image:SkipDown.png|link=#skipDeleteCommands|Skip Down]]</td> <!-- skip Down --> | ||
| + | <td width=50>[[image:SkipUp.png|link=#skipEditDrivers|Skip Up]]</td> <!-- skip Up --> | ||
| + | <td width=46> </td> | ||
| + | <td width=75> </td> | ||
| + | <td width=75> </td> | ||
| + | <td width=75> </td> | ||
| + | </tr> | ||
| + | </table> <!-- END Nav Buttons Table --> | ||
| − | == | + | <table width=1000> |
| + | <tr valign="top"> | ||
| + | <td>The grey area below the driver details (name, loco, owner) is the '''Driver Command Bar'''. This is where the driving instructions (the "train orders") used by the Trainz AI system are given to the driver.</td> | ||
| + | </tr> | ||
| + | </table> | ||
| − | + | <table width=1000> | |
| − | + | ||
| − | <table> | + | |
<tr valign="top"> | <tr valign="top"> | ||
| − | <td width=" | + | <td width="500">[[image:DriverSetupAddCommand.JPG|500px|link=]]<br> |
| − | Shown below is a ''Command Bar'' after two | + | Shown below is a '''Driver Command Bar''' after two driver commands have been added. Each command has its own icon. Move the mouse pointer onto a command icon to reveal a '''tooltip''' showing the contents of the command, as shown in the image.<br> |
| − | [[ | + | [[image:DriverSetupAddedCommand.JPG|500px|link=]] |
</td> | </td> | ||
| − | <td><table cellpadding=" | + | <td> |
| − | <tr> | + | <table bgcolor=#000000 cellpadding=2> |
| − | <td colspan= | + | <tr valign="top"> |
| − | + | <td> | |
| + | <table bgcolor=#ffffff cellpadding=2> | ||
| + | <tr valign="top"> | ||
| + | <td colspan=2><span style="font-weight: 700; font-size: 15px;">Steps:</span> To add driver commands:-</td> | ||
</tr> | </tr> | ||
<tr valign="top"> | <tr valign="top"> | ||
| − | <td>[[ | + | <td width=25>[[image:DotPoint1.JPG|link=]]</td> |
| − | <td><span style="font-size: | + | <td><span style="font-weight: 700; font-size: 15px; background-color: lightcyan;">Left Click</span> the small "double chevron" icon shown in the image on the left.<br> |
| − | + | [[image:AddCommandIconTANE.png|link=]] '''T:ANE''' or [[image:AddCommandIcon.png|link=]] '''Trains Plus''' and '''TRS22'''<br> | |
| − | + | ||
| + | This will open a Command List menu which will show the driver commands that can be added to this drivers '''Command Bar'''</td> | ||
</tr> | </tr> | ||
| − | <tr> | + | <tr valign="top"> |
| − | <td | + | <td>[[image:DotPoint2.JPG|link=]]</td> |
| − | --- | + | <td><span style="font-weight: 700; font-size: 15px; background-color: lightcyan;">Left Click</span> on a command to add it to the '''Driver Command Bar'''</td> |
| + | </tr> | ||
| + | </table> | ||
| + | </td> | ||
</tr> | </tr> | ||
</table> | </table> | ||
| Line 290: | Line 506: | ||
<table> | <table> | ||
<tr valign="top"> | <tr valign="top"> | ||
| − | <td width="162">[[ | + | <td width="162">[[image:DriverSetupCommandMenu.JPG|link=]]</td> |
<td> | <td> | ||
| − | <table | + | <table width=338 bgcolor=#000000> |
<tr valign="top"> | <tr valign="top"> | ||
| − | <td>[[ | + | <td> |
| + | <table bgcolor=#ffffb0> | ||
| + | <tr valign="top"> | ||
| + | <td>[[image:NotePad.PNG|link=]]</td> | ||
<td><span style="font-size: 17px;">'''Notes:'''</span><br> | <td><span style="font-size: 17px;">'''Notes:'''</span><br> | ||
| − | + | ---- | |
| − | + | </td> | |
| − | + | ||
| − | + | ||
| − | + | ||
</tr> | </tr> | ||
| − | </ | + | <tr valign="top"> |
| + | <td>[[image:DotPoint.JPG|10px|link=]]</td> | ||
| + | <td>The commands that will be shown and are available for use are decided by another rule, the [[image:PageLink.PNG|link=]] '''[[#Driver Command Rule|Driver Command Rule]]'''. If a command that you want is not in the list then open and edit the '''Driver Command Rule'''</td> | ||
</tr> | </tr> | ||
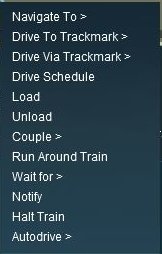
| − | </table></td> | + | <tr valign="top"> |
| + | <td>[[image:DotPoint.JPG|10px|link=]]</td> | ||
| + | <td>Many of the items in the menu will open sub-menus. These are indicated by the <span style="font-weight: 700; font-size: 15px;">></span> character after the command name. For example:- | ||
| + | <table> | ||
| + | <tr valign="top"> | ||
| + | <td width=10>[[image:RedDot10x10.png|link=]]</td> | ||
| + | <td>The <span style="font-weight: 700; font-size: 15px;">Drive To Trackmark ></span> will open a sub-menu listing all the available trackmarks</td> | ||
</tr> | </tr> | ||
| − | |||
| − | |||
| − | |||
<tr valign="top"> | <tr valign="top"> | ||
| − | <td>[[ | + | <td>[[image:RedDot10x10.png|link=]]</td> |
| − | <td><span style="font-size: | + | <td>The <span style="font-weight: 700; font-size: 15px;">Navigate To ></span> will open a sub-menu of all the interactive industries</td> |
| − | + | </tr> | |
| + | <tr valign="top"> | ||
| + | <td>[[image:RedDot10x10.png|link=]]</td> | ||
| + | <td>The <span style="font-weight: 700; font-size: 15px;">Wait For ></span> will open a sub-menu of different wait times</td> | ||
| + | </tr> | ||
| + | </table> | ||
| + | </td> | ||
| + | </tr> | ||
| + | </table> | ||
| + | </td> | ||
| + | </tr> | ||
| + | </table> | ||
| + | </td> | ||
| + | </tr> | ||
| + | </table> | ||
| + | </td> | ||
</tr> | </tr> | ||
</table> | </table> | ||
| − | == | + | <table bgcolor=#000000 width=900> |
| − | + | ||
| − | + | ||
<tr valign="top"> | <tr valign="top"> | ||
| − | |||
<td> | <td> | ||
| − | <table | + | <table bgcolor=#ffffb0> |
| − | <tr> | + | <tr valign="top"> |
| − | <td | + | <td>[[image:NotePad.PNG|link=]]</td> |
| − | ----</td> | + | <td><span style="font-size: 17px; font-weight: 700;">Notes:'''</span><br> |
| + | ---- | ||
| + | When a driver command has been executed in '''Driver Mode''' by the Trainz AI system, it will be deleted from the '''Driver Command Bar''' and the next command in the sequence will then be executed. This will continue until the last command has been executed and deleted. Then the AI control of the train will terminate. | ||
| + | </td> | ||
</tr> | </tr> | ||
| + | </table> | ||
| + | </td> | ||
| + | </tr> | ||
| + | </table> | ||
| + | <br> | ||
| + | <table width=1000> <!-- BEGIN Nav Buttons Table SKIPS NO SECTIONS --> | ||
<tr valign="top"> | <tr valign="top"> | ||
| − | <td>[[ | + | <td width=629><span id="skipDeleteCommands"></span> |
| − | <td> | + | =='''Deleting Driver Commands'''== |
| − | # | + | </td> |
| − | # | + | <td width=50>[[image:SkipDown.png|link=#skipRepeatCommand|Skip Down]]</td> <!-- skip Down --> |
| + | <td width=50>[[image:SkipUp.png|link=#skipAddCommands|Skip Up]]</td> <!-- skip Up --> | ||
| + | <td width=46> </td> | ||
| + | <td width=75> </td> | ||
| + | <td width=75> </td> | ||
| + | <td width=75> </td> | ||
</tr> | </tr> | ||
| − | <tr> | + | </table> <!-- END Nav Buttons Table --> |
| − | <td | + | To remove a command from the '''Driver Command Bar'''... |
| − | ----</td> | + | <table width=1000> |
| + | <tr valign="top"> | ||
| + | <td>[[image:DriverSetupDeleteCommand.JPG|link=]]</td> | ||
| + | <td> | ||
| + | <table bgcolor=#000000 cellpadding=2> | ||
| + | <tr valign="top"> | ||
| + | <td> | ||
| + | <table bgcolor=#ffffff cellpadding=2> | ||
| + | <tr valign="top"> | ||
| + | <td colspan=2><span style="font-weight: 700; font-size: 15px;">Steps:</span> To '''remove''' a command from the '''Driver Command Bar''':-</td> | ||
| + | </tr> | ||
| + | <tr valign="top"> | ||
| + | <td width=25>[[image:DotPoint1.JPG|link=]]</td> | ||
| + | <td><span style="font-weight: 700; font-size: 15px; background-color: lightcyan;">Left Click and Drag</span> the command out of the '''Driver Command Bar''' area</td> | ||
</tr> | </tr> | ||
</table> | </table> | ||
| Line 341: | Line 601: | ||
</tr> | </tr> | ||
</table> | </table> | ||
| − | + | </td> | |
| − | + | ||
| − | + | ||
| − | + | ||
| − | + | ||
| − | + | ||
</tr> | </tr> | ||
</table> | </table> | ||
| + | <br> | ||
| + | <table width=1000> <!-- BEGIN Nav Buttons Table SKIPS NO SECTIONS --> | ||
| + | <tr valign="top"> | ||
| + | <td width=629><span id="skipRepeatCommand"></span> | ||
| + | =='''The "Repeat" Command'''== | ||
| + | </td> | ||
| + | <td width=50>[[image:SkipDown.png|link=#stepCopying|Skip Down]]</td> <!-- skip Down --> | ||
| + | <td width=50>[[image:SkipUp.png|link=#skipDeleteCommands|Skip Up]]</td> <!-- skip Up --> | ||
| + | <td width=46> </td> | ||
| + | <td width=75> </td> | ||
| + | <td width=75> </td> | ||
| + | <td width=75> </td> | ||
| + | </tr> | ||
| + | </table> <!-- END Nav Buttons Table --> | ||
| − | <table> | + | <table width=1000 bgcolor="lightcyan" cellpadding=2> |
<tr valign="top"> | <tr valign="top"> | ||
| − | <td>[[ | + | <td width=10>[[image:BlueDot10x10.png|link=]]</td> |
| + | <td>The '''Repeat''' command is a special built in '''Driver Command''' that allows ALL the driver commands to be repeated endlessly</td> | ||
| + | </tr> | ||
| + | </table> | ||
| + | <br> | ||
| + | <table width=1000> | ||
| + | <tr valign="top"> | ||
| + | <td><br> | ||
| + | [[image:DriverSetupAddRepeat.JPG|link=]]</td> | ||
<td> | <td> | ||
| − | <table | + | <table bgcolor=#000000 cellpadding=2> |
<tr valign="top"> | <tr valign="top"> | ||
| − | <td>[[ | + | <td> |
| − | <td>'''The | + | <table bgcolor=#ffffb0 cellpadding=2> |
| + | <tr valign="top"> | ||
| + | <td width=25>[[image:NotePad.PNG|link=]]</td> | ||
| + | <td><span style="font-size: 17px; font-weight: 700;">Notes:'''</span><br> | ||
| + | ---- | ||
| + | The '''Repeat''' command is only available when at least one command is present in the '''Driver Command Bar''' and only one '''Repeat''' command can be added</td> | ||
</tr> | </tr> | ||
</table> | </table> | ||
| − | + | </td> | |
| − | + | ||
| − | + | ||
| − | + | ||
</tr> | </tr> | ||
| + | </table> | ||
| + | <br> | ||
| + | <table bgcolor=#000000 cellpadding=2> | ||
<tr valign="top"> | <tr valign="top"> | ||
| − | <td> | + | <td> |
| − | <td><span style="font-size: | + | <table bgcolor=#ffffff cellpadding=2> |
| − | + | <tr valign="top"> | |
| − | + | <td colspan=2><span style="font-weight: 700; font-size: 15px;">Steps:</span> To add a '''Repeat''' command:-</td> | |
| − | </td> | + | |
</tr> | </tr> | ||
| − | <tr> | + | <tr valign="top"> |
| − | <td | + | <td width=25>[[image:DotPoint1.JPG|link=]]</td> |
| − | ----</td> | + | <td><span style="font-weight: 700; font-size: 15px; background-color: lightcyan;">Left Click</span> the '''Add Command''' button (<span style="font-weight: 700; font-size: 15px;">>></span>) on the '''Driver Command Bar'''</td> |
</tr> | </tr> | ||
| − | </table></td> | + | <tr valign="top"> |
| + | <td>[[image:DotPoint2.JPG|link=]]</td> | ||
| + | <td>Select the '''Repeat''' option</td> | ||
| + | </tr> | ||
| + | </table> | ||
| + | </td> | ||
| + | </tr> | ||
| + | </table> | ||
| + | </td> | ||
</tr> | </tr> | ||
</table> | </table> | ||
| − | <table> | + | <table width=1000> |
<tr valign="top"> | <tr valign="top"> | ||
| − | <td>[[ | + | <td>[[image:DriverSetupRepeatIcon.JPG|link=]]</td> |
<td> | <td> | ||
| − | <table | + | <table bgcolor=#000000 cellpadding=2> |
<tr valign="top"> | <tr valign="top"> | ||
| − | < | + | <td> |
| − | < | + | <table bgcolor=#ffffb0 cellpadding=2> |
| − | + | ||
| − | + | ||
| − | + | ||
<tr valign="top"> | <tr valign="top"> | ||
| − | <td>[[ | + | <td width=25>[[image:NotePad.PNG|link=]]</td> |
<td><span style="font-size: 17px;">'''Notes:'''</span><br> | <td><span style="font-size: 17px;">'''Notes:'''</span><br> | ||
| − | As each command is executed by the Trainz AI system, it will be deleted from the front of the command list and added to the end of the list to create an "endless loop" of commands | + | ---- |
| + | </td> | ||
| + | </tr> | ||
| + | <tr valign="top"> | ||
| + | <td>[[image:DotPoint.JPG|10px|link=]]</td> | ||
| + | <td>The '''Repeat''' icon will '''always''' be placed at the end of the '''Driver Command Bar''' after the '''Add Command''' button (<span style="font-weight: 700; font-size: 15px;">>></span>)</td> | ||
| + | </tr> | ||
| + | <tr valign="top"> | ||
| + | <td>[[image:DotPoint.JPG|10px|link=]]</td> | ||
| + | <td>As each command is executed by the Trainz AI system, it will be deleted from the front of the command list and added to the end of the list to create an "endless loop" of commands</td> | ||
| + | </tr> | ||
| + | </table> | ||
| + | </td> | ||
</tr> | </tr> | ||
</table> | </table> | ||
| Line 401: | Line 699: | ||
</table> | </table> | ||
| − | <table> | + | <table width=1000> |
<tr valign="top"> | <tr valign="top"> | ||
| − | <td>[[ | + | <td width=580>[[image:DriverSetupRemoveRepeat.JPG|link=]]</td> |
<td> | <td> | ||
| − | <table | + | <table bgcolor=#000000 width=420> |
<tr valign="top"> | <tr valign="top"> | ||
| − | <td>[[ | + | <td> |
| + | <table bgcolor=#ffffb0> | ||
| + | <tr valign="top"> | ||
| + | <td>[[image:NotePad.PNG|link=]]</td> | ||
<td><span style="font-size: 17px;">'''Notes:'''</span><br> | <td><span style="font-size: 17px;">'''Notes:'''</span><br> | ||
| − | + | ---- | |
| − | + | <table> | |
| + | <tr valign="top"> | ||
| + | <td width=10>[[image:DotPoint.JPG|10px|link=]]</td> | ||
| + | <td>If a '''Repeat''' command is already present, then the '''Add Command''' menu list will show '''Don't Repeat''' as its first option</td> | ||
</tr> | </tr> | ||
| − | </table></td> | + | <tr valign="top"> |
| + | <td>[[image:DotPoint.JPG|10px|link=]]</td> | ||
| + | <td>Select '''Don't Repeat''' to remove the '''Repeat''' command</td> | ||
| + | </tr> | ||
| + | </table> | ||
| + | </td> | ||
| + | </tr> | ||
| + | </table> | ||
| + | </td> | ||
| + | </tr> | ||
| + | </table> | ||
| + | </td> | ||
</tr> | </tr> | ||
</table> | </table> | ||
<br> | <br> | ||
| − | <table cellpadding= | + | <table cellpadding=4 bgcolor=#ff0000 width="640"> |
<tr valign="top"> | <tr valign="top"> | ||
<td> | <td> | ||
<table cellpading="4" bgcolor=#ffffff> | <table cellpading="4" bgcolor=#ffffff> | ||
<tr valign="top"> | <tr valign="top"> | ||
| − | <td>[[ | + | <td>[[image:Bug.png|link=]]</td> |
| − | <td><span style="font-size: 17px;">'''Known Issues:'''</span><br> | + | <td><span style="font-size: 17px;">'''Known Issues:'''</span> This is an issue in '''T:ANE'''. It has been '''FIXED''' in '''TRS19''' and later versions.<br> |
| − | If a '''Repeat''' command is present in the ''Command Bar'' and all the other commands are then deleted, the '''Repeat''' command will remain in the ''Command Bar'' and cannot be removed. Because there are no other commands to be repeated this will not cause a problem. However when later adding new commands the presence of the '''Repeat''' command can be easily overlooked. | + | If a '''Repeat''' command is present in the '''Driver Command Bar''' and all the other commands are then deleted, the '''Repeat''' command will remain in the '''Driver Command Bar''' and cannot be removed. Because there are no other commands to be repeated this will not cause a problem. However when later adding new commands the presence of the '''Repeat''' command can be easily overlooked. |
| − | <table cellpadding= | + | <table cellpadding=4 bgcolor=#bbffbb width="640"> |
<tr valign="top"> | <tr valign="top"> | ||
| − | <td>[[ | + | <td>[[image:Spanner.PNG|link=]]</td> |
<td><span style="font-size: 17px;">'''Workaround:'''</span><br> | <td><span style="font-size: 17px;">'''Workaround:'''</span><br> | ||
| − | Add a command (any command) to the ''Command Bar''. The '''Don't Repeat''' option will then become available and the '''Repeat''' command can be removed.</td> | + | Add a command (any command) to the '''Driver Command Bar'''. The '''Don't Repeat''' option will then become available and the '''Repeat''' command can be removed.</td> |
</tr> | </tr> | ||
</table></td> | </table></td> | ||
| Line 436: | Line 751: | ||
</table> | </table> | ||
| − | <table> <!-- BEGIN Nav Buttons Table --> | + | <table width=1000> <!-- BEGIN Nav Buttons Table --> |
<tr valign="top"> | <tr valign="top"> | ||
| − | <td width= | + | <td width=629><span id="stepCopying"></span> |
| − | <td width=46>[[ | + | ='''Copying the Driver Setup Rule'''= |
| − | <td width=75>[[ | + | </td> |
| − | <td width=75>[[ | + | <td width=50> </td> <!-- skip Down --> |
| − | <td width=75>[[ | + | <td width=50>[[image:SkipUp.png|link=#skipRepeatCommand|Skip Up]]</td> <!-- skip Up --> |
| + | <td width=46>[[image:BackToTop.png|link=#top|alt=Top|Top]]</td> | ||
| + | <td width=75>[[image:NextUp.png|link=#stepSetup|alt=Next Up|Top]]</td> | ||
| + | <td width=75>[[image:NextDown.png|link=#stepCommand|alt=Next Down|Next Down]]</td> | ||
| + | <td width=75>[[image:BackToBottom.png|link=#bottom|alt=Bottom|Bottom]]</td> | ||
</tr> | </tr> | ||
</table> <!-- END Nav Buttons Table --> | </table> <!-- END Nav Buttons Table --> | ||
| − | + | <table width=1000 bgcolor="lightcyan" cellpadding=2> | |
| − | <table | + | |
<tr valign="top"> | <tr valign="top"> | ||
| − | <td>[[ | + | <td width=10>[[image:BlueDot10x10.png|link=]]</td> |
| − | <td>''' | + | <td>The '''Driver Setup Rule''' (and other rules) can be copied between Sessions</td> |
</tr> | </tr> | ||
</table> | </table> | ||
| − | <table cellpadding= | + | <br> |
| + | <table bgcolor=#000000 cellpadding=2> | ||
<tr valign="top"> | <tr valign="top"> | ||
| − | |||
<td> | <td> | ||
| − | <span style="font-weight: 700; | + | <table bgcolor=#ffffff cellpadding=2> |
| − | </td> | + | <tr valign="top"> |
| + | <td colspan=2><span style="font-weight: 700; font-size: 15px;">Steps:</span> To copy the '''Driver Setup Rule''' to other sessions:-</td> | ||
</tr> | </tr> | ||
| − | < | + | <tr valign="top"> |
| − | + | <td width=25>[[image:DotPoint1.JPG|link=]]</td> | |
| − | + | <td>in the '''Session Editor''' <span style="font-weight: 700; font-size: 15px; background-color: lightcyan;">Right Click</span> on the '''Driver Setup Rule'''</td> | |
| − | < | + | |
| − | <td | + | |
| − | + | ||
</tr> | </tr> | ||
<tr valign="top"> | <tr valign="top"> | ||
| − | <td>[[ | + | <td>[[image:DotPoint2.JPG|link=]]</td> |
| − | <td> | + | <td>select '''Copy''' from the popup menu</td> |
| − | + | ||
| − | + | ||
| − | + | ||
| − | + | ||
| − | + | ||
</tr> | </tr> | ||
| − | <tr> | + | <tr valign="top"> |
| − | <td | + | <td>[[image:DotPoint3.JPG|link=]]</td> |
| − | --- | + | <td>exit the Session</td> |
| + | </tr> | ||
| + | <tr valign="top"> | ||
| + | <td>[[image:DotPoint4.JPG|link=]]</td> | ||
| + | <td>load the second Session (where the Rule is to be copied to) into Surveyor and open the '''Session Editor'''</td> | ||
| + | </tr> | ||
| + | <tr valign="top"> | ||
| + | <td>[[image:DotPoint5.JPG|link=]]</td> | ||
| + | <td><span style="font-weight: 700; font-size: 15px; background-color: lightcyan;">Right Click</span> after the last rule entry and select '''Paste'''</td> | ||
| + | </tr> | ||
| + | </table> | ||
| + | </td> | ||
</tr> | </tr> | ||
</table> | </table> | ||
<br> | <br> | ||
| − | + | <table width=1000 bgcolor=#000000> | |
| − | <table | + | |
<tr valign="top"> | <tr valign="top"> | ||
| − | <td>[[ | + | <td> |
| + | <table bgcolor=#ffffb0> | ||
| + | <tr valign="top"> | ||
| + | <td>[[image:NotePad.PNG|link=]]</td> | ||
<td><span style="font-size: 17px; font-weight: 700;">Notes:'''</span><br> | <td><span style="font-size: 17px; font-weight: 700;">Notes:'''</span><br> | ||
| − | There are some conditions that must be met | + | ---- |
| + | There are some conditions that must be met before the copy between session will work:- | ||
<br> | <br> | ||
| − | <table cellpadding= | + | <table cellpadding=4> |
<tr valign="top"> | <tr valign="top"> | ||
| − | <td>[[ | + | <td width=25>[[image:DotPoint1Blue.png|link=]]</td> |
<td>'''Drivers, Driver Assignments and Driver Commands ONLY are Copied'''<br> | <td>'''Drivers, Driver Assignments and Driver Commands ONLY are Copied'''<br> | ||
Copying the '''Driver Setup Rule''' will '''NOT''' copy the actual locomotives and consists that the drivers are assigned to. These must be copied or recreated separately</td> | Copying the '''Driver Setup Rule''' will '''NOT''' copy the actual locomotives and consists that the drivers are assigned to. These must be copied or recreated separately</td> | ||
</tr> | </tr> | ||
<tr valign="top"> | <tr valign="top"> | ||
| − | <td>[[ | + | <td>[[image:DotPoint2Blue.png|link=]]</td> |
<td>'''No Duplicate Locos Allowed''' - this is only an issue if you keep both the original and the copied '''Driver Setup Rule''' in the Session<br> | <td>'''No Duplicate Locos Allowed''' - this is only an issue if you keep both the original and the copied '''Driver Setup Rule''' in the Session<br> | ||
If the same loco is present in both '''Driver Setup Rules''' then only the first loco (in the top copy of the rule) will be active. The duplicate loco in the second copy of the rule will be ignored</td> | If the same loco is present in both '''Driver Setup Rules''' then only the first loco (in the top copy of the rule) will be active. The duplicate loco in the second copy of the rule will be ignored</td> | ||
</tr> | </tr> | ||
<tr valign="top"> | <tr valign="top"> | ||
| − | <td>[[ | + | <td>[[image:DotPoint3Blue.png|link=]]</td> |
<td>'''Missing Locos will be Ignored'''<br> | <td>'''Missing Locos will be Ignored'''<br> | ||
| − | If a loco is listed in the copied '''Driver Setup Rule''' but does not exist in the new Session because it was not copied across then it will be ignored</td> | + | If a loco is listed in the copied '''Driver Setup Rule''' but does not exist in the new Session because it was not copied across then it will be ignored |
| + | </td> | ||
</tr> | </tr> | ||
| − | </table></td> | + | </table> |
| + | </td> | ||
</tr> | </tr> | ||
</table> | </table> | ||
| − | <table> <!-- BEGIN Nav Buttons Table --> | + | </td> |
| + | </tr> | ||
| + | </table> | ||
| + | <br> | ||
| + | <table width=1000> <!-- BEGIN Nav Buttons Table --> | ||
<tr valign="top"> | <tr valign="top"> | ||
| − | <td width= | + | <td width=629><span id="stepCommand"></span> |
| − | <td width=46>[[ | + | ='''Driver Command Rule'''= |
| − | <td width=75>[[ | + | </td> |
| − | <td width=75> | + | <td width=50> </td> <!-- Skip Down --> |
| − | <td width=75>[[ | + | <td width=50> </td> <!-- Skip Up --> |
| + | <td width=46>[[image:BackToTop.png|link=#top|alt=Top|Top]]</td> | ||
| + | <td width=75>[[image:NextUp.png|link=#stepCopying|alt=Next Up|Top]]</td> | ||
| + | <td width=75> </td> | ||
| + | <td width=75>[[image:BackToBottom.png|link=#bottom|alt=Bottom|Bottom]]</td> | ||
</tr> | </tr> | ||
</table> <!-- END Nav Buttons Table --> | </table> <!-- END Nav Buttons Table --> | ||
| − | + | <table width=1000 bgcolor="lightcyan" cellpadding=2> | |
| − | <table | + | |
<tr valign="top"> | <tr valign="top"> | ||
| − | <td | + | <td width=10>[[image:BlueDot10x10.png|link=]]</td> |
| − | < | + | <td>The '''[[image:WikiLink.PNG|link=]] [[Session Rule List with Parameters#Driver Command Rule|Driver Command Rule]]''' controls which '''Driver Commands''' will be available to a user. This applies to both:- |
| + | <table> | ||
<tr valign="top"> | <tr valign="top"> | ||
| − | <td>[[ | + | <td width=10>[[image:BlueDot10x10.png|link=]]</td> |
| − | <td> | + | <td>commands added to the [[image:PageLink.PNG|link=]] '''[[#Driver Setup Rule|Driver Setup Rule]]''' in the [[image:WikiLink.PNG|link=]] '''[[How to Use Session Editor|Session Editor]]''' in '''Surveyor''', and</td> |
| − | + | ||
| − | + | ||
</tr> | </tr> | ||
<tr valign="top"> | <tr valign="top"> | ||
| − | <td>[[ | + | <td>[[image:BlueDot10x10.png|link=]]</td> |
| − | <td> | + | <td>commands for the user to manually add to the '''Driver Command Bar''' of user and AI controlled trains running in '''Driver'''</td> |
| + | </tr> | ||
| + | </table> | ||
| + | </td> | ||
</tr> | </tr> | ||
</table> | </table> | ||
<br> | <br> | ||
| − | The [[ | + | The [[image:WikiLink.PNG|link=]] '''[[Session Rule List with Parameters#Driver Command Rule|Driver Command Rule]]''' is automatically added to the Session Editor of every Session. |
<br> | <br> | ||
| − | + | <table width=1000> | |
| − | <table> | + | |
<tr valign="top"> | <tr valign="top"> | ||
| − | <td>[[ | + | <td>[[image:EditSessionWindow.JPG|480px|link=]]</td> |
<td> | <td> | ||
| − | <table | + | <table bgcolor=#000000 cellpadding=2> |
<tr valign="top"> | <tr valign="top"> | ||
| − | <td>[[ | + | <td> |
| − | <td><span style="font-size: | + | <table bgcolor=#ffffff cellpadding=2> |
| − | + | <tr valign="top"> | |
| − | + | <td colspan=2><span style="font-weight: 700; font-size: 15px;">Steps:</span> To edit the '''Driver Command Rule''':-</td> | |
| + | </tr> | ||
| + | <tr valign="top"> | ||
| + | <td width=25>[[image:DotPoint1.JPG|link=]]</td> | ||
| + | <td>Select (<span style="font-weight: 700; font-size: 15px; background-color: lightcyan;">Left Click</span>) the '''Driver Command Rule''' shown left (it is usually near the top of the list)</td> | ||
| + | </tr> | ||
| + | <tr valign="top"> | ||
| + | <td>[[image:DotPoint2.JPG|link=]]</td> | ||
| + | <td><span style="font-weight: 700; font-size: 15px; background-color: lightcyan;">Left Click</span> the <span style="font-weight: 700; font-size: 15px; color: white; background-color: black;"> Edit </span> button at the bottom of the Session Editor window</td> | ||
| + | </tr> | ||
| + | </table> | ||
| + | </td> | ||
</tr> | </tr> | ||
</table> | </table> | ||
<br> | <br> | ||
| − | <table | + | <table bgcolor=#ff0000> |
<tr valign="top"> | <tr valign="top"> | ||
| − | <td>[[ | + | <td> |
| + | <table bgcolor=#fcbcbc> | ||
| + | <tr valign="top"> | ||
| + | <td>[[image:Stop.PNG|link=]]</td> | ||
<td>If the '''Driver Command Rule''' is not shown in the list then... | <td>If the '''Driver Command Rule''' is not shown in the list then... | ||
| − | # | + | <table bgcolor=#ffffff cellpadding=2> |
| − | + | <tr valign="top"> | |
| − | + | <td colspan=2><span style="font-weight: 700; font-size: 15px;">Steps:</span> To add the '''Driver Command Rule''':-</td> | |
| + | </tr> | ||
| + | <tr valign="top"> | ||
| + | <td width=25>[[image:DotPoint1.JPG|link=]]</td> | ||
| + | <td><span style="font-weight: 700; font-size: 15px; background-color: lightcyan;">Left Click</span> the <span style="font-weight: 700; font-size: 15px; color: white; background-color: black;"> Add </span> button at the bottom of the '''Session Editor''' window</td> | ||
| + | </tr> | ||
| + | <tr valign="top"> | ||
| + | <td>[[image:DotPoint2.JPG|link=]]</td> | ||
| + | <td>Scroll through the list of rules to locate and select the '''Driver Command Rule'''</td> | ||
| + | </tr> | ||
| + | <tr valign="top"> | ||
| + | <td>[[image:DotPoint3.JPG|link=]]</td> | ||
| + | <td><span style="font-weight: 700; font-size: 15px; background-color: lightcyan;">Left Click</span> the [[image:Tick.PNG|link=]] icon on the rule list window</td> | ||
| + | </tr> | ||
| + | </table> | ||
This will add the rule to the Session Editor.</td> | This will add the rule to the Session Editor.</td> | ||
</tr> | </tr> | ||
| − | </table></td> | + | </table> |
| + | </td> | ||
| + | </tr> | ||
| + | </table> | ||
| + | </td> | ||
</tr> | </tr> | ||
</table> | </table> | ||
<br> | <br> | ||
| − | + | <table width=1000> | |
| − | <table> | + | |
<tr valign="top"> | <tr valign="top"> | ||
| − | |||
<td> | <td> | ||
| − | <table | + | The Rule properties window will open to show all the ''Driver Commands'' that have been installed in '''Trainz''' on your system. This list includes the commands that are built in and those that have been downloaded from the DLS.</td> |
| + | </tr> | ||
| + | </table> | ||
| + | <br> | ||
| + | <table width=1000> | ||
| + | <tr valign="top"> | ||
| + | <td width=500>[[image:DriverCommandAddCommand.JPG|500px|link=]]</td> | ||
| + | <td> | ||
| + | <table cellpadding=4 bgcolor=#eeeeee> | ||
<tr> | <tr> | ||
<td colspan="2"> | <td colspan="2"> | ||
| Line 575: | Line 948: | ||
</tr> | </tr> | ||
<tr valign="top"> | <tr valign="top"> | ||
| − | <td>[[ | + | <td>[[image:Gears.PNG|link=]]</td> |
| − | <td><span style="font-size: 17px;">'''Settings:'''</span>< | + | <td><span style="font-size: 17px;">'''Settings:'''</span> |
| − | + | <table> | |
| − | + | <tr valign="top"> | |
| − | + | <td width=10>[[image:BlackDot10x10.png|link=]]</td> | |
| + | <td>Commands that are [[image:CheckBox.PNG|link=]] '''Checked ON''' will be available in the '''Driver Setup Rule''' Command List in the Session Editor and for the user in '''Driver'''</td> | ||
| + | </tr> | ||
| + | <tr valign="top"> | ||
| + | <td>[[image:BlackDot10x10.png|link=]]</td> | ||
| + | <td>Commands that are [[image:CheckBoxOff.PNG|link=]] '''Checked OFF''' will '''NOT''' be available in the '''Driver Setup Rule''' Command List in the Session Editor and for the user in '''Driver'''</td> | ||
| + | </tr> | ||
| + | <tr valign="top"> | ||
| + | <td>[[image:BlackDot10x10.png|link=]]</td> | ||
| + | <td>To change the status of a command simply check it '''ON''' or '''OFF'''</td> | ||
| + | </tr> | ||
| + | </table> | ||
| + | </td> | ||
</tr> | </tr> | ||
<tr> | <tr> | ||
| Line 587: | Line 972: | ||
</table> | </table> | ||
<br> | <br> | ||
| − | <table | + | <table bgcolor=#000000 cellpadding=2> |
<tr valign="top"> | <tr valign="top"> | ||
| − | <td>[[ | + | <td> |
| − | <td> | + | <table bgcolor=#ffffe0 cellpadding=2> |
| − | + | <tr valign="top"> | |
| + | <td>[[image:PencilTips.PNG|link=]]</td> | ||
| + | <td>Removing '''Driver Commands''' such as '''Navigate''' and '''Drive''' will force players to manually drive trains when in '''Driver''' instead of allowing them to use the AI system to do all the work</td> | ||
| + | </tr> | ||
| + | </table> | ||
</td> | </td> | ||
</tr> | </tr> | ||
</table> | </table> | ||
| − | <table | + | </td> |
| + | </tr> | ||
| + | </table> | ||
| + | <br> | ||
| + | <table width=1000 bgcolor=#000000 cellpadding=2> | ||
<tr valign="top"> | <tr valign="top"> | ||
| − | |||
<td> | <td> | ||
| − | + | <table width=996 bgcolor=#ffffb0 cellpadding=2> | |
| + | <tr valign="top"> | ||
| + | <td width=25>[[image:NotePad.PNG|link=]]</td> | ||
| + | <td><span style="font-size: 17px;">'''Notes:'''</span><br> | ||
| + | ---- | ||
| + | </td> | ||
</tr> | </tr> | ||
| − | </table></td> | + | <tr valign="top"> |
| + | <td>[[image:DotPoint.JPG|10px|link=]]</td> | ||
| + | <td>If a command that you want to use does not appear in the list, then check in '''Content Manager''' that it has been installed and is free of errors</td> | ||
| + | </tr> | ||
| + | <tr valign="top"> | ||
| + | <td>[[image:DotPoint.JPG|10px|link=]]</td> | ||
| + | <td>In '''T:ANE''' some Driver Commands that have been checked '''ON''' will not appear in the '''Driver Command Bar''' if there is no target for their action. For example, no set trackmarks or interactive industries for the '''Drive To''' command</td> | ||
| + | </tr> | ||
| + | </table> | ||
| + | </td> | ||
</tr> | </tr> | ||
</table> | </table> | ||
<br> | <br> | ||
| − | <table> <!-- BEGIN Nav Buttons Table --> | + | <table width=1000> <!-- BEGIN Nav Buttons Table --> |
<tr valign="top"> | <tr valign="top"> | ||
| − | <td width= | + | <td width=629><span id="bottom"></span> </td> |
| − | <td width=46>[[ | + | <td width=50> </td> <!-- Skip Down --> |
| − | <td width=75>[[ | + | <td width=50> </td> <!-- Skip Up --> |
| + | <td width=46>[[image:BackToTop.png|link=#top|alt=Top|Top]]</td> | ||
| + | <td width=75>[[image:NextUp.png|link=#stepCommand|alt=Next Up|Top]]</td> | ||
<td width=75> </td> | <td width=75> </td> | ||
<td width=75> </td> | <td width=75> </td> | ||
| Line 618: | Line 1,026: | ||
='''Trainz Wiki'''= | ='''Trainz Wiki'''= | ||
| − | <table | + | <table width=1000> |
<tr valign="top"> | <tr valign="top"> | ||
| − | <td>[[ | + | <td> |
| + | <table width=500 cellpadding=2 bgcolor=#ffffff> | ||
| + | <tr valign="top"> | ||
| + | <td width=80>[[image:TrainzWiki.png|link=]]</td> | ||
<td> | <td> | ||
<span style="font-size: 17px;">'''More Tutorials and Guides to Using Trainz'''</span><br> | <span style="font-size: 17px;">'''More Tutorials and Guides to Using Trainz'''</span><br> | ||
| Line 627: | Line 1,038: | ||
*'''[[Session Rule List with Parameters|Session Rules List (Alphabetical) with Parameters]]''' | *'''[[Session Rule List with Parameters|Session Rules List (Alphabetical) with Parameters]]''' | ||
*'''[[Session Rules By Categories With Properties|Session Rules List (Categories) With Parameters]]''' | *'''[[Session Rules By Categories With Properties|Session Rules List (Categories) With Parameters]]''' | ||
| + | </td> | ||
| + | </tr> | ||
| + | </table> | ||
| + | </td> | ||
| + | <td> | ||
| + | <table width=500 cellpadding=4 bgcolor="aquamarine"> | ||
| + | <tr valign="top"> | ||
| + | <td width=50>[[image:LinkWiki.PNG|link=]]</td> | ||
| + | <td> | ||
| + | <span style="font-size: 17px;">'''Related Links'''</span><br> | ||
| + | * '''[[How to Use Session Editor|Using the Session Editor]]''' | ||
| + | </td> | ||
| + | </tr> | ||
| + | </table> | ||
</td> | </td> | ||
</tr> | </tr> | ||
Latest revision as of 20:34, 22 November 2023
The information in this Wiki Page applies to T:ANE, TRS19, Trainz Plus and TRS22.
|
|
[edit] Driver Setup Rule |
 |
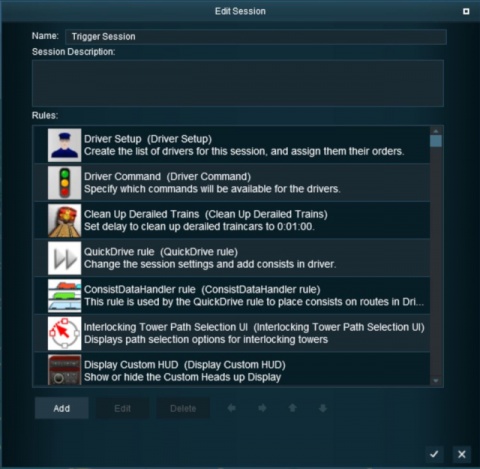
A list of available Driver Commands can be found on the Trainz Wiki Page at:- |
The ![]() Driver Setup Rule is automatically added to the Session Editor of every Session.
Driver Setup Rule is automatically added to the Session Editor of every Session.
 |
|
||||||||||||||||||||||
[edit] Adding New Drivers |
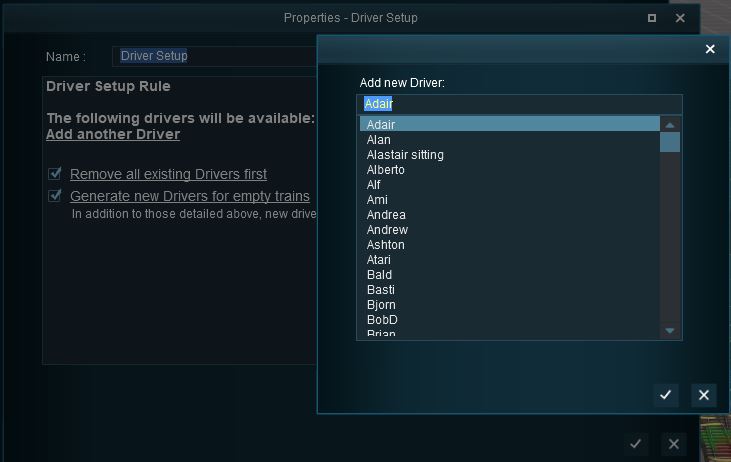
| After opening the Driver Setup Rule Left Click the link:-
The image on the right shows the properties window if it is opened with no drivers placed in the layout. This will open the Add New Driver window. Select a driver from the list and Left Click the Tick button. |
 |
| Timeout Problem in T:ANE This is an issue in T:ANE. It has been FIXED in TRS19 and later versions.
|
[edit] Remove Existing Drivers First
| After selecting the Driver Setup Rule Left Click the Edit button, the Driver Setup Properties Window will be shown. The image below shows the properties window if it is opened with no drivers placed in the layout. |
 |
|
|||||||||||||
|
[edit] Generate New Drivers for Empty Trains
![]()
|
|
|||||||||||||
[edit] Wait For Schedule Completion

|
|
|||||
Settings:
|
|||||
|
|
|||||
[edit] Focus Camera on First Driver

|
|
|||||
Settings:
|
|||||
|
|
|||||
[edit] Editing the Driver List |
When drivers and trains have been added to the rule, it will appear as shown below.
 |
|
|
||||||||||||||||||||||||
[edit] Adding Driver Commands |
| The grey area below the driver details (name, loco, owner) is the Driver Command Bar. This is where the driving instructions (the "train orders") used by the Trainz AI system are given to the driver. |
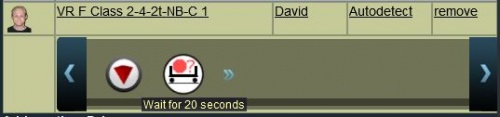
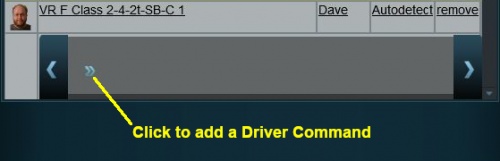 Shown below is a Driver Command Bar after two driver commands have been added. Each command has its own icon. Move the mouse pointer onto a command icon to reveal a tooltip showing the contents of the command, as shown in the image. |
|
||||||||||||||||||||||
|
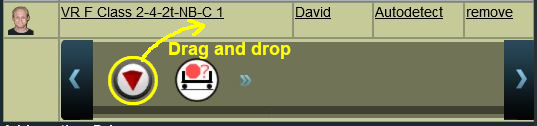
[edit] Deleting Driver Commands |
To remove a command from the Driver Command Bar...
 |
|
|||||
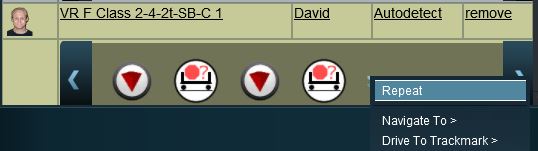
[edit] The "Repeat" Command |
| The Repeat command is a special built in Driver Command that allows ALL the driver commands to be repeated endlessly |
 |
|
||||||||||
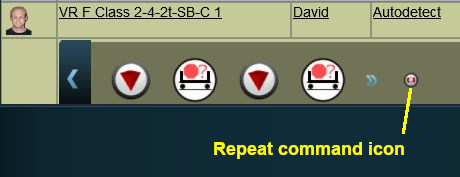 |
|
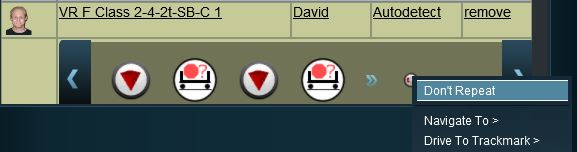 |
|
|
[edit] Copying the Driver Setup Rule |
| The Driver Setup Rule (and other rules) can be copied between Sessions |
|
||||||||||||
|
[edit] Driver Command Rule |
The
|
The ![]() Driver Command Rule is automatically added to the Session Editor of every Session.
Driver Command Rule is automatically added to the Session Editor of every Session.
|
|
||||||||||||||||||
| The Rule properties window will open to show all the Driver Commands that have been installed in Trainz on your system. This list includes the commands that are built in and those that have been downloaded from the DLS. |
 |
|
|||||||||||||||
|
[edit] Trainz Wiki
|
|

This page was created by Trainz user pware in June 2018 and was last updated as shown below.