How to Create a Message Popup Icon
m |
m (→Trainz Wiki) |
||
| (69 intermediate revisions by one user not shown) | |||
| Line 1: | Line 1: | ||
| − | The information in this Wiki Page applies to | + | The information in this Wiki Page applies to '''TANE''', '''TRS19''', '''Trainz Plus''' and '''TRS22'''. |
| + | <table width=1000> <!-- BEGIN Nav Buttons Table NO SKIPS --> | ||
| + | <tr valign="top"> | ||
| + | <td width=629> </td> | ||
| + | <td width=50> </td> <!-- Skip Down --> | ||
| + | <td width=50> </td> <!-- Skip Up --> | ||
| + | <td width=46> </td> | ||
| + | <td width=75> </td> | ||
| + | <td width=75>[[image:NextDown.png|link=#stepMessage|alt=Next Down|Next Down]]</td> | ||
| + | <td width=75>[[image:BackToBottom.png|link=#bottom|alt=Bottom|Bottom]]</td> | ||
| + | </tr> | ||
| + | </table> <!-- END Nav Buttons Table --> | ||
| + | <table> | ||
| + | <tr valign="top"> | ||
| + | <td> | ||
__TOC__ | __TOC__ | ||
| − | = | + | </td> |
| + | <td align="center"><span style="font-weight: 700; font-size: 17px; color: white; background-color: black;"> Workflow Diagram </span><br> | ||
| + | [[image:PopupIconWorkflow.png|link=|alt=Workflow diagram]]</td> | ||
| + | </tr> | ||
| + | </table> | ||
| − | '''Message Popup Icons''' | + | <table width=1000> <!-- BEGIN Nav Buttons Table NO SKIPS --> |
| + | <tr valign="top"> | ||
| + | <td width=629><span id="stepMessage"></span> | ||
| + | ='''Message Popup Icons'''= | ||
| + | </td> | ||
| + | <td width=50> </td> <!-- Skip Down --> | ||
| + | <td width=50> </td> <!-- Skip Up --> | ||
| + | <td width=46>[[image:BackToTop.png|link=#top|alt=Top|Top]]</td> | ||
| + | <td width=75></td> | ||
| + | <td width=75>[[image:NextDown.png|link=#stepCreate|alt=Next Down|Next Down]]</td> | ||
| + | <td width=75>[[image:BackToBottom.png|link=#bottom|alt=Bottom|Bottom]]</td> | ||
| + | </tr> | ||
| + | </table> <!-- END Nav Buttons Table --> | ||
| − | <table | + | <table width=1000 bgcolor="lightcyan" cellpadding=2> |
<tr valign="top"> | <tr valign="top"> | ||
| − | <td>[[ | + | <td width=10>[[image:BlueDot10x10.png|link=]]</td> |
| − | <td> | + | <td>'''Message Popup Icons''' are small graphic icons that can be placed in browser message windows in Driver mode. The browser windows are created by the '''Message Popup Rule'''</td> |
| + | </tr> | ||
| + | <tr valign="top"> | ||
| + | <td>[[image:BlueDot10x10.png|link=]]</td> | ||
| + | <td>'''Message Popup Icons''' are classified as '''Non-Environmental Textures'''</td> | ||
</tr> | </tr> | ||
</table> | </table> | ||
| − | |||
| − | |||
| − | |||
| − | |||
| − | |||
| − | |||
<br> | <br> | ||
| + | <table cellpadding=4 bgcolor="Aquamarine"> | ||
| + | <tr valign="top"> | ||
| + | <td>[[file:LinkWiki.PNG|link=]]</td> | ||
| + | <td>Information on creating and using '''Message Popups''' can be found on the '''Trainz Wiki pages''' at:- | ||
| + | <table> | ||
| + | <tr valign="top"> | ||
| + | <td width=10>[[image:BlueDot10x10.png|link=]]</td> | ||
| + | <td>'''[[How to Use Message Popup Rule|Using the Message Popup Rule]]'''</td> | ||
| + | </tr> | ||
| + | <tr valign="top"> | ||
| + | <td>[[image:BlueDot10x10.png|link=]]</td> | ||
| + | <td>'''[[How to Use Message Popup Rule (Applications)|Using the Message Popup Rule (Applications)]]'''</td> | ||
| + | </tr> | ||
| + | <tr valign="top"> | ||
| + | <td>[[image:BlueDot10x10.png|link=]]</td> | ||
| + | <td>'''[[How to Create a HTML Asset|How to Create a HTML Asset]]'''</td> | ||
| + | </tr> | ||
| + | <tr valign="top"> | ||
| + | <td>[[image:BlueDot10x10.png|link=]]</td> | ||
| + | <td>'''[[Session Rule List with Parameters#Message Popup Rule|Message Popup Rule (description)]]'''</td> | ||
| + | </tr> | ||
| + | </table> | ||
| + | </td> | ||
| + | </tr> | ||
| + | </table> | ||
| + | <br> | ||
| + | <table width=1000> <!-- BEGIN Nav Buttons Table NO SKIPS --> | ||
| + | <tr valign="top"> | ||
| + | <td width=629><span id="stepCreate"></span> | ||
| + | ='''Create a Non-Environmental Texture Asset'''= | ||
| + | </td> | ||
| + | <td width=50> </td> <!-- Skip Down --> | ||
| + | <td width=50> </td> <!-- Skip Up --> | ||
| + | <td width=46>[[image:BackToTop.png|link=#top|alt=Top|Top]]</td> | ||
| + | <td width=75>[[image:NextUp.png|link=#stepMessage|alt=Next Up|Next Up]]</td> | ||
| + | <td width=75>[[image:NextDown.png|link=#stepConfig|alt=Next Down|Next Down]]</td> | ||
| + | <td width=75>[[image:BackToBottom.png|link=#bottom|alt=Bottom|Bottom]]</td> | ||
| + | </tr> | ||
| + | </table> <!-- END Nav Buttons Table --> | ||
| − | = | + | <table width=1000> <!-- BEGIN Step table --> |
| − | + | <tr valign="top"> | |
| − | <table cellpadding=" | + | <td width=50><span style="font-weight: 700; font-size: 15px;">Steps:</span></td> |
| + | <td>[[image:DotPoint1.JPG|link=]] <span style="font-size: 17px; font-weight: 700;">Create the Asset:</span><br> | ||
| + | <table> <!-- BEGIN Step 1 table --> | ||
| + | <tr valign="top"> | ||
| + | <td>[[image:NewAsset.PNG|link=]]<br><br> | ||
| + | [[image:NewAssetCreated.PNG|link=]]</td> | ||
| + | <td> | ||
| + | <table bgcolor=#000000 cellpadding=2> | ||
| + | <tr valign="top"> | ||
| + | <td> | ||
| + | <table bgcolor=#ffffff cellpadding=2> | ||
| + | <tr valign="top"> | ||
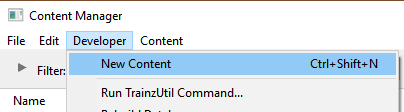
| + | <td colspan=2><span style="font-weight: 700; font-size: 15px;">Steps:</span> From the '''Trainz Launcher''':-</td> | ||
| + | </tr> | ||
| + | <tr valign="top"> | ||
| + | <td><span style="font-weight: 700; font-size: 15px; color: white; background-color: blue;"> 1 </span></td> | ||
| + | <td>select <span style="color: white; background-color: black; font-weight: 700; font-size: 15px;"> Manage Content </span></td> | ||
| + | </tr> | ||
| + | <tr valign="top"> | ||
| + | <td><span style="font-weight: 700; font-size: 15px; color: white; background-color: blue;"> 2 </span></td> | ||
| + | <td>in '''Content Manager''' open the <span style="font-weight: 700; font-size: 15px; color: white; background-color: blue;"> Developer </span> menu</td> | ||
| + | </tr> | ||
<tr valign="top"> | <tr valign="top"> | ||
| − | <td> | + | <td><span style="font-weight: 700; font-size: 15px; color: white; background-color: blue;"> 3 </span></td> |
| − | <td>< | + | <td>select <span style="font-weight: 700; font-size: 15px; color: white; background-color: blue;"> New Content </span> |
<table> | <table> | ||
<tr valign="top"> | <tr valign="top"> | ||
| − | <td>[[ | + | <td width=10>[[image:DotPoint.JPG|10px|link=]]</td> |
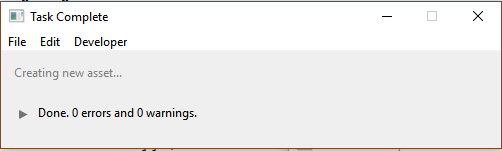
| − | + | <td>This will create a new asset and open it for editing.</td> | |
| − | <td> | + | </tr> |
| − | + | <tr valign="top"> | |
| − | + | <td>[[image:DotPoint.JPG|10px|link=]]</td> | |
| − | + | <td>A message window will appear that will (hopefully) report on the successful creation of a new asset</td> | |
| − | This will create a new asset and open it for editing. | + | </tr> |
| − | < | + | </table> |
| − | A message window will appear that will (hopefully) report on the successful creation of a new asset | + | |
| − | + | ||
</td> | </td> | ||
</tr> | </tr> | ||
| − | </ | + | <tr valign="top"> |
| + | <td><span style="font-weight: 700; font-size: 15px; color: white; background-color: blue;"> 4 </span></td> | ||
| + | <td>Close the message window</td> | ||
</tr> | </tr> | ||
</table> | </table> | ||
| + | </td> | ||
| + | </tr> | ||
| + | </table> | ||
| + | </td> | ||
| + | </tr> | ||
| + | </table> | ||
| + | </td> | ||
| + | </tr> | ||
| + | </table> <!-- END Step 1 table --> | ||
<br> | <br> | ||
| − | <table cellpadding=" | + | <table width=1000> <!-- BEGIN Step 2 table --> |
| + | <tr valign="top"> | ||
| + | <td width=50> </td> | ||
| + | <td>[[image:DotPoint2.JPG|link=]] <span style="font-size: 17px; font-weight: 700;">Find the New Asset:</span><br> | ||
| + | <table> | ||
| + | <tr valign="top"> | ||
| + | <td>[[image:NewAssetSelectOpen.PNG|link=]]</td> | ||
| + | <td> | ||
| + | <table bgcolor=#000000 cellpadding=2> | ||
| + | <tr valign="top"> | ||
| + | <td> | ||
| + | <table bgcolor=#ffffff cellpadding=2> | ||
| + | <tr valign="top"> | ||
| + | <td><span style="font-weight: 700; font-size: 15px; color: white; background-color: blue;"> 5 </span></td> | ||
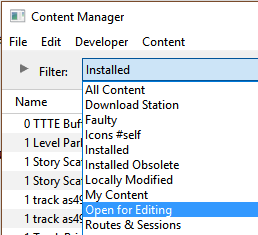
| + | <td>Set the '''Content Manager''' Search Filter to <span style="font-weight: 700; font-size: 15px; color: white; background-color: blue;"> Open for Editing </span></td> | ||
| + | </tr> | ||
<tr> | <tr> | ||
| − | <td colspan= | + | <td colspan=2>This will display only those assets that have been opened for editing (hopefully only your new and as yet unnamed asset will be shown)</td> |
| − | + | ||
</tr> | </tr> | ||
| + | </table> | ||
| + | </td> | ||
| + | </tr> | ||
| + | </table> | ||
| + | </td> | ||
| + | </tr> | ||
| + | </table> | ||
| + | </td> | ||
| + | </tr> | ||
| + | </table> <!-- END Step 2 table --> | ||
| + | <br> | ||
| + | <table width=1000> <!-- BEGIN Step 3 table --> | ||
<tr valign="top"> | <tr valign="top"> | ||
| − | <td> | + | <td width=50> </td> |
| − | <td><font size | + | <td>[[image:DotPoint3.JPG|link=]] <span style="font-size: 17px; font-weight: 700;">Open the Asset in Windows File Explorer:</span><br> |
<table> | <table> | ||
<tr valign="top"> | <tr valign="top"> | ||
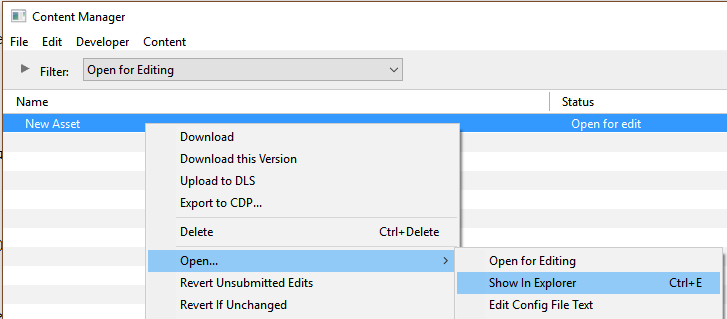
| − | <td>[[ | + | <td>[[image:NewAssetShowExplorer.PNG|link=]]</td> |
<td> | <td> | ||
| − | + | <table bgcolor=#000000 cellpadding=2> | |
| − | + | <tr valign="top"> | |
| + | <td> | ||
| + | <table bgcolor=#ffffff cellpadding=2> | ||
| + | <tr valign="top"> | ||
| + | <td><span style="font-weight: 700; font-size: 15px; color: white; background-color: blue;"> 6 </span></td> | ||
| + | <td><span style="font-weight: 700; font-size: 15px; background-color: lightcyan;">Right Click</span> on the entry '''New Asset'''</td> | ||
| + | </tr> | ||
| + | <tr valign="top"> | ||
| + | <td><span style="font-weight: 700; font-size: 15px; color: white; background-color: blue;"> 7 </span></td> | ||
| + | <td>Select <span style="font-weight: 700; font-size: 15px; color: white; background-color: blue;">Open...</span></td> | ||
| + | </tr> | ||
| + | <tr valign="top"> | ||
| + | <td><span style="font-weight: 700; font-size: 15px; color: white; background-color: blue;"> 8 </span></td> | ||
| + | <td>Select <span style="font-weight: 700; font-size: 15px; color: white; background-color: blue;">Show in Explorer</span></td> | ||
| + | </tr> | ||
| + | </table> | ||
</td> | </td> | ||
</tr> | </tr> | ||
| − | </table></td> | + | </table> |
| + | </td> | ||
| + | </tr> | ||
| + | </table> <!-- END Step 3 table --> | ||
| + | </td> | ||
</tr> | </tr> | ||
</table> | </table> | ||
<br> | <br> | ||
| − | <table | + | <table width=1000> <!-- BEGIN Step 4 table --> |
| − | < | + | |
| − | + | ||
| − | ---- | + | |
| − | + | ||
<tr valign="top"> | <tr valign="top"> | ||
| − | <td> | + | <td width=50> </td> |
| − | <td><font size | + | <td>[[image:DotPoint4.JPG|link=]] <span style="font-size: 17px; font-weight: 700;">Open Config.txt File in Notepad:</span> |
| − | <table> | + | <table> <!-- BEGIN Step 4 table --> |
<tr valign="top"> | <tr valign="top"> | ||
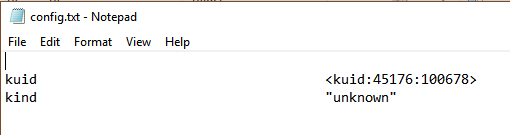
| − | <td>[[ | + | <td>[[image:NewAssetOpenExplorer.PNG|link=]]</td> |
<td> | <td> | ||
| − | # | + | <table bgcolor=#000000 cellpadding=2> |
| − | # | + | <tr valign="top"> |
| − | # | + | <td> |
| + | <table bgcolor=#ffffff cellpadding=2> | ||
| + | <tr valign="top"> | ||
| + | <td colspan=2>There will only be a single item in the asset, its config.txt file</td> | ||
| + | </tr> | ||
| + | <tr valign="top"> | ||
| + | <td><span style="font-weight: 700; font-size: 15px; color: white; background-color: blue;"> 9 </span></td> | ||
| + | <td><span style="font-weight: 700; font-size: 15px; background-color: lightcyan;">Double Left Click</span> on the file to open it in '''Notepad'''</td> | ||
| + | </tr> | ||
| + | </table> | ||
</td> | </td> | ||
</tr> | </tr> | ||
| − | </table></td> | + | </table> |
| + | </td> | ||
</tr> | </tr> | ||
</table> | </table> | ||
| + | </td> | ||
| + | </tr> | ||
| + | </table> <!-- END Step 4 table --> | ||
<br> | <br> | ||
| − | <table cellpadding=" | + | <table width=1000> <!-- BEGIN Step 5 table --> |
| − | <tr> | + | <tr valign="top"> |
| − | <td colspan= | + | <td width=50> </td> |
| − | + | <td>[[image:DotPoint5.JPG|link=]] <span style="font-size: 17px; font-weight: 700;">Edit the Config.txt File:</span><br> | |
| + | <table> <!-- BEGIN Step 5 table --> | ||
| + | <tr valign="top"> | ||
| + | <td>[[image:NewAssetOpenNotepad.PNG|link=]]</td> | ||
| + | <td> | ||
| + | <table bgcolor=#000000 cellpadding=2> | ||
| + | <tr valign="top"> | ||
| + | <td> | ||
| + | <table bgcolor=#ffffff cellpadding=2> | ||
| + | <tr valign="top"> | ||
| + | <td colspan=2>You will need to edit the contents of this file.</td> | ||
</tr> | </tr> | ||
<tr valign="top"> | <tr valign="top"> | ||
| − | <td> | + | <td><span style="font-weight: 700; font-size: 15px; color: white; background-color: blue;"> 10 </span></td> |
| − | <td> | + | <td>The next section, [[image:PageLink.PNG|link=]] '''[[#The Config.txt File|The Config.txt File]]''', identifies the changes you will need to make. The new name you give to the asset will not take effect until '''after''' it has been '''Submitted'''</td> |
| − | < | + | </tr> |
<tr valign="top"> | <tr valign="top"> | ||
| − | <td> | + | <td><span style="font-weight: 700; font-size: 15px; color: white; background-color: blue;"> 11 </span></td> |
| − | <td> | + | <td>After editing, save the changes and exit '''Notepad'''</td> |
| − | + | ||
</tr> | </tr> | ||
| − | </table></td> | + | </table> |
| + | </td> | ||
</tr> | </tr> | ||
</table> | </table> | ||
| + | </td> | ||
| + | </tr> | ||
| + | </table> | ||
| + | </td> | ||
| + | </tr> | ||
| + | </table> <!-- END Step 5 table --> | ||
<br> | <br> | ||
| − | <table | + | <table width=1000> <!-- BEGIN Step 5 Warning table --> |
| − | <tr> | + | <tr valign="top"> |
| − | <td | + | <td width=50> </td> |
| − | ----</td> | + | <td> |
| + | <table bgcolor=#ff0000> <!-- BEGIN Step 5 warning table --> | ||
| + | <tr valign="top"> | ||
| + | <td> | ||
| + | <table bgcolor=#fcbcbc> | ||
| + | <tr valign="top"> <!-- warning --> | ||
| + | <td colspan=2><span style="font-size: 17px;"><b>Warning:</b></span></td> | ||
</tr> | </tr> | ||
<tr valign="top"> | <tr valign="top"> | ||
| − | <td>[[ | + | <td>[[image:Stop.PNG|link=]]</td> |
| − | <td><font size | + | <td>Unless you know '''exactly''' what you are doing'''*''', <span style="color: white; background-color: red; font-weight: 700; font-size: 17px;"> DO NOT ALTER THE KUID NUMBER </span> that has been added to the file<br> |
| + | '''*''' but even if you do, think <span style="font-weight: 700; text-decoration: underline">twice</span> before you change it ! | ||
| + | </td> | ||
| + | </tr> | ||
| + | </table> | ||
| + | </td> | ||
| + | </tr> | ||
| + | </table> | ||
| + | </td> | ||
| + | </tr> | ||
| + | </table> <!-- END Step 5 warning table --> | ||
| + | <br> | ||
| + | <table width=1000> <!-- BEGIN Step 6 table --> | ||
| + | <tr valign="top"> | ||
| + | <td width=50> </td> | ||
| + | <td>[[image:DotPoint6.JPG|link=]] <span style="font-size: 17px; font-weight: 700;">Add Any Extras:</span><br> | ||
| + | <table> | ||
| + | <tr valign="top"> | ||
| + | <td colspan=2> | ||
| + | <table bgcolor=#000000 cellpadding=2> | ||
| + | <tr valign="top"> | ||
| + | <td> | ||
| + | <table bgcolor=#ffffff cellpadding=2> | ||
| + | <tr valign="top"> | ||
| + | <td><span style="font-weight: 700; font-size: 15px; color: white; background-color: blue;"> 12 </span></td> | ||
| + | <td>You will need to add:- | ||
<table> | <table> | ||
<tr valign="top"> | <tr valign="top"> | ||
| − | <td>[[file: | + | <td width=10>[[image:DotPoint.JPG|10px|link=]]</td> |
| − | <td> | + | <td>a thumbnail image as described in the section [[file:PageLink.PNG|link=]] '''[[#The Thumbnail Image|The Thumbnail Image]]'''</td> |
| − | + | </tr> | |
| − | + | <tr valign="top"> | |
| − | + | <td>[[image:DotPoint.JPG|10px|link=]]</td> | |
| + | <td>the icon image as described in the section [[file:PageLink.PNG|link=]] '''[[#The Icon Image|The Icon Image]]'''</td> | ||
| + | </tr> | ||
| + | <tr valign="top"> | ||
| + | <td>[[image:DotPoint.JPG|10px|link=]]</td> | ||
| + | <td>texture text file as described in the section [[file:PageLink.PNG|link=]] '''[[#The Texture File|The Texture File]]'''</td> | ||
| + | </tr> | ||
| + | </table> | ||
| + | </td> | ||
| + | </tr> | ||
| + | </table> | ||
| + | </td> | ||
| + | </tr> | ||
| + | </table> | ||
</td> | </td> | ||
</tr> | </tr> | ||
| − | |||
| − | |||
<tr valign="top"> | <tr valign="top"> | ||
| − | <td> | + | <td colspan=2><span style="font-size: 17px;">'''THIS IS AN EXAMPLE ONLY'''</span><br></td> |
| − | + | ||
</tr> | </tr> | ||
| − | </table></td> | + | <tr> |
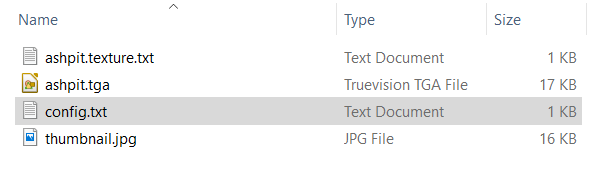
| + | <td>[[file:TexturePopupFiles.PNG|link=]]</td> | ||
| + | <td><br><br> | ||
| + | This is the '''minimum''' number of files needed for a '''Driver Character'''</td> | ||
| + | </tr> | ||
| + | </table> <!-- END Step 6 table --> | ||
| + | </td> | ||
</tr> | </tr> | ||
</table> | </table> | ||
<br> | <br> | ||
| − | <table | + | <table width=1000> <!-- BEGIN Step 7 table --> |
| − | <tr> | + | <tr valign="top"> |
| − | <td | + | <td width=50> </td> |
| − | --- | + | <td>[[image:DotPoint7.JPG|link=]] <span style="font-size: 17px; font-weight: 700;">Finish Up:</span> |
| + | <table> | ||
| + | <tr valign="top"> | ||
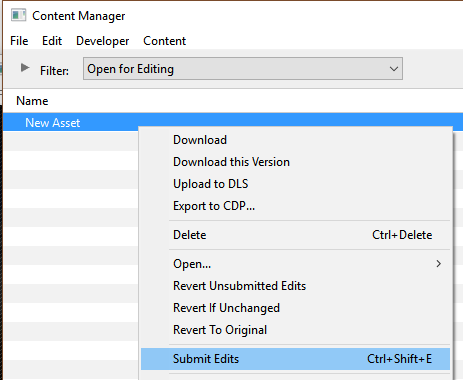
| + | <td>[[image:NewAssetSubmit.PNG|link=]]</td> | ||
| + | <td> | ||
| + | <table bgcolor=#000000 cellpadding=2> | ||
| + | <tr valign="top"> | ||
| + | <td> | ||
| + | <table bgcolor=#ffffff cellpadding=2> | ||
| + | <tr valign="top"> | ||
| + | <td><span style="font-weight: 700; font-size: 15px; color: white; background-color: blue;"> 13 </span></td> | ||
| + | <td>Close the Asset window</td> | ||
</tr> | </tr> | ||
<tr valign="top"> | <tr valign="top"> | ||
| − | <td> | + | <td><span style="font-weight: 700; font-size: 15px; color: white; background-color: blue;"> 14 </span></td> |
| − | <td> | + | <td>Commit the asset in '''Content Manager''' |
| − | + | <table> | |
| − | + | <tr valign="top"> | |
| − | + | <td width=10>[[image:DotPoint.JPG|10px|link=]]</td> | |
| − | + | <td><span style="font-weight: 700; font-size: 15px; background-color: lightcyan;">Right Click</span> on the asset</td> | |
| + | </tr> | ||
| + | <tr valign="top"> | ||
| + | <td>[[image:DotPoint.JPG|10px|link=]]</td> | ||
| + | <td>Select <span style="font-weight: 700; font-size: 15px; color: white; background-color: blue;"> Submit Edits </span> | ||
| + | Hopefully there will be no errors.</td> | ||
| + | </tr> | ||
| + | </table> | ||
| + | </td> | ||
| + | </tr> | ||
| + | </table> | ||
| + | </td> | ||
| + | </tr> | ||
| + | </table> | ||
<br> | <br> | ||
| − | + | <table bgcolor=#000000> <!-- BEGIN Step 7 Notes table --> | |
| + | <tr valign="top"> | ||
| + | <td> | ||
| + | <table bgcolor=#ffffb0> <!-- BEGIN Step 7 Notes table --> | ||
| + | <tr valign="top"> | ||
| + | <td width=25>[[image:NotePad.PNG|link=]]</td> | ||
| + | <td>Because you still have the Search Filter '''Open for Editing''' in operation, the now closed and '''Submitted''' asset will vanish from the '''Content Manager''' display. To check that your asset has been correctly created and renamed, set the Search Filter to '''Today'''. | ||
| + | </td> | ||
</tr> | </tr> | ||
</table> | </table> | ||
| + | </td> | ||
| + | </tr> | ||
| + | </table> <!-- END Step 7 Notes table --> | ||
<br> | <br> | ||
| + | <table cellpadding=4 bgcolor=#ff0000> <!-- BEGIN Step 7 errors table --> | ||
| + | <tr valign="top"> | ||
| + | <td> | ||
| + | <table cellpading="4" bgcolor=#ffffff> <!-- BEGIN Step 7 errors-bugs table --> | ||
| + | <tr valign="top"> | ||
| + | <td>[[image:Bug.png|link=]]</td> | ||
| + | <td>Some of the most common errors that can occur when creating and '''Submitting''' a new asset are:- | ||
<table> | <table> | ||
| − | <tr> | + | <tr valign="top"> |
| − | <td>[[ | + | <td width=10>[[image:DotPoint.JPG|10px|link=]]</td> |
| − | <td> | + | <td>no '''''thumbnail image''''' in the asset</td> |
| − | + | </tr> | |
| + | <tr valign="top"> | ||
| + | <td>[[image:DotPoint.JPG|10px|link=]]</td> | ||
| + | <td>typing errors in the config.txt file</td> | ||
| + | </tr> | ||
| + | <tr valign="top"> | ||
| + | <td>[[image:DotPoint.JPG|10px|link=]]</td> | ||
| + | <td>poorly formatted tags in the config.txt file</td> | ||
| + | </tr> | ||
| + | <tr valign="top"> | ||
| + | <td>[[image:DotPoint.JPG|10px|link=]]</td> | ||
| + | <td>incorrect file types added to the asset folder</td> | ||
| + | </tr> | ||
| + | <tr valign="top"> | ||
| + | <td>[[image:DotPoint.JPG|10px|link=]]</td> | ||
| + | <td>files missing from the asset folder</td> | ||
| + | </tr> | ||
| + | <tr valign="top"> | ||
| + | <td>[[image:DotPoint.JPG|10px|link=]]</td> | ||
| + | <td>an incorrect '''kuid''' value (despite the warning you changed it in '''Step''' <span style="font-weight: 700; font-size: 15px; color: white; background-color: red;"> 5 </span>)</td> | ||
</tr> | </tr> | ||
</table> | </table> | ||
| + | </td> | ||
| + | </tr> | ||
| + | </table> <!-- END Step 7 errors-bugs table --> | ||
| + | </td> | ||
| + | </tr> | ||
| + | </table> <!-- END Step 7 errors table --> | ||
| + | </td> | ||
| + | </tr> | ||
| + | </table> <!-- END Step 7 table --> | ||
| + | </td> | ||
| + | </tr> | ||
| + | </table> <!-- END Steps table --> | ||
| + | <br> | ||
| + | <table width=1000> <!-- BEGIN Nav Buttons Table NO SKIPS --> | ||
| + | <tr valign="top"> | ||
| + | <td width=629><span id="stepConfig"></span> | ||
| + | ='''The Config.txt File'''= | ||
| + | </td> | ||
| + | <td width=50> </td> <!-- Skip Down --> | ||
| + | <td width=50> </td> <!-- Skip Up --> | ||
| + | <td width=46>[[file:BackToTop.png|link=#top|alt=Top|Top]]</td> | ||
| + | <td width=75>[[file:NextUp.png|link=#stepCreate|alt=Next Up|Top]]</td> | ||
| + | <td width=75>[[file:NextDown.png|link=#stepThumbIcon|alt=Next Down|Next Down]]</td> | ||
| + | <td width=75>[[file:BackToBottom.png|link=#bottom|alt=Bottom|Bottom]]</td> | ||
| + | </tr> | ||
| + | </table> <!-- END Nav Buttons Table --> | ||
| − | <table cellpadding=" | + | <table width=1000 bgcolor="lightcyan" cellpadding=2> |
| + | <tr valign="top"> | ||
| + | <td width=10>[[image:BlueDot10x10.png|link=]]</td> | ||
| + | <td>'''All assets must have a config.txt file'''</td> | ||
| + | </tr> | ||
| + | </table> <!-- END Dot point table --> | ||
| + | <br> | ||
| + | <table cellpadding=4 bgcolor=#eeeeee> <!-- BEGIN Settings table --> | ||
<tr> | <tr> | ||
<td colspan="2"> | <td colspan="2"> | ||
| Line 161: | Line 468: | ||
</tr> | </tr> | ||
<tr valign="top"> | <tr valign="top"> | ||
| − | <td>[[ | + | <td>[[image:Gears.PNG|link=]]</td> |
| − | <td><font size | + | <td><span style="font-size: 17px;">'''Settings:'''</span> |
<table> | <table> | ||
<tr valign="top"> | <tr valign="top"> | ||
| − | <td> | + | <td>The Texture asset must have a '''config.txt''' text file that '''must''' include the following tags:- |
| − | + | <table> | |
| − | + | ||
| − | + | ||
| − | + | ||
| − | + | ||
| − | + | ||
| − | <table | + | |
<tr valign="top"> | <tr valign="top"> | ||
| − | <td>[[ | + | <td width=10>[[image:BlackDot10x10.png|link=]]</td> |
| − | <td | + | <td>'''kind''' set to '''"texture"'''</td> |
| − | + | ||
</tr> | </tr> | ||
| − | |||
| − | |||
<tr valign="top"> | <tr valign="top"> | ||
| − | <td> | + | <td>[[image:BlackDot10x10.png|link=]]</td> |
| − | < | + | <td>'''username''' set to the asset title or name</td> |
| + | </tr> | ||
<tr valign="top"> | <tr valign="top"> | ||
| − | <td>[[ | + | <td>[[image:BlackDot10x10.png|link=]]</td> |
| − | <td> | + | <td>'''kuid''' a unique ID code</td> |
| − | + | ||
| − | + | ||
| − | + | ||
| − | + | ||
| − | + | ||
| − | + | ||
</tr> | </tr> | ||
| − | </ | + | <tr valign="top"> |
| + | <td>[[image:BlackDot10x10.png|link=]]</td> | ||
| + | <td>'''thumbnails''' set to a 240 by 180 pixel JPG image</td> | ||
</tr> | </tr> | ||
| − | </table></td> | + | </table> |
| + | </td> | ||
</tr> | </tr> | ||
| − | < | + | <tr valign="top"> |
| + | <td>While not mandatory, the following tag is useful:- | ||
| + | <table> | ||
| + | <tr valign="top"> | ||
| + | <td>[[image:BlackDot10x10.png|link=]]</td> | ||
| + | <td>'''category-class''' set to '''"JI"'''</td> | ||
</tr> | </tr> | ||
</table> | </table> | ||
| + | </td> | ||
| + | </tr> | ||
| + | </table> | ||
| + | </td> | ||
| + | </tr> | ||
| + | <tr> | ||
| + | <td colspan="2"> | ||
| + | ----</td> | ||
| + | </tr> | ||
| + | </table> <!-- END Settings table --> | ||
<br> | <br> | ||
| + | <table width=1000> | ||
| + | <tr valign="top"> | ||
| + | <td colspan=2>This file should follow the same (or a similar) format as the example below.</td> | ||
| + | </tr> | ||
| + | <tr valign="top"> | ||
| + | <td width=10>[[image:DotPoint.JPG|10px|link=]]</td> | ||
| + | <td>entries in <span style="background-color: red; color: white; font-weight: 700;"> red </span> must not be changed</td> | ||
| + | </tr> | ||
| + | <tr valign="top"> | ||
| + | <td>[[image:DotPoint.JPG|10px|link=]]</td> | ||
| + | <td>the indenting of the lines and the spacing ("tabbing") between the "tags" on the left and their contents on the right are purely to make it easier for humans to read</td> | ||
| + | </tr> | ||
| + | <tr valign="top"> | ||
| + | <td>[[image:DotPoint.JPG|10px|link=]]</td> | ||
| + | <td>the use of the '''{ }''' braces is to group tags into common "containers". These containers must not be broken up and the number of '''{''' characters must match the number of '''}''' characters</td> | ||
| + | </tr> | ||
| + | <tr valign="top"> | ||
| + | <td>[[image:DotPoint.JPG|10px|link=]]</td> | ||
| + | <td>the order of the "tags" is not important</td> | ||
| + | </tr> | ||
| + | </table> | ||
| − | + | '''kuid''' <span style="background-color: red; color: white; font-weight: 700;"><kuid: this is an auto-generated number ></span> | |
| − | + | '''kind''' "<span style="background-color: red; color: white; font-weight: 700;">texture</span>" | |
| − | + | '''texture "icon_gradeXing'''<span style="background-color: red; color: white; font-weight: 700;">.texture</span>" | |
| − | + | '''username "icon grade crossing ahead"''' | |
| − | + | '''category-class "'''<span style="background-color: red; color: white; font-weight: 700;">JI</span>'''"''' | |
| − | '''kind "texture" | + | '''trainz-build 4.3''' |
| − | '''texture | + | |
| − | + | ||
| − | '''category-class''' | + | |
| − | '''trainz-build | + | |
'''thumbnails''' | '''thumbnails''' | ||
{ | { | ||
| − | ''' | + | '''Default''' |
{ | { | ||
| − | width 240 | + | '''width''' <span style="background-color: red; color: white; font-weight: 700;">240</span> |
| − | height 180 | + | '''height''' <span style="background-color: red; color: white; font-weight: 700;">180</span> |
| − | image "'''< | + | '''image "icon_gradeXing'''<span style="background-color: red; color: white; font-weight: 700;">.jpg</span>'''"''' |
} | } | ||
| − | ''' | + | '''01''' |
{ | { | ||
| − | width 64 | + | '''width''' <span style="background-color: red; color: white; font-weight: 700;">64</span> |
| − | height 64 | + | '''height''' <span style="background-color: red; color: white; font-weight: 700;">64</span> |
| − | image " | + | '''image "icon_gradeXing'''<span style="background-color: red; color: white; font-weight: 700;">.texture</span>'''"''' |
} | } | ||
} | } | ||
| − | + | '''description "Icon representing an approaching grade crossing. Designed for message popups."''' | |
| − | <table cellpadding= | + | <table width=1000 cellpadding=4 bgcolor=#eeeeee> |
<tr> | <tr> | ||
<td colspan="2"> | <td colspan="2"> | ||
| Line 236: | Line 564: | ||
</tr> | </tr> | ||
<tr valign="top"> | <tr valign="top"> | ||
| − | <td>[[file:Gears.PNG]]</td> | + | <td>[[file:Gears.PNG|link=]]</td> |
| − | <td><font size | + | <td><span style="font-size: 17px;">'''Settings:'''</span><br> |
| − | '''For the above example:'''< | + | '''For the above example:''' |
| − | + | <table> | |
| − | + | <tr valign="top"> | |
| − | + | <td width=10>[[image:BlackDot10x10.png|link=]]</td> | |
| − | + | <td>The <span style="background-color: black; color: white; font-weight: 700;"> kuid </span> is unique to every asset so it is <span style="background-color: red; color: white; font-weight: 700;"> not a good idea to choose your own </span>. This will be automatically generated by the '''Content Manager''' program when a new asset is created</td> | |
| − | + | </tr> | |
| − | + | <tr valign="top"> | |
| − | + | <td>[[image:BlackDot10x10.png|link=]]</td> | |
| − | + | <td>The <span style="background-color: black; color: white; font-weight: 700;"> kind </span> identifies the ''type'' of asset and the types of files that '''Trainz''' will expect to find in the asset. It also tells '''Trainz''' how to render and error check the asset. For '''Texture''' assets, the category class is <span style="font-weight: 700; color: white; background-color: red;"> texture </span>. A list of asset kinds can be found at [[file:WikiLink.PNG|link=]] '''[[KIND_TrainzBaseSpec#KIND_Hierarchy|KIND Hierarchy]]'''</td> | |
| − | + | </tr> | |
| − | + | <tr valign="top"> | |
| − | + | <td>[[image:BlackDot10x10.png|link=]]</td> | |
| − | + | <td>The <span style="background-color: black; color: white; font-weight: 700;"> texture </span> is the name of the assets '''texture''' file. This will be a simple text file and will have the name '''<span style="color: black;">asset_name</span>.texture''' where '''<span style="color: black;">asset_name</span>''' will be a name you have selected for this asset - e.g. "'''icon_gradeXing.texture'''". The actual texture file itself will be named '''<span style="color: black;">asset_name</span>.texture.txt''' (e.g. "'''icon_gradeXing.texture.txt'''") but the filename ending "'''.txt'''" is not added to the name in the '''texture''' tag so it would appear as "'''icon_gradeXing.texture'''"</td> | |
| − | + | </tr> | |
| − | + | <tr valign="top"> | |
| − | + | <td>[[image:BlackDot10x10.png|link=]]</td> | |
| − | + | <td>The <span style="background-color: black; color: white; font-weight: 700;"> username </span> is your name for the asset and the name that other users will see. It is also the name that will appear in the '''Driver Setup Rule''' when the driver is being selected. It is a good idea to make it short and meaningful</td> | |
| + | </tr> | ||
| + | <tr valign="top"> | ||
| + | <td>[[image:BlackDot10x10.png|link=]]</td> | ||
| + | <td>The <span style="background-color: black; color: white; font-weight: 700;"> category-class </span> identifies the ''intent'' of the asset and is important in classifying it for filtering and searching. For '''driver character''' assets, the category class is <span style="font-weight: 700; color: white; background-color: red;"> JI </span>. A list of category classes can be found at [[file:WikiLink.PNG|link=]] '''[[Category-class]]'''</td> | ||
| + | </tr> | ||
| + | <tr valign="top"> | ||
| + | <td>[[image:BlackDot10x10.png|link=]]</td> | ||
| + | <td>The <span style="background-color: black; color: white; font-weight: 700;"> trainz-build </span> identifies the ''minimum'' Trainz version needed for this asset. A list of asset trainz-build numbers and their corresponding Trainz versions can be found at [[file:WikiLink.PNG|link=]] '''[["Trainz-build"_number]]'''</td> | ||
| + | </tr> | ||
| + | <tr valign="top"> | ||
| + | <td>[[image:BlackDot10x10.png|link=]]</td> | ||
| + | <td>The <span style="background-color: black; color: white; font-weight: 700;"> thumbnails </span> container holds the ''preview'' images of the asset shown by the '''Content Manager''' program, the Web version of the ''DLS'' and, for '''some assets''', the Surveyor main menu image(s) and, in this case, the asset texture itself. Information on thumbnails can be found at [[file:WikiLink.PNG|link=]] '''[[Thumbnails]]''' | ||
| + | <table> | ||
| + | <tr valign="top"> | ||
| + | <td width=10>[[image:BlackCircle10x10.png|link=]]</td> | ||
| + | <td>The first thumbnail <span style="background-color: black; color: white; font-weight: 700;"> Default </span> is the '''container ID''' or '''placeholder''' for the thumbnail used by CM and the Web based DLS. While its ''exact label'' (or number - eg. "Default", "00", "01", etc) is not important, it must be different from any other labels. '''Default''' and '''0''' are commonly used placeholder labels for the 240 x 180 thumbnail image | ||
| + | *The '''image''' is the name of the thumbnail image. It does not have to be called '''thumbnail.jpg''' but it '''must''' be a JPG format image | ||
| + | *The '''width''' of the image in pixels must be <span style="background-color: red; color: white; font-weight: 700;"> 240 </span> | ||
| + | *The '''height''' of the image in pixels must be <span style="background-color: red; color: white; font-weight: 700;"> 180 </span></td> | ||
| + | </tr> | ||
| + | <tr valign="top"> | ||
| + | <td>[[image:BlackCircle10x10.png|link=]]</td> | ||
| + | <td>The second thumbnail <span style="background-color: black; color: white; font-weight: 700;">''' 01 '''</span> is the placeholder label for the 64 x 64 icon image used by the '''Driver Character''' for this asset. Its ''exact label'' does not matter but it must be different from the first thumbnail image placeholder label | ||
| + | *The '''image''' is the assets '''<span style="color: black;">asset_name</span>.texture.txt''' file (but without the ".txt" at the end) | ||
| + | *The '''width''' of the image in pixels must be <span style="background-color: red; color: white; font-weight: 700;"> 64 </span> | ||
| + | *The '''height''' of the image in pixels must be <span style="background-color: red; color: white; font-weight: 700;"> 64 </span></td> | ||
| + | </tr> | ||
| + | </table> | ||
| + | </td> | ||
| + | </tr> | ||
| + | <tr valign="top"> | ||
| + | <td>[[image:BlackDot10x10.png|link=]]</td> | ||
| + | <td>The <span style="background-color: black; color: white; font-weight: 700;"> description </span> provides more details for users than the '''username'''</td> | ||
| + | </tr> | ||
| + | </table> | ||
</td> | </td> | ||
</tr> | </tr> | ||
| Line 260: | Line 623: | ||
<td colspan="2"> | <td colspan="2"> | ||
----</td> | ----</td> | ||
| + | </tr> | ||
| + | </table> | ||
| + | |||
| + | <table width=1000 bgcolor=#ffffe0> | ||
| + | <tr valign="top"> | ||
| + | <td>[[file:PencilTips.PNG|link=]]</td> | ||
| + | <td><span style="font-weight: 700; font-size: 17px;">Language Options:</span><br> | ||
| + | ---- | ||
| + | </td> | ||
| + | </tr> | ||
| + | <tr valign="top"> | ||
| + | <td></td> | ||
| + | <td>All Trainz assets have a language facility built into their config.txt files that allows other language translations to be added for certain tags, such as the '''username''' and '''description''' tags. A full description of the process can be found on the Trainz Wiki at [[file:WikiLink.PNG|link=]] '''[[HowTo/Localize_an_Asset|Localize an Asset]]''' and a list of all the supported languages with their two character codes at [[file:WikiLink.PNG|link=]] '''[[Localization_code|Localization (country) Codes]]'''.<br> | ||
| + | |||
| + | At the very basic level any creator can easily provide other language translations for the '''username''' and '''description''' tags in the assets they create. Examples are shown below for this sample asset.</td> | ||
| + | </tr> | ||
| + | <tr valign="top"> | ||
| + | <td colspan=2> | ||
| + | username "icon grade crossing ahead" | ||
| + | username-c2 "图标前方的路口" | ||
| + | username-de "Symbol Bahnübergang voraus" | ||
| + | username-es "icono de cruce de grados por delante" | ||
| + | username-fr "icône passage à niveau avant" | ||
| + | username-nl "pictogram cijferovergang vooruit" | ||
| + | username-ru "значок пересекает" | ||
| + | </td> | ||
| + | </tr> | ||
| + | <tr valign="top"> | ||
| + | <td></td> | ||
| + | <td>Translations to Chinese (simplified), Spanish, French, German, Dutch and Russian, perfect or not, were provided by Google Translate. | ||
| + | </td> | ||
</tr> | </tr> | ||
</table> | </table> | ||
<br> | <br> | ||
| + | <table width=1000> <!-- BEGIN Nav Buttons Table NO SKIPS --> | ||
| + | <tr valign="top"> | ||
| + | <td width=629><span id="stepThumbIcon"></span> | ||
| + | ='''The Thumbnail Image'''= | ||
| + | </td> | ||
| + | <td width=50> </td> <!-- Skip Down --> | ||
| + | <td width=50> </td> <!-- Skip Up --> | ||
| + | <td width=46>[[file:BackToTop.png|link=#top|alt=Top|Top]]</td> | ||
| + | <td width=75>[[file:NextUp.png|link=#stepConfig|alt=Next Up|Top]]</td> | ||
| + | <td width=75>[[file:NextDown.png|link=#stepIcon|alt=Next Down|Next Down]]</td> | ||
| + | <td width=75>[[file:BackToBottom.png|link=#bottom|alt=Bottom|Bottom]]</td> | ||
| + | </tr> | ||
| + | </table> <!-- END Nav Buttons Table --> | ||
| + | <br> | ||
| + | <table width=1000 bgcolor="lightcyan" cellpadding=2> | ||
| + | <tr valign="top"> | ||
| + | <td width=10>[[image:BlueDot10x10.png|link=]]</td> | ||
| + | <td>'''A thumbnail image MUST be present in the asset'''</td> | ||
| + | </tr> | ||
| + | </table> | ||
| + | <br> | ||
| + | <table width=1000> | ||
| + | <tr valign="top"> | ||
| + | <td> | ||
| + | <table bgcolor=#000000 width=720> | ||
| + | <tr valign="top"> | ||
| + | <td> | ||
| + | <table bgcolor=#ffffb0 width=716> | ||
| + | <tr valign="top"> | ||
| + | <td>[[image:NotePad.PNG|link=]]</td> | ||
| + | <td><span style="font-size: 17px;">'''Notes:'''</span><br> | ||
| + | ---- | ||
| + | The thumbnail image:- | ||
| + | <table> | ||
| + | <tr valign="top"> | ||
| + | <td width=10>[[image:DotPoint.JPG|10px|link=]]</td> | ||
| + | <td>must be in '''JPG''' format</td> | ||
| + | </tr> | ||
| + | <tr valign="top"> | ||
| + | <td>[[image:DotPoint.JPG|10px|link=]]</td> | ||
| + | <td>must be '''240''' pixels wide by '''180''' pixels tall</td> | ||
| + | </tr> | ||
| + | <tr valign="top"> | ||
| + | <td>[[image:DotPoint.JPG|10px|link=]]</td> | ||
| + | <td>'''does not''' have to be named ''thumbnail.jpg'' as long as the name used is in the '''Thumbnails''' container in the '''config.txt''' file</td> | ||
| + | </tr> | ||
| + | </table> | ||
| + | </td> | ||
| + | </tr> | ||
| + | </table> | ||
| + | </td> | ||
| + | </tr> | ||
| + | </table> | ||
| + | </td> | ||
| + | <td with=240>[[image:IconDecoupleThumbnail.png|link=|alt=Thumbnail]]</td> | ||
| + | </tr> | ||
| + | </table> | ||
| + | <br> | ||
| + | <table width=1000> <!-- BEGIN Nav Buttons Table NO SKIPS --> | ||
| + | <tr valign="top"> | ||
| + | <td width=629><span id="stepIcon"></span> | ||
='''The Icon Image'''= | ='''The Icon Image'''= | ||
| + | </td> | ||
| + | <td width=50> </td> <!-- Skip Down --> | ||
| + | <td width=50> </td> <!-- Skip Up --> | ||
| + | <td width=46>[[image:BackToTop.png|link=#top|alt=Top|Top]]</td> | ||
| + | <td width=75>[[image:NextUp.png|link=#stepThumbIcon|alt=Next Up|Next Up]]</td> | ||
| + | <td width=75>[[image:NextDown.png|link=#stepTexture|alt=Next Down|Next Down]]</td> | ||
| + | <td width=75>[[image:BackToBottom.png|link=#bottom|alt=Bottom|Bottom]]</td> | ||
| + | </tr> | ||
| + | </table> <!-- END Nav Buttons Table --> | ||
| − | <table | + | <table width=1000 bgcolor="lightcyan" cellpadding=2> |
<tr valign="top"> | <tr valign="top"> | ||
| − | <td>[[ | + | <td width=10>[[image:BlueDot10x10.png|link=]]</td> |
| − | <td>You will need image editing software to create the icon image or to change an existing image to the required dimensions and format.</td> | + | <td>You will need image editing software to create the icon image or to change an existing image to the required dimensions and format</td> |
| + | </tr> | ||
| + | <tr valign="top"> | ||
| + | <td>[[image:BlueDot10x10.png|link=]]</td> | ||
| + | <td>See the [[file:PageLink.PNG|link=]] '''[[#Create the Driver Image|Create the Driver Image]]''' section at the top of this page for an example</td> | ||
</tr> | </tr> | ||
</table> | </table> | ||
<br> | <br> | ||
| − | <table> | + | <table width=1000> |
<tr valign="top"> | <tr valign="top"> | ||
| − | <td>[[file:Texture64Pixels.PNG]]<br> | + | <td>[[file:Texture64Pixels.PNG|link=]]<br> |
(not to scale)</td> | (not to scale)</td> | ||
<td> | <td> | ||
| − | <table cellpadding= | + | <table cellpadding=4 bgcolor=#eeeeee> |
<tr> | <tr> | ||
<td colspan="2"> | <td colspan="2"> | ||
| Line 284: | Line 752: | ||
</tr> | </tr> | ||
<tr valign="top"> | <tr valign="top"> | ||
| − | <td>[[file:Gears.PNG]]</td> | + | <td>[[file:Gears.PNG|link=]]</td> |
| − | <td><font size | + | <td><span style="font-size: 17px;">'''Settings:'''</span><br> |
The image must meet the following specifications:- | The image must meet the following specifications:- | ||
| − | + | <table> | |
| − | + | <tr valign="top"> | |
| − | + | <td width=10>[[image:BlackDot10x10.png|link=]]</td> | |
| − | + | <td>64 pixels wide and 64 pixels tall</td> | |
| − | + | </tr> | |
| − | + | <tr valign="top"> | |
| − | + | <td>[[image:BlackDot10x10.png|link=]]</td> | |
| + | <td>bit depth ''should'' be 24 (no '''alpha channel''' or transparency) or 32 (if an '''alpha channel''' is used)</td> | ||
| + | </tr> | ||
| + | <tr valign="top"> | ||
| + | <td>[[image:BlackDot10x10.png|link=]]</td> | ||
| + | <td>image file format can be any of:- | ||
| + | <table> | ||
| + | <tr valign="top"> | ||
| + | <td width=10>[[image:BlackCircle10x10.png|link=]]</td> | ||
| + | <td>'''bmp'''</td> | ||
| + | </tr> | ||
| + | <tr valign="top"> | ||
| + | <td>[[image:BlackCircle10x10.png|link=]]</td> | ||
| + | <td>'''jpg''' (jpg '''does not''' support transparency)</td> | ||
| + | </tr> | ||
| + | <tr valign="top"> | ||
| + | <td>[[image:BlackCircle10x10.png|link=]]</td> | ||
| + | <td>'''png'''</td> | ||
| + | </tr> | ||
| + | <tr valign="top"> | ||
| + | <td>[[image:BlackCircle10x10.png|link=]]</td> | ||
| + | <td>'''tga''' (tga compression '''should not''' be used)</td> | ||
| + | </tr> | ||
| + | </table> | ||
| + | </td> | ||
| + | </tr> | ||
| + | </table> | ||
| + | </td> | ||
</tr> | </tr> | ||
<tr valign="top"> | <tr valign="top"> | ||
| Line 303: | Line 798: | ||
</table> | </table> | ||
<br> | <br> | ||
| − | <table | + | <table width=1000 bgcolor=#000000> |
<tr valign="top"> | <tr valign="top"> | ||
| − | <td>[[file:PencilTips.PNG]]</td> | + | <td> |
| + | <table bgcolor=#ffffe0> | ||
| + | <tr valign="top"> | ||
| + | <td>[[file:PencilTips.PNG|link=]]</td> | ||
<td>If your image will have a transparency, such as a transparent background, it is usually a lot easier to save the image in a format that supports an '''alpha channel''' ('''bmp''', '''png''' or '''tga''') and either | <td>If your image will have a transparency, such as a transparent background, it is usually a lot easier to save the image in a format that supports an '''alpha channel''' ('''bmp''', '''png''' or '''tga''') and either | ||
| − | + | <table> | |
| − | + | <tr valign="top"> | |
| − | than it is to use a format that does not support an | + | <td width=10>[[image:DotPoint.JPG|10px|link=]]</td> |
| + | <td>convert the background to a transparency <span style="font-weight: 700; font-size: 15px;">OR</span></td> | ||
| + | </tr> | ||
| + | <tr valign="top"> | ||
| + | <td>[[image:DotPoint.JPG|10px|link=]]</td> | ||
| + | <td>remove the background and add a transparent layer to the image as its background</td> | ||
| + | </tr> | ||
| + | </table> | ||
| + | ... than it is to use a format that does not support an alpha channel. See [[file:PageLink.PNG|link=]] '''[[#The Texture File|The Texture File]]''' below for more details.</td> | ||
| + | </tr> | ||
| + | </table> | ||
| + | </td> | ||
</tr> | </tr> | ||
</table> | </table> | ||
<br> | <br> | ||
| − | + | <table width=1000> <!-- BEGIN Nav Buttons Table NO SKIPS --> | |
| + | <tr valign="top"> | ||
| + | <td width=629><span id="stepTexture"></span> | ||
='''The Texture File'''= | ='''The Texture File'''= | ||
| + | </td> | ||
| + | <td width=50> </td> <!-- Skip Down --> | ||
| + | <td width=50> </td> <!-- Skip Up --> | ||
| + | <td width=46>[[file:BackToTop.png|link=#top|alt=Top|Top]]</td> | ||
| + | <td width=75>[[file:NextUp.png|link=#stepIcon|alt=Next Up|Top]]</td> | ||
| + | <td width=75>[[file:NextDown.png|link=#stepUsing|alt=Next Down|Next Down]]</td> | ||
| + | <td width=75>[[file:BackToBottom.png|link=#bottom|alt=Bottom|Bottom]]</td> | ||
| + | </tr> | ||
| + | </table> <!-- END Nav Buttons Table --> | ||
| − | <table | + | <table width=1000 bgcolor="lightcyan" cellpadding=2> |
<tr valign="top"> | <tr valign="top"> | ||
| − | <td>[[ | + | <td width=10>[[image:BlueDot10x10.png|link=]]</td> |
<td>The '''.texture.txt''' file controls how an image icon is displayed, particularly its '''Alpha Channel''' (or transparency) data. The file must be present even if no transparency is used in the icon.</td> | <td>The '''.texture.txt''' file controls how an image icon is displayed, particularly its '''Alpha Channel''' (or transparency) data. The file must be present even if no transparency is used in the icon.</td> | ||
</tr> | </tr> | ||
</table> | </table> | ||
<br> | <br> | ||
| − | <table cellpadding= | + | <table cellpadding=4 bgcolor=#eeeeee> |
<tr> | <tr> | ||
<td colspan="2"> | <td colspan="2"> | ||
| Line 329: | Line 849: | ||
</tr> | </tr> | ||
<tr valign="top"> | <tr valign="top"> | ||
| − | <td>[[file:Gears.PNG]]</td> | + | <td>[[file:Gears.PNG|link=]]</td> |
| − | <td><font size | + | <td><span style="font-size: 17px;">'''Settings:'''</span> |
| − | + | <table> | |
| − | + | <tr valign="top"> | |
| − | + | <td width=10>[[image:BlackDot10x10.png|link=]]</td> | |
| − | + | <td>the '''Texture File''' is a standard '''text''' file</td> | |
| − | + | </tr> | |
| + | <tr valign="top"> | ||
| + | <td>[[image:BlackDot10x10.png|link=]]</td> | ||
| + | <td>the filename is composed of:- | ||
| + | <table> | ||
| + | <tr valign="top"> | ||
| + | <td width=10>[[image:BlackCircle10x10.png|link=]]</td> | ||
| + | <td>a user selected '''asset_name''' followed by a period ('''.''')</td> | ||
| + | </tr> | ||
| + | <tr valign="top"> | ||
| + | <td>[[image:BlackCircle10x10.png|link=]]</td> | ||
| + | <td>the word '''texture''' followed by a period ('''.''')</td> | ||
| + | </tr> | ||
| + | <tr valign="top"> | ||
| + | <td>[[image:BlackCircle10x10.png|link=]]</td> | ||
| + | <td>the letters '''txt'''</td> | ||
| + | </tr> | ||
| + | </table> | ||
| + | </td> | ||
| + | </tr> | ||
| + | </table> | ||
| + | </td> | ||
</tr> | </tr> | ||
<tr valign="top"> | <tr valign="top"> | ||
| Line 344: | Line 885: | ||
<br> | <br> | ||
A sample '''Texture File''', "ashpit.texture.txt", is shown below:- | A sample '''Texture File''', "ashpit.texture.txt", is shown below:- | ||
| − | <table cellpadding=5> | + | <table width=1000 cellpadding=5> |
<tr> | <tr> | ||
<td> | <td> | ||
| Line 352: | Line 893: | ||
</td> | </td> | ||
<td> | <td> | ||
| − | <table cellpadding= | + | <table cellpadding=4 bgcolor=#eeeeee> |
<tr valign="top"> | <tr valign="top"> | ||
<td colspan="2"> | <td colspan="2"> | ||
| Line 358: | Line 899: | ||
</tr> | </tr> | ||
<tr valign="top"> | <tr valign="top"> | ||
| − | <td>[[file:Gears.PNG]]</td> | + | <td>[[file:Gears.PNG|link=]]</td> |
| − | <td>< | + | <td><span style="font-size: 17px;">'''Settings:'''</span> |
| − | + | <table> | |
| − | + | <tr valign="top"> | |
| − | + | <td width=10>[[image:BlackDot10x10.png|link=]]</td> | |
| + | <td>'''primary''' - this is the name of the icon image file that contains the '''RGB''' colour image. Any '''alpha channel''' in this file will be ignored</td> | ||
| + | </tr> | ||
| + | <tr valign="top"> | ||
| + | <td>[[image:BlackDot10x10.png|link=]]</td> | ||
| + | <td>'''alpha''' - this is the name of the icon image file that contains the '''Alpha Channel''' (transparency) image (see '''Notes:''' below)</td> | ||
| + | </tr> | ||
| + | <tr valign="top"> | ||
| + | <td>[[image:BlackDot10x10.png|link=]]</td> | ||
| + | <td>'''tile=st''' - instructs '''Trainz''' to tile the image both horizontally and vertically. This has no effect on the Driver Character icon but must be included for validation purposes</td> | ||
| + | </tr> | ||
| + | </table> | ||
No "white spaces" between the text characters is allowed.</td> | No "white spaces" between the text characters is allowed.</td> | ||
</tr> | </tr> | ||
| Line 369: | Line 921: | ||
----</td> | ----</td> | ||
</tr> | </tr> | ||
| − | </table></td> | + | </table> |
| + | </td> | ||
</tr> | </tr> | ||
</table> | </table> | ||
| − | <table cellpadding= | + | |
| + | <table width=1000 cellpadding=2 bgcolor=#ffffb0> | ||
<tr valign="top"> | <tr valign="top"> | ||
| − | <td>[[ | + | <td>[[image:NotePad.PNG|link=]]</td> |
| − | <td><font size | + | <td><span style="font-size: 17px;">'''Notes:'''</span><br> |
| + | ---- | ||
There are 3 general "scenarios" for the structure of the '''Texture File''' in a '''Texture Non Environmental''' asset.<br> | There are 3 general "scenarios" for the structure of the '''Texture File''' in a '''Texture Non Environmental''' asset.<br> | ||
<table> | <table> | ||
<tr valign="top"> | <tr valign="top"> | ||
| − | <td>[[ | + | <td width=25>[[image:Ablue.png|link=]]</td> |
| − | <td>If the icon has a transparency (an '''alpha channel''') and is saved in a format that supports the '''alpha channel'''< | + | <td>If the icon has a transparency (an '''alpha channel''') and is saved in a format that supports the '''alpha channel'''<br> |
| − | + | ||
| − | + | ||
Then:- | Then:- | ||
<table> | <table> | ||
<tr valign="top"> | <tr valign="top"> | ||
<td> | <td> | ||
| − | primary= | + | primary=Lillian64.png |
| − | alpha= | + | alpha=Lillian64.png |
tile=st | tile=st | ||
</td> | </td> | ||
| − | <td>< | + | <td> |
| − | + | <table> | |
| − | + | <tr valign="top"> | |
| + | <td width=10>[[image:DotPoint.JPG|10px|link=]]</td> | ||
| + | <td>the '''primary''' and '''alpha''' images are the same file, as in the example shown left</td> | ||
| + | </tr> | ||
| + | <tr valign="top"> | ||
| + | <td>[[image:DotPoint.JPG|10px|link=]]</td> | ||
| + | <td>the image must contain '''<span style="text-decoration: underline;">both</span>''' the '''RGB''' colour data and the '''Alpha Channel''' (transparency) data (it must have a '''depth''' of '''32 bits''')</td> | ||
| + | </tr> | ||
| + | </table> | ||
| + | </td> | ||
| + | </tr> | ||
| + | </table> | ||
| + | </td> | ||
</tr> | </tr> | ||
</table> | </table> | ||
| Line 399: | Line 964: | ||
<table> | <table> | ||
<tr valign="top"> | <tr valign="top"> | ||
| − | <td>[[ | + | <td>[[image:Bblue.png|link=]]</td> |
| − | <td>If the icon needs to have transparency (an '''alpha channel''') but an '''alpha channel''' is not available (e.g. it is saved in the jpg file format) or is not suitable</td> | + | <td>If the icon needs to have transparency (an '''alpha channel''') but an '''alpha channel''' is not available (e.g. it is saved in the jpg file format) or is not suitable<br> |
| + | Then:- | ||
| + | <table> | ||
| + | <tr valign="top"> | ||
| + | <td> | ||
| + | primary=Lillian64.jpg | ||
| + | alpha=Lillian64_alpha.jpg | ||
| + | tile=st | ||
| + | </td> | ||
| + | <td> | ||
| + | <table> | ||
| + | <tr valign="top"> | ||
| + | <td width=10>[[image:DotPoint.JPG|10px|link=]]</td> | ||
| + | <td>two different files (different file names or different image file formats) must be used as in the example shown left</td> | ||
| + | </tr> | ||
| + | <tr valign="top"> | ||
| + | <td>[[image:DotPoint.JPG|10px|link=]]</td> | ||
| + | <td>both images must be the same size (64 pixels x 64 pixels)</td> | ||
| + | </tr> | ||
| + | <tr valign="top"> | ||
| + | <td>[[image:DotPoint.JPG|10px|link=]]</td> | ||
| + | <td>both images must have a '''depth''' of '''24 bits''' - so no '''alpha channel''' must be present in either image</td> | ||
| + | </tr> | ||
| + | <tr valign="top"> | ||
| + | <td>[[image:DotPoint.JPG|10px|link=]]</td> | ||
| + | <td>the '''alpha''' image file should be a greyscale image or just black and white</td> | ||
</tr> | </tr> | ||
</table> | </table> | ||
| + | </td> | ||
| + | </tr> | ||
| + | </table> | ||
| + | </td> | ||
| + | </tr> | ||
| + | </table> | ||
| + | |||
| + | <table> | ||
| + | <tr valign="top"> | ||
| + | <td>[[image:Cblue.png|link=]]</td> | ||
| + | <td>If the icon image does not have a transparency and no '''alpha channel''' is needed<br> | ||
Then:- | Then:- | ||
<table> | <table> | ||
<tr valign="top"> | <tr valign="top"> | ||
<td> | <td> | ||
| − | primary= | + | primary=Lillian64.jpg |
| − | + | ||
tile=st | tile=st | ||
</td> | </td> | ||
<td> | <td> | ||
| − | + | <table> | |
| − | + | <tr valign="top"> | |
| − | + | <td width=10>[[image:DotPoint.JPG|10px|link=]]</td> | |
| − | + | <td>the '''alpha=''' line in the '''.texture.txt file''' is not needed, as in the example shown left</td> | |
| + | </tr> | ||
| + | <tr valign="top"> | ||
| + | <td>[[image:DotPoint.JPG|10px|link=]]</td> | ||
| + | <td>the '''primary''' file contains the '''RGB''' colour data and can be in any supported image format. If it also has '''alpha channel''' data then the alpha channel data will be ignored so the icon will be shown without any transparency</td> | ||
| + | </tr> | ||
| + | </table> | ||
| + | </td> | ||
| + | </tr> | ||
| + | </table> | ||
| + | </td> | ||
</tr> | </tr> | ||
</table> | </table> | ||
| + | Image file formats supported by '''Trainz''' that have an '''alpha channel''' are:- | ||
<table> | <table> | ||
<tr valign="top"> | <tr valign="top"> | ||
| − | <td>[[ | + | <td width=10>[[image:DotPoint.JPG|10px|link=]]</td> |
| − | <td> | + | <td>'''bmp'''</td> |
| + | </tr> | ||
| + | <tr valign="top"> | ||
| + | <td>[[image:DotPoint.JPG|10px|link=]]</td> | ||
| + | <td>'''png'''</td> | ||
| + | </tr> | ||
| + | <tr valign="top"> | ||
| + | <td>[[image:DotPoint.JPG|10px|link=]]</td> | ||
| + | <td>'''tga''' (do not use compression)</td> | ||
</tr> | </tr> | ||
</table> | </table> | ||
| − | + | Image file formats supported by '''Trainz''' that '''DO NOT''' have an '''alpha channel''' are:- | |
<table> | <table> | ||
<tr valign="top"> | <tr valign="top"> | ||
| − | <td | + | <td width=10>[[image:DotPoint.JPG|10px|link=]]</td> |
| − | + | <td>'''jpg'''</td> | |
| − | + | </tr> | |
| + | </table> | ||
</td> | </td> | ||
| − | |||
| − | |||
| − | |||
</tr> | </tr> | ||
</table> | </table> | ||
| − | + | <br> | |
| − | + | <table cellpadding=4 bgcolor="Aquamarine"> | |
| − | + | <tr valign="top"> | |
| − | + | <td>[[file:LinkWiki.PNG|link=]]</td> | |
| − | + | <td>A detailed description of the '''.texture''' file format can be found on the '''Trainz Wiki Page''' at:-<br> | |
| − | + | [[image:BlueDot10x10.png|link=]] '''[[Texture_file|Texture File]]'''</td> | |
</tr> | </tr> | ||
</table> | </table> | ||
<br> | <br> | ||
| − | + | <table width=1000> <!-- BEGIN Nav Buttons Table NO SKIPS --> | |
| − | < | + | <tr valign="top"> |
| − | + | <td width=629><span id="stepUsing"></span> | |
='''Using the Asset'''= | ='''Using the Asset'''= | ||
| + | </td> | ||
| + | <td width=50> </td> <!-- Skip Down --> | ||
| + | <td width=50> </td> <!-- Skip Up --> | ||
| + | <td width=46>[[file:BackToTop.png|link=#top|alt=Top|Top]]</td> | ||
| + | <td width=75>[[file:NextUp.png|link=#stepTexture|alt=Next Up|Top]]</td> | ||
| + | <td width=75> </td> | ||
| + | <td width=75>[[file:BackToBottom.png|link=#bottom|alt=Bottom|Bottom]]</td> | ||
| + | </tr> | ||
| + | </table> <!-- END Nav Buttons Table --> | ||
| − | + | <table width=1000> | |
| − | + | ||
| − | <table> | + | |
<tr valign="top"> | <tr valign="top"> | ||
| − | <td>[[file:TextureAssetList.PNG]]</td> | + | <td>Once the new asset has been committed it will be available for use in a '''Message Popup Rule'''. It will appear as a '''Texture Asset''' in the rule icon list.</td> |
| + | </tr> | ||
| + | </table> | ||
| + | <br> | ||
| + | <table width=1000> | ||
| + | <tr valign="top"> | ||
| + | <td>[[file:TextureAssetList.PNG|link=]]</td> | ||
<td> | <td> | ||
| − | <table cellpadding=" | + | <table bgcolor=#000000 cellpadding=2> |
| − | <tr> | + | <tr valign="top"> |
| − | <td colspan= | + | <td> |
| − | + | <table bgcolor=#ffffff cellpadding=2> | |
| + | <tr valign="top"> | ||
| + | <td colspan=2><span style="font-weight: 700; font-size: 15px;">Steps:</span> To use the Texture asset:-</td> | ||
</tr> | </tr> | ||
<tr valign="top"> | <tr valign="top"> | ||
| − | <td>[[file: | + | <td colspan=2>In the [[file:WikiLink.PNG|link=]] '''[[How to Use Session Editor|Session Editor]]''' add a [[file:WikiLink.PNG|link=]] '''[[How to Use Message Popup Rule|Message Popup Rule]]''' and open it for editing.</td> |
| − | + | ||
| − | + | ||
| − | + | ||
| − | + | ||
| − | + | ||
| − | + | ||
| − | + | ||
</tr> | </tr> | ||
| − | <tr> | + | <tr valign="top"> |
| − | <td | + | <td width=25>[[image:DotPoint1.JPG|link=]]</td> |
| − | + | <td>Select [[file:PortalOptionButtonFilled.PNG|link=]] '''Custom Text'''</td> | |
</tr> | </tr> | ||
| − | </ | + | <tr valign="top"> |
| + | <td>[[image:DotPoint2.JPG|link=]]</td> | ||
| + | <td><span style="font-weight: 700; font-size: 15px; background-color: lightcyan;">Left Click</span> the icon link '''<span style="text-decoration: underline;">Click here to set</span>'''</td> | ||
| + | </tr> | ||
| + | <tr valign="top"> | ||
| + | <td>[[image:DotPoint3.JPG|link=]]</td> | ||
| + | <td>Scroll through the list of Texture Icons</td> | ||
| + | </tr> | ||
| + | <tr valign="top"> | ||
| + | <td>[[image:DotPoint4.JPG|link=]]</td> | ||
| + | <td>Select the required icon</td> | ||
| + | </tr> | ||
| + | <tr valign="top"> | ||
| + | <td>[[image:DotPoint5.JPG|link=]]</td> | ||
| + | <td><span style="font-weight: 700; font-size: 15px; background-color: lightcyan;">Left Click</span> the [[file:Tick.PNG|link=]] icon to accept the selection</td> | ||
</tr> | </tr> | ||
</table> | </table> | ||
| + | </td> | ||
| + | </tr> | ||
| + | </table> | ||
| + | </td> | ||
| + | </tr> | ||
| + | </table> | ||
| + | <br> | ||
| + | <table> <!-- BEGIN Nav Buttons Table --> | ||
| + | <tr valign="top"> | ||
| + | <td width=729><span id="bottom"></span> </td> | ||
| + | <td width=46>[[file:BackToTop.png|link=#top|alt=Top|Top]]</td> | ||
| + | <td width=75>[[file:NextUp.png|link=#stepUsing|alt=Next Up|Top]]</td> | ||
| + | <td width=75> </td> | ||
| + | <td width=75> </td> | ||
| + | </tr> | ||
| + | </table> <!-- END Nav Buttons Table --> | ||
---- | ---- | ||
---- | ---- | ||
| − | |||
| − | |||
='''Trainz Wiki'''= | ='''Trainz Wiki'''= | ||
| − | <table | + | <table width=1000> |
<tr valign="top"> | <tr valign="top"> | ||
| − | |||
<td> | <td> | ||
| − | < | + | <table width=500 cellpadding=2 bgcolor=#ffffff> |
| + | <tr valign="top"> | ||
| + | <td width=80>[[image:TrainzWiki.png|link=]]</td> | ||
| + | <td> | ||
| + | <span style="font-size: 17px;">'''More Tutorials and Guides to Using Trainz'''</span><br> | ||
*'''<span class="plainlinks">[http://online.ts2009.com/mediaWiki/index.php/HowTo How to Guides]</span>''' | *'''<span class="plainlinks">[http://online.ts2009.com/mediaWiki/index.php/HowTo How to Guides]</span>''' | ||
*'''[[Driver Commands List]]''' | *'''[[Driver Commands List]]''' | ||
| Line 496: | Line 1,152: | ||
</tr> | </tr> | ||
</table> | </table> | ||
| − | + | </td> | |
| + | <td> | ||
| + | <table width=500 cellpadding=4 bgcolor="aquamarine"> | ||
| + | <tr valign="top"> | ||
| + | <td width=50>[[image:LinkWiki.PNG|link=]]</td> | ||
| + | <td> | ||
| + | <span style="font-size: 17px;">'''Related Links'''</span><br> | ||
| + | * '''[[How to Use Message Popup Rule|How to Use the Message Popup Rule]]''' | ||
| + | </td> | ||
| + | </tr> | ||
| + | </table> | ||
| + | </td> | ||
| + | </tr> | ||
| + | </table> | ||
| + | ---- | ||
| + | This page was created by Trainz user '''<span class="plainlinks">[http://online.ts2009.com/mediaWiki/index.php/User:Pware pware]</span>''' in August 2018 and was last updated as shown below. | ||
| + | ---- | ||
[[Category:How-to guides]] | [[Category:How-to guides]] | ||
Latest revision as of 22:08, 23 November 2023
The information in this Wiki Page applies to TANE, TRS19, Trainz Plus and TRS22.
|
Workflow Diagram 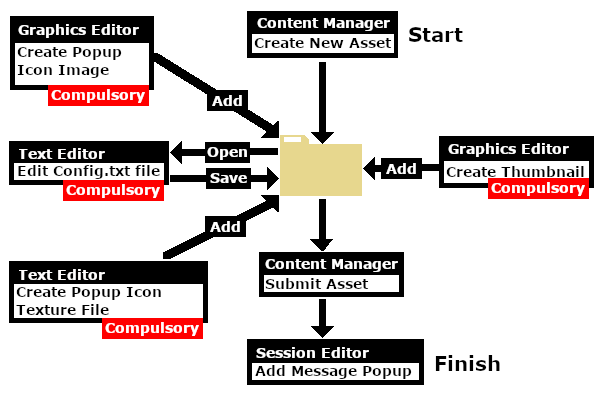 |
[edit] Message Popup Icons |
| Message Popup Icons are small graphic icons that can be placed in browser message windows in Driver mode. The browser windows are created by the Message Popup Rule | |
| Message Popup Icons are classified as Non-Environmental Textures |
 |
Information on creating and using Message Popups can be found on the Trainz Wiki pages at:-
|
[edit] Create a Non-Environmental Texture Asset |
| Steps: |
|
|||||||||||||||||
|
||||||||
|
|
||||||||

|
||||||||||
|
||||||
|
||||||||||||||||
|
[edit] The Config.txt File |
| All assets must have a config.txt file |
|
|
|||||||||||||
Settings:
|
|||||||||||||
|
|
|||||||||||||
| This file should follow the same (or a similar) format as the example below. | |
| entries in red must not be changed | |
| the indenting of the lines and the spacing ("tabbing") between the "tags" on the left and their contents on the right are purely to make it easier for humans to read | |
| the use of the { } braces is to group tags into common "containers". These containers must not be broken up and the number of { characters must match the number of } characters | |
| the order of the "tags" is not important | |
kuid                                    <kuid: this is an auto-generated number >
kind                                    "texture"
texture                                 "icon_gradeXing.texture"
username                                "icon grade crossing ahead"
category-class                          "JI"
trainz-build                            4.3

thumbnails
{
  Default
  {
    width                               240
    height                              180
    image                               "icon_gradeXing.jpg"
  }
  01
  {
    width                               64
    height                              64
    image                               "icon_gradeXing.texture"
  }
}
description             "Icon representing an approaching grade crossing. Designed for message popups."
|
|
|||||||||||||||||||||
| Settings: For the above example:
|
|||||||||||||||||||||
|
|
|||||||||||||||||||||
| Language Options: |
|
| All Trainz assets have a language facility built into their config.txt files that allows other language translations to be added for certain tags, such as the username and description tags. A full description of the process can be found on the Trainz Wiki at At the very basic level any creator can easily provide other language translations for the username and description tags in the assets they create. Examples are shown below for this sample asset. |
|
username "icon grade crossing ahead" username-c2 "图标前方的路口" username-de "Symbol Bahnübergang voraus" username-es "icono de cruce de grados por delante" username-fr "icône passage à niveau avant" username-nl "pictogram cijferovergang vooruit" username-ru "значок пересекает" |
|
| Translations to Chinese (simplified), Spanish, French, German, Dutch and Russian, perfect or not, were provided by Google Translate. | |
[edit] The Thumbnail Image |
| A thumbnail image MUST be present in the asset |
|
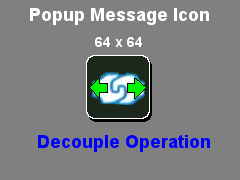 |
[edit] The Icon Image |
| You will need image editing software to create the icon image or to change an existing image to the required dimensions and format | |
| See the |
(not to scale) |
|
||||||||||||||||||||
|
[edit] The Texture File |
| The .texture.txt file controls how an image icon is displayed, particularly its Alpha Channel (or transparency) data. The file must be present even if no transparency is used in the icon. |
|
|
|||||||||||
Settings:
|
|||||||||||
|
|
|||||||||||
A sample Texture File, "ashpit.texture.txt", is shown below:-
primary=ashpit.jpg alpha=ashpit.bmp tile=st |
|
||||||||||||
| Notes: There are 3 general "scenarios" for the structure of the Texture File in a Texture Non Environmental asset.
Image file formats supported by Trainz that have an alpha channel are:-
Image file formats supported by Trainz that DO NOT have an alpha channel are:-
|
|
A detailed description of the .texture file format can be found on the Trainz Wiki Page at:- |
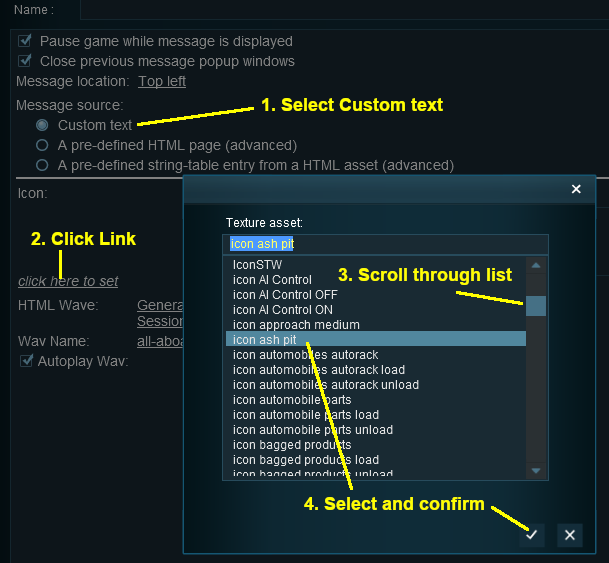
[edit] Using the Asset |
| Once the new asset has been committed it will be available for use in a Message Popup Rule. It will appear as a Texture Asset in the rule icon list. |
 |
|
|||||||||||||||
[edit] Trainz Wiki
|
|

This page was created by Trainz user pware in August 2018 and was last updated as shown below.