Color effect layer
The Color Effect Layer is an Effect Layer type which is used to add colour tinting to areas of ground texture. It works in HD, 5m and 10m resolution layouts.
It can be particulary useful when using HD Terrain which limits you to 16 different ground textures per baseboard. The color effect layer allows you to add different coloured tints to those 16 textures.
The Color Effect Layer is only available to Trainz Plus subscribers.
Contents |
Surveyor Configuration
In Surveyor, effect layers are added and configured using the Effect Layers dialog. Once added to the Route, the effect itself is "painted" onto the world using the Brush tool. Below is a detailed breakdown of the editable fields for a color effect layer.
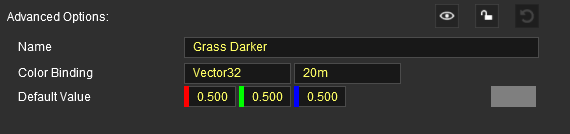
name
The name of this effect layer. This is used for display and identification purposes only, and has no effect on use or visuals.
color binding
default value
These are the Red, Green and Blue values of the Default colour tint for the layer. Each value is a number from 0.000 (off) to 1.000 (full on). Grey scale tints are created by entering the same value (e.g. 0.500) for all three colours. The colour produced by these values is shown in the colour display box on the right.
The colour used by the brush to paint the layer can be changed in different locations by the Color control in the Tool Options Palette.
Click the ![]() icon at the bottom right of the configuration window to create the new effect layer.
icon at the bottom right of the configuration window to create the new effect layer.
Use in Surveyor
You can only have a single Color Effect Layer in a route but, through the Tool Options Palette, it can be given different colours in different locations.
Create a Color Effect Layer
If you don't already have a color effect layer then you can create one by using any one of three different methods:-
- the Layers Palette, or
- the Surveyor main Edit Menu or
- the Brush Tool target box
Layers Palette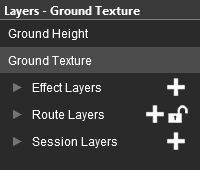 |
Click on the + icon next to the label Effect Layers |
Surveyor Edit Menu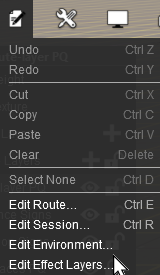 |
 |
Brush Tool Target |
Click on the Edit Effect Layers... option from the Brush Tool Target List.
|
 |
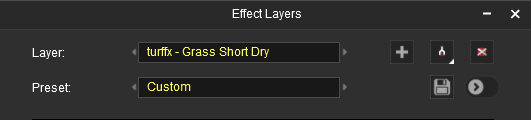
1. | Enter a name in the Effect Name text box. This allows it to be easily identified in the various tools and palettes. |
| 2. | Click on the Effect Type drop down box and select the option Color. If the option Color is greyed out and cannot be selected then a color effect layer has already been created so a new one cannot be added. |
|
| 3. | Click the |
|
| 4. | If required configure the settings for the color effect layer as described in the section Surveyor Configuration above. In the majority of cases you will probably leave these settings at their default values. |
Select the Color Effect Layer
You can select the Color Effect Layer in Surveyor by one of two methods:-
- From the Layers Palette
- select the color effect layer name. This will also select the Brush tool and set it to paint with the selected effect layer.
- From the Tools Palette
- select the Brush Tool
- from the brush target dropdown box select the color effect layer name.
Set the Colour
You have the option of changing the colour tint used by the effect layer brush. The brush will use the set colour until it is changed to a new one. Different colours can be used in different areas of the layout to match or complement the ground textures used.
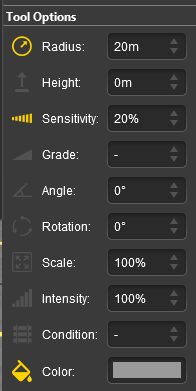 |
The Tool Options Palette will show the brush settings for the color effect layer.
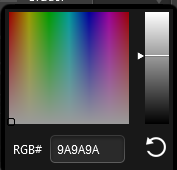
The setting, Color, allows you to set the colour and its intensity (brightness/darkness) that is to be used by the brush. The coloured box next to the label Color shows the currently set brush colour. Click on the box to open the colour picker and select a new brush colour.
|
Painting with the Color Effect Layer
Use the Tool Options Palette to set the brush radius and sensitivity. Higher sensitivity settings will make the colour more obvious.
Paint the effect layer using the same sweeping motion used for painting a ground texture.
The effect layer will only change the colours of the ground texture where it is used. It will not alter the colours or appearance of any objects placed at the same location.
It is recommended that you experiment with the settings and painting to achieve the result you want.
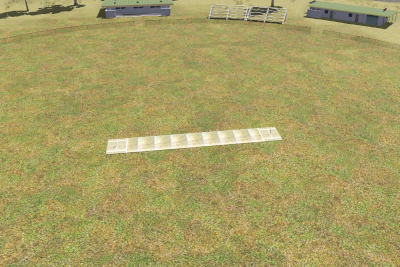
| No color effect layer applied | Color effect layer applied |
 |
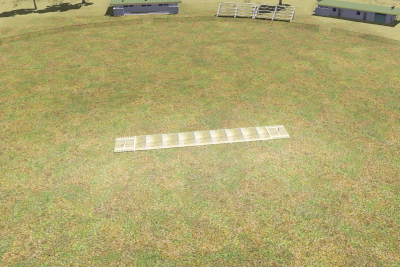 |
| Cricket pitch scene before and after applying a color effect layer that gives the impression of "wear and tear" around the pitch area | |
See Also
Back to Effect_Layer