CCG/Modelling: Bump Mapping Information
| Line 15: | Line 15: | ||
| − | |||
| − | Bump Mapping in Trainz | + | ===Bump Mapping in Trainz=== |
| − | + | TS2009 onwards supports bump mapping for most game objects. Used in conjunction with 'level of detail' mesh reduction, it is a powerful tool to enhance the detailled appearance of the game. Refer to Level of Detail, Page 370. | |
| − | TS2009 onwards supports bump mapping for most game objects. Used in conjunction with 'level of detail' mesh reduction it is a powerful tool to enhance the detailled appearance of the game. Refer to Level of Detail, Page 370. | + | |
Bump mapping can be used to simulate 3-dimensional detail to rivets, bolts, rust and joints for example. The following example is taken from Auran's steam locomotive the QR Class PB 15 (figure 1). | Bump mapping can be used to simulate 3-dimensional detail to rivets, bolts, rust and joints for example. The following example is taken from Auran's steam locomotive the QR Class PB 15 (figure 1). | ||
| + | [[Image:CCG_QR_Class_PB15.jpg]] | ||
| + | . . . . QR Class PB 15 . . . . . Figure 1 | ||
| − | |||
| − | + | . . . . . . .DIFFUSE TEXTURE 1024x512 24 bit .tga | |
| + | [[Image:CCG_Diffuse_Texture_PB_15.jpg]] | ||
| + | . . . . . . . . . . . Figure 2 | ||
| − | + | . . . . . .GREYSCALE HEIGHT MAP 1024x512 | |
| + | [[Image:CCG_GreyScale_Bump_Map_PB_15.jpg]] | ||
| + | . . . . . . . . . . . Figure 3 | ||
| − | |||
| + | . . . . . . . . RGB NORMAL MAP 1024x512 | ||
| − | + | [[Image:CCG_Normal_Map_PB_15.jpg]] | |
| − | + | . . . . . . . . . . . Figure 4 | |
| − | + | ==='Normal' Map Generation=== | |
| − | + | ||
| − | 'Normal' Map Generation | + | |
This 'normal' map was created from the greyscale height map above using a Photoshop Normal Map Generation Filter available for download from the Nvidia web site. The plug-in also includes a 3D preview with per-pixel lighting to view the generated normal map. | This 'normal' map was created from the greyscale height map above using a Photoshop Normal Map Generation Filter available for download from the Nvidia web site. The plug-in also includes a 3D preview with per-pixel lighting to view the generated normal map. | ||
| Line 66: | Line 67: | ||
| + | . . . PHOTOSHOP NORMAL MAP GENERATION FILTER | ||
| + | [[Image:CCG_Nvidia_normal_map_filter.jpg]] | ||
| − | + | . . . . . . . . . Figure 5 | |
| − | + | ||
| − | Important Notes | + | ===Important Notes on 'Normal Maps'=== |
| − | + | - Once the bump map has been converted to a RGB Normal Map, do not apply any changes to it like scale, blur sharpen etc. If you wish to alter the normal, apply the changes to the greyscale height map then re-generate. | |
| − | + | ||
| − | + | ||
| − | |||
| − | + | - The normal map does not have to be the same dimensions as the diffuse map. Normal maps can be smaller to save texture space, larger for finer grain bumps but the later is not advisable at 1024x512. As above, do not apply changes to an already generated normal map. | |
| − | + | - At no time should you save RGB normal maps in a 'lossy' file format (i.e. jpg or other compression file format). This is due to the fact that compression de-normalises normals. Use only uncompressed 24 bit tga's. | |
| − | |||
| − | + | - Keep all mapping clean. i.e. Don't stretch your mapping co-ordinates. You can get some seriously undesirable effects! | |
| − | |||
| + | ====Note==== | ||
| + | These settings will also apply when specifying specular levels of non-bump mapped materials. Just remember to make the Diffuse and Ambient colour values pure white (unless you really know what you are doing!). | ||
| + | :Emissive values (self-illumination) is also exportable using the above configuration. | ||
| + | :Specific material naming conventions need not apply to non-bump mapped materials. | ||
| − | |||
| − | |||
| − | |||
| − | |||
| − | |||
| − | |||
| − | |||
| + | ===Bump Mapped Materials=== | ||
| + | 3D Studio Max 4/4.2, 5.1 | ||
| + | The setup has altered from previous exporters. This is to allow specular control of bump mapped surfaces (see notes on Page 354 for Specular Control). | ||
| + | After downloading and installing the exporter, ensure the following configuration: | ||
| − | C:\3dsmax4\plugins\JetExporter\JetExporter.cfg | + | '''C:\3dsmax4\plugins\JetExporter\JetExporter.cfg''' |
| − | + | ||
enablearnings = 1 | enablearnings = 1 | ||
| − | |||
[C:\3dsmax4\Plugins\JetExporter\IndexedMeshExport.dll] | [C:\3dsmax4\Plugins\JetExporter\IndexedMeshExport.dll] | ||
{ | { | ||
| Line 125: | Line 121: | ||
[C:\3dsmax4\Plugins\JetExporter\AnimationExport.dll] | [C:\3dsmax4\Plugins\JetExporter\AnimationExport.dll] | ||
{ | { | ||
| − | + | ||
} | } | ||
| − | + | ||
| + | ===Material Naming Conventions=== | ||
| + | This information, for TS2009 onwards, is better covered in <font color="red">XXXXXXX</font> | ||
| + | |||
| + | Specular Values Representation: | ||
| + | The specular setting is controlled by the whiteness slider in 3DSMax (left). The whiter it is, the higher the value. | ||
| + | :- Ensure '''Specular Level''' is 100 | ||
| + | :- For bump mapped materials, the Glossiness value gives a visual representation in MAX only.. Trainz forces this value to 32. | ||
| + | :- For non-bump mapped materials the glossiness value WILL be exported, you should still use the whiteness slider to determine the specular level. | ||
| − | + | For a "m.tbumptex" material (a normal mapped texture), the specular level is mapped by the normal map alpha channel. Thus you can have per-pixel control over specular lighting. | |
| − | |||
| − | |||
| − | |||
| − | |||
| − | |||
| − | |||
| − | |||
| − | |||
| − | |||
| − | + | [[Modelling: Locomotive Numbering|Previous Page]] . . . [[Modelling: Textures and Opacity Effects|Next Page]] | |
| − | + | ==Return to CCG Index== | |
| − | + | [[Content Creator's Guide]] | |
Revision as of 15:14, 14 June 2011
Contents |
Bump Mapping Information
Note: Bump mapped materials for TRS requires 3DSMmax 4 or later exporter. A GMax exporter supporting normal mapping is not available.
Bump Mapping Background Theory
For those new to this term, Bump mapping is used to add 3-dimensional detail to an image (using an applied RGB `Normal' map), without increasing the number of polygons.
A 'normal' is a vector that points into the direction that a surface is facing (orthogonal to its surface). 'Normal' bump mapping applies 'false' normals to each pixel of a polygon, so that the reflection is not computed in accordance to the 'real' polygon surface, but according to the surface vectors of the normal map.
This results in the bump mapping effect, giving the surface a 3D-appearance that is not 'really' geometrically there.
If the user's graphics card does not support per-pixel bump mapping, then the bump mapping effect won't be seen.
Bump Mapping in Trainz
TS2009 onwards supports bump mapping for most game objects. Used in conjunction with 'level of detail' mesh reduction, it is a powerful tool to enhance the detailled appearance of the game. Refer to Level of Detail, Page 370.
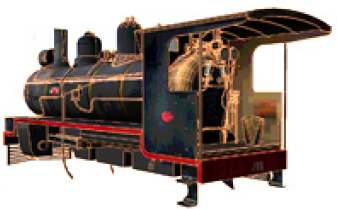
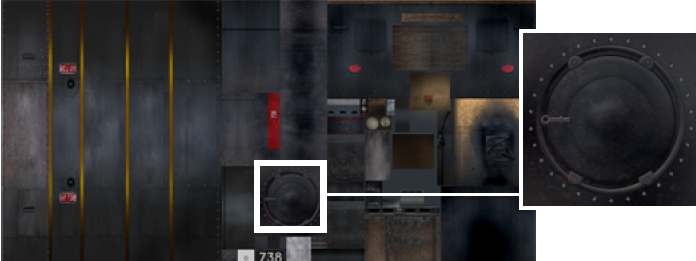
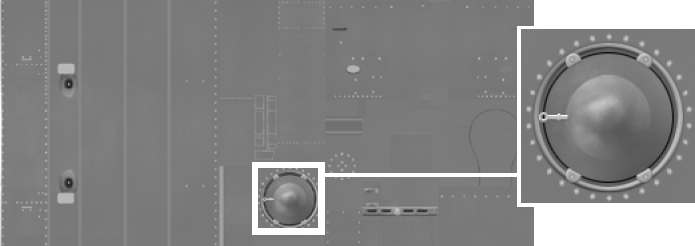
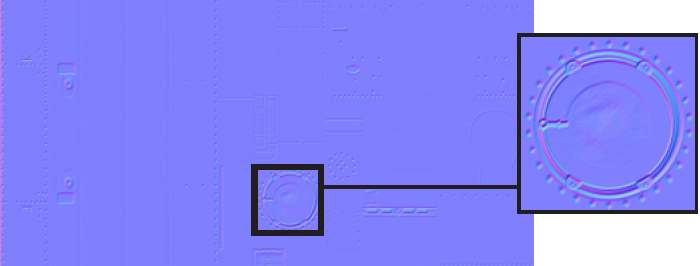
Bump mapping can be used to simulate 3-dimensional detail to rivets, bolts, rust and joints for example. The following example is taken from Auran's steam locomotive the QR Class PB 15 (figure 1).
. . . . QR Class PB 15 . . . . . Figure 1
. . . . . . .DIFFUSE TEXTURE 1024x512 24 bit .tga
. . . . . . . . . . . Figure 2
. . . . . .GREYSCALE HEIGHT MAP 1024x512
. . . . . . . . . . . Figure 3
. . . . . . . . RGB NORMAL MAP 1024x512
. . . . . . . . . . . Figure 4
'Normal' Map Generation
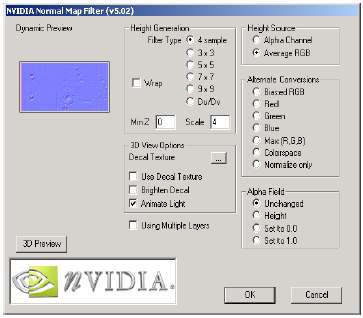
This 'normal' map was created from the greyscale height map above using a Photoshop Normal Map Generation Filter available for download from the Nvidia web site. The plug-in also includes a 3D preview with per-pixel lighting to view the generated normal map.
The plug-in generates the normal map by calculating the greyscale contrast. White is high, grey is flat, black is low.
The above normal map was generated using the settings displayed right (figure 5).
Other third party Trainz tools such as PEV's Images2TGA or Andi06's AssetX also have normal map filters.
Note: Bump map textures will need to be in a pixel ratio of `power of 2' for the filter to function. i.e. 512x512, 256x512, 512x1024 etc. Of course these are the same dimensions as TRS2004 so you shouldn't have a problem!
Refer to Important Notes: 'Normal Maps' below.
. . . PHOTOSHOP NORMAL MAP GENERATION FILTER
. . . . . . . . . Figure 5
Important Notes on 'Normal Maps'
- Once the bump map has been converted to a RGB Normal Map, do not apply any changes to it like scale, blur sharpen etc. If you wish to alter the normal, apply the changes to the greyscale height map then re-generate.
- The normal map does not have to be the same dimensions as the diffuse map. Normal maps can be smaller to save texture space, larger for finer grain bumps but the later is not advisable at 1024x512. As above, do not apply changes to an already generated normal map.
- At no time should you save RGB normal maps in a 'lossy' file format (i.e. jpg or other compression file format). This is due to the fact that compression de-normalises normals. Use only uncompressed 24 bit tga's.
- Keep all mapping clean. i.e. Don't stretch your mapping co-ordinates. You can get some seriously undesirable effects!
Note
These settings will also apply when specifying specular levels of non-bump mapped materials. Just remember to make the Diffuse and Ambient colour values pure white (unless you really know what you are doing!).
- Emissive values (self-illumination) is also exportable using the above configuration.
- Specific material naming conventions need not apply to non-bump mapped materials.
Bump Mapped Materials
3D Studio Max 4/4.2, 5.1 The setup has altered from previous exporters. This is to allow specular control of bump mapped surfaces (see notes on Page 354 for Specular Control).
After downloading and installing the exporter, ensure the following configuration:
C:\3dsmax4\plugins\JetExporter\JetExporter.cfg
       enablearnings = 1
       [C:\3dsmax4\Plugins\JetExporter\IndexedMeshExport.dll]
       {
         buildNeighborArray = 0
         forceTxtOverwrite = 0
         defaultMaterialColor = 0
         disableautobillboard = 1
       }
       [C:\3dsmax4\Plugins\JetExporter\ProgressiveMeshExport.dll]
       {
         buildNeighborArray = 0
         forceTxtOverwrite = 0
         defaultMaterialColor = 0
         disableautobillboard = 1
       }
       [C:\3dsmax4\Plugins\JetExporter\AnimationExport.dll]
       {

       }
Material Naming Conventions
This information, for TS2009 onwards, is better covered in XXXXXXX
Specular Values Representation:
The specular setting is controlled by the whiteness slider in 3DSMax (left). The whiter it is, the higher the value.
- - Ensure Specular Level is 100
- - For bump mapped materials, the Glossiness value gives a visual representation in MAX only.. Trainz forces this value to 32.
- - For non-bump mapped materials the glossiness value WILL be exported, you should still use the whiteness slider to determine the specular level.
For a "m.tbumptex" material (a normal mapped texture), the specular level is mapped by the normal map alpha channel. Thus you can have per-pixel control over specular lighting.
Previous Page . . . Next Page
