SAR Scenario Depot Fuel Run V1
From TrainzOnline
(Difference between revisions)
(Created page with "<!-- V1.0 --> <table width=1000> <tr valign="top"> <td width=50 align="left">30px</td> <td width=900 align="center">...") |
m |
||
| (4 intermediate revisions by one user not shown) | |||
| Line 1: | Line 1: | ||
<!-- V1.0 --> | <!-- V1.0 --> | ||
| + | <!-- Scenario 1 --> | ||
<table width=1000> | <table width=1000> | ||
<tr valign="top"> | <tr valign="top"> | ||
| − | <td width=50 align="left">[[image:ArrowLeftBtn.png|link=SAR Scenario Quorn | + | <td width=50 align="left">[[image:ArrowLeftBtn.png|link=SAR Scenario Quorn Shunter_V1|30px]]</td> |
<td width=900 align="center"><span style="font-size: 21px; font-weight: 700;"> <span style="background-color: black; color: white;"> 1 </span> <span style="background-color: black; color: white;"> Gladstone to Peterborough Depot Fuel Run </span></span></td> | <td width=900 align="center"><span style="font-size: 21px; font-weight: 700;"> <span style="background-color: black; color: white;"> 1 </span> <span style="background-color: black; color: white;"> Gladstone to Peterborough Depot Fuel Run </span></span></td> | ||
| − | <td width=50 align="right">[[image:ArrowRightBtn.png|link=SAR Scenario East-West | + | <td width=50 align="right">[[image:ArrowRightBtn.png|link=SAR Scenario East-West Express_V1|30px]]</td> |
</tr> | </tr> | ||
<tr valign="top"> | <tr valign="top"> | ||
| − | <td align="center" colspan=3>A scenario in the '''[[SAR Peterborough Base Session]]'''</td> | + | <td align="center" colspan=3>A scenario in the '''[[SAR Peterborough Base Session_V1|SAR Peterborough Base Session]]'''</td> |
</tr> | </tr> | ||
</table> | </table> | ||
| Line 35: | Line 36: | ||
<tr valign="top"> | <tr valign="top"> | ||
<td><span style="font-size: 15px; font-weight: 700; color: white; background-color: black;"> Loco: </span></td> | <td><span style="font-size: 15px; font-weight: 700; color: white; background-color: black;"> Loco: </span></td> | ||
| − | <td>'''[[ | + | <td>'''[[SAR_Scenario_Rolling_Stock_V1#SAR_T_Class|SAR T 258]] on Gladstone <span style="color: black; background-color: yellow;"> Goods Loop </span>'''<br> |
| − | See [[image:Loco_Roster_Label.png|link=SAR Peterborough Division Loco | + | See [[image:Loco_Roster_Label.png|link=SAR Peterborough Division Loco Roster_V1]] for a full list of locos.</td> |
</tr> | </tr> | ||
<tr valign="top"> | <tr valign="top"> | ||
<td><span style="font-size: 15px; font-weight: 700; color: white; background-color: black;"> Consist: </span></td> | <td><span style="font-size: 15px; font-weight: 700; color: white; background-color: black;"> Consist: </span></td> | ||
<td>Attached to '''SAR T 258''' | <td>Attached to '''SAR T 258''' | ||
| − | *5 '''[[ | + | *5 '''[[SAR_Scenario_Rolling_Stock_V1#TGR_CCC|CCC Gondola]]''' wagons loaded with '''coal''' |
| − | *3 '''[[ | + | *3 '''[[SAR_Scenario_Rolling_Stock_V1#Tank|Tank Fuel]]''' wagons loaded with '''bunker c oil''' |
| − | *1 '''[[ | + | *1 '''[[SAR_Scenario_Rolling_Stock_V1#Guard_Vans|Guard Van]]'''</td> |
</tr> | </tr> | ||
<tr valign="top"> | <tr valign="top"> | ||
| Line 56: | Line 57: | ||
</tr> | </tr> | ||
</table> | </table> | ||
| + | |||
<table bgcolor="lightcyan" width=1000> | <table bgcolor="lightcyan" width=1000> | ||
<tr> | <tr> | ||
<td> | <td> | ||
| − | [[Image:Location Index.png|link=SAR | + | [[Image:Location Index.png|link=SAR Index_V1|alt=Location Index|Location Index]]</td> |
<td>'''Each location in the layout has a detailed set of track diagrams that provide a variety of useful information'''<br> | <td>'''Each location in the layout has a detailed set of track diagrams that provide a variety of useful information'''<br> | ||
The <span style="font-weight: 700; color: white; background-color: black;"> Getting Started </span> guide below gives a summary of what is available.<br> | The <span style="font-weight: 700; color: white; background-color: black;"> Getting Started </span> guide below gives a summary of what is available.<br> | ||
| − | To display this information click any [[image:Line_Index_Label.png|link= | + | To display this information click any [[image:Line_Index_Label.png|link=SAR_Index_V1|Location Index]] graphic, or go to the bottom of the page for all the session links (all links will open in this window).</td> |
</tr> | </tr> | ||
</table> | </table> | ||
| + | |||
<table cellpadding="2" bgcolor="black" width=1000> | <table cellpadding="2" bgcolor="black" width=1000> | ||
<tr valign="top"> | <tr valign="top"> | ||
| Line 75: | Line 78: | ||
#*Open the '''Finder Tool''' (press <span style="font-weight: 700; font-size: 15px; color: white; background-color: black;"> Ctrl </span> <span style="font-weight: 700; font-size: 15px; color: white; background-color: black;"> F </span>) and type, in the '''Name''' field, the name of the loco, in this case '''SAR T 258''' (or just '''T 258''' should be enough). Click the '''tick''' icon, '''OR''' | #*Open the '''Finder Tool''' (press <span style="font-weight: 700; font-size: 15px; color: white; background-color: black;"> Ctrl </span> <span style="font-weight: 700; font-size: 15px; color: white; background-color: black;"> F </span>) and type, in the '''Name''' field, the name of the loco, in this case '''SAR T 258''' (or just '''T 258''' should be enough). Click the '''tick''' icon, '''OR''' | ||
#*Open the '''Driver List''' (bottom left of the screen) and then scroll through the list to find the '''loco name''' ('''SAR T 258''') then click the drivers '''Eye''' icon [[image:Driver_Eye.png|link=]] to take control of the loco | #*Open the '''Driver List''' (bottom left of the screen) and then scroll through the list to find the '''loco name''' ('''SAR T 258''') then click the drivers '''Eye''' icon [[image:Driver_Eye.png|link=]] to take control of the loco | ||
| − | # Take a few moments to get your bearings. Click [[image:Line_Index_Gladstone.png|link= | + | # Take a few moments to get your bearings. Click [[image:Line_Index_Gladstone.png|link=SAR_Gladstone_V1|Gladstone Data]] (this link will open in this window) to show the location details and track plans for '''Gladstone'''. In each location details page:- |
#*the [[image:Tab_HM_White.png|link=|75px]] tab gives an overall summary of each location with a "potted" history (where available). | #*the [[image:Tab_HM_White.png|link=|75px]] tab gives an overall summary of each location with a "potted" history (where available). | ||
#*the [[image:Tab_TM_Grey.png|link=|75px]] tab reveals the invisible [[image:Trackmark_Right.png|link=|alt=TM|8px]] '''Track Marks''' for '''Drive To''' commands. | #*the [[image:Tab_TM_Grey.png|link=|75px]] tab reveals the invisible [[image:Trackmark_Right.png|link=|alt=TM|8px]] '''Track Marks''' for '''Drive To''' commands. | ||
| Line 95: | Line 98: | ||
<table bgcolor="lightcyan" width=996> | <table bgcolor="lightcyan" width=996> | ||
<tr valign="center"> | <tr valign="center"> | ||
| − | <td width=70 align="right">[[image:SAR Tutorial.png|link=SAR Scenarios | + | <td width=70 align="right">[[image:SAR Tutorial.png|link=SAR Scenarios Tutorial_V1|alt=Tutorial]]</td> |
<td width=750>'''A tutorial on using these scenarios is provided in the link on the left. The link will open in this window'''.<br> | <td width=750>'''A tutorial on using these scenarios is provided in the link on the left. The link will open in this window'''.<br> | ||
The tutorial uses the first stage of this scenario, from leaving '''Gladstone''' to arriving at '''Jamestown''', so if this is your first scenarios then the Tutorial may be an ideal starting point.</td> | The tutorial uses the first stage of this scenario, from leaving '''Gladstone''' to arriving at '''Jamestown''', so if this is your first scenarios then the Tutorial may be an ideal starting point.</td> | ||
| Line 131: | Line 134: | ||
<tr valign="top"> | <tr valign="top"> | ||
<td> | <td> | ||
| − | A summary of the facilities and product loads at all locations along the line is provided in the link [[Image:SAR_PortPirie-BrokenHill_Line.png|link=SAR Port Pirie-Broken | + | A summary of the facilities and product loads at all locations along the line is provided in the link [[Image:SAR_PortPirie-BrokenHill_Line.png|link=SAR Port Pirie-Broken Hill_V1|alt=Port Pirie-Broken Hill Line|Show Port Pirie-Broken Hill Line]] |
*The approaches to all locations are protected by invisible signals to prevent the '''AI Half Speed Slowdown Problem''' when approaching a signal at stop. | *The approaches to all locations are protected by invisible signals to prevent the '''AI Half Speed Slowdown Problem''' when approaching a signal at stop. | ||
| − | *Trackmarks and industries have been provided for AI '''Drive To Trackmark''', '''Drive via Trackmark''' and <span style="font-weight: 700;">Drive to <span style="background-color: yellow; color: black;"> Industry </span></span> commands. Click [[image:Line_Index_Label.png|link= | + | *Trackmarks and industries have been provided for AI '''Drive To Trackmark''', '''Drive via Trackmark''' and <span style="font-weight: 700;">Drive to <span style="background-color: yellow; color: black;"> Industry </span></span> commands. Click [[image:Line_Index_Label.png|link=SAR_Index_V1|Location Index]] for details. |
| − | *Manual (no AI) driving is possible. As a visual driving aid, a '''Caution''' warning sign has been placed at the location of the '''Main Approach Dn''' and '''Main Approach Up''' trackmarks. Click [[image:Line_Index_Label.png|link= | + | *Manual (no AI) driving is possible. As a visual driving aid, a '''Caution''' warning sign has been placed at the location of the '''Main Approach Dn''' and '''Main Approach Up''' trackmarks. Click [[image:Line_Index_Label.png|link=SAR_Index_V1|Location Index]] for details. |
*If driving manually in yards, you are responsible for correctly setting any '''catch points'''. | *If driving manually in yards, you are responsible for correctly setting any '''catch points'''. | ||
</td> | </td> | ||
| Line 146: | Line 149: | ||
<table width=180> | <table width=180> | ||
<tr valign="top"> | <tr valign="top"> | ||
| − | |||
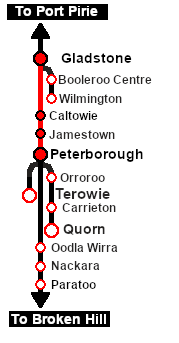
<td align="center">[[image:SAR Scenario Gladstone-Peterborough Strip Map.png|link=|alt=Strip Map]]<br>[[image:SAR Scenario Route.png|link=|alt=Route Key]]</td> | <td align="center">[[image:SAR Scenario Gladstone-Peterborough Strip Map.png|link=|alt=Strip Map]]<br>[[image:SAR Scenario Route.png|link=|alt=Route Key]]</td> | ||
</tr> | </tr> | ||
| Line 159: | Line 161: | ||
</tr> | </tr> | ||
<tr valign="center"> | <tr valign="center"> | ||
| − | <td width=50 align="left">[[image:ArrowLeftBtn.png|link=SAR Scenario Quorn | + | <td width=50 align="left">[[image:ArrowLeftBtn.png|link=SAR Scenario Quorn Shunter_V1|30px]]</td> |
| − | <td width=125 align="center">[[image:Session Scenario Index.png|link=SAR Peterborough Base | + | <td width=125 align="center">[[image:Session Scenario Index.png|link=SAR Peterborough Base Session_V1|alt=Scenarios|Scenario Index]]<br>'''[[SAR Peterborough Base Session_V1|Scenario Index]]'''</td> |
| − | <td width=125 align="center">[[Image:Location Index.png|link=SAR | + | <td width=125 align="center">[[Image:Location Index.png|link=SAR Index_V1|alt=Location Index|Location Index]]<br>'''[[SAR Index_V1|Location Index]]'''</td> |
| − | <td width=125 align="center">[[image:SAR Tutorial.png|link=SAR Scenarios | + | <td width=125 align="center">[[image:SAR Tutorial.png|link=SAR Scenarios Tutorial_V1|alt=Tutorial|Drive Tutorial]]<br>'''[[SAR Scenarios Tutorial_V1|Drive Tutorial]]'''</td> |
| − | <td width=125 align="center">[[image:Rolling Stock Index.png|link=SAR Scenario Rolling | + | <td width=125 align="center">[[image:Rolling Stock Index.png|link=SAR Scenario Rolling Stock_V1|alt=Rolling Stock|Rolling Stock List]]<br>'''[[SAR Scenario Rolling Stock_V1|Rolling Stock List]]'''</td> |
| − | <td width=125 align="center">[[image:Loco Index.png|link=SAR Peterborough Division Loco | + | <td width=125 align="center">[[image:Loco Index.png|link=SAR Peterborough Division Loco Roster_V1|alt=Loco Roster|Loco Roster]]<br>'''[[SAR Peterborough Division Loco Roster_V1|Loco Roster]]'''</td> |
| − | <td width=125 align="center">[[image:Industry Index.png|link=SAR Scenario | + | <td width=125 align="center">[[image:Industry Index.png|link=SAR Scenario Industries_V1|alt=Industries|Active Industries]]<br>'''[[SAR Scenario Industries_V1|Active Industries]]'''</td> |
<td width=125 align="center">[[image:BackToTop.png|link=#top|alt=Top|Top]]</td> | <td width=125 align="center">[[image:BackToTop.png|link=#top|alt=Top|Top]]</td> | ||
| − | <td width= | + | <td width=50 align="right">[[image:ArrowRightBtn.png|link=SAR Scenario East-West Express_V1|30px]]</td> |
</tr> | </tr> | ||
</table> | </table> | ||
Revision as of 21:29, 13 May 2024
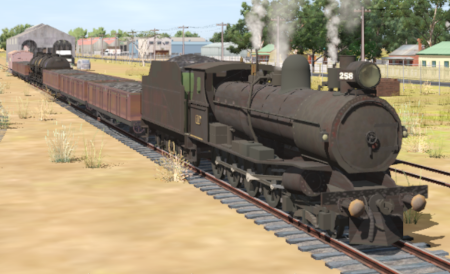
| 1 Gladstone to Peterborough Depot Fuel Run | ||
| A scenario in the SAR Peterborough Base Session | ||
| Loco coal stages and fuel-oil points need to be refilled regularly. This service delivers coal to the loco coal stages at Jamestown and Peterborough, and bunker c oil (for the SAR 400 class Garrett locos) to the loco (main) depot at Peterborough. |
 |
|
|||||||||||
 |
Each location in the layout has a detailed set of track diagrams that provide a variety of useful information The Getting Started guide below gives a summary of what is available. |
Getting Started:
|
Tutorial:
|
|
|


| Links: All links will open in this window | ||||||||
 Scenario Index |
Location Index |
 Drive Tutorial |
 Rolling Stock List |
 Loco Roster |
 Active Industries |
|||
This page was created by Trainz user pware in February 2021 and was last updated as shown below.