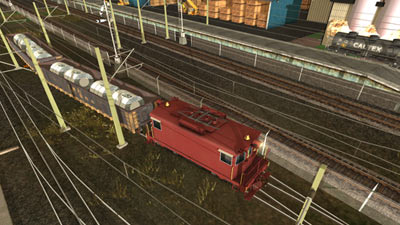
The Bidye Traction
Contents |
The Bidye Traction Railroad is a short line electric traction railroad serving several inter-dependent industries. It is the last remnants of a once far more extensive traction system.
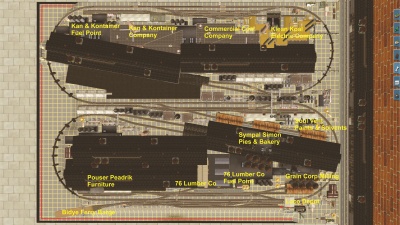
The industries served by the railroad include a lumber mill, a furniture factory, a grain mill, a commercial bakery, a paint and solvent factory, a metal can and container factory, and a coal fired electricity plant.
The lumber mill, as an example, produces timber for the furniture works, and crates and pallets for the bakery, the metal can factory and the paint factory. Some of the metal cans are used by the paint factory. Milled grains are used by the bakery.
Box cars, gondolas, hoppers, flat cars, tank cars and other rolling stock arrive by a ferry barge.
A Class 1 railroad also has running rights over the main track.
The railroad is one of the few surviving reminders of the grim, grimy, decaying smoke stack USA.
General
Map of the layout, click for high resolution.
In the Trainz Map View, all interactive industries have the prefix “IND”.
Freight cars will load or unload when spotted between the yellow markers.
In some sessions AI trains may be circulating in both directions, generally at frequencies between 7 and 10 minutes.
At the crossing loops the AI trains will always take the right track.
It is assumed that the Player is competent in accessing the Map View (“Ctrl-M” in Driver), can pan and zoom the map view, and can use the map to monitor the position of AI trains.
It is assumed that the Player is competent in using the external 4-key view to scout ahead to set switches and to monitor the location of AI trains.
Sessions can be paused by pressing the P key. When paused switches can be set, the Map consulted and the external 4-key view used.
In the sessions Signal Link has been configured to help the Player transit the single track sections.
The usual duration for a session is between a half and one and a half hours, though this will depend on the skills of the player. Some of the more advanced sessions with AI trains running at short headways are not for the faint hearted.
In sessions “Help” (the red/green indicators at switches) has been set to off. To toggle “Help” on/off, press “Ctrl-H”.
There is nothing more frustrating than almost completing a session only to have a corn field meet with an oncoming AI train. Before attempting any heroic manoeuvre involving AI consider making a save session first.
In the sessions the Dispatcher sets you a task. The task can be completed in any order. Give some thought to how to best complete the task. Setting up the freight car cuts in the correct order can, for example, save considerable time later.
Points are awarded for completing individual tasks and for completing the session.
Popup screens may appear as the session progresses. These can be dismissed by pressing Esc.
Standard Operating Procedures
The switches have been configured so that the switch is in the straight through position when the switch stand target disk is side on.
In confined locations a switch stand embedded between the track has been used.
There are no overhead electrified wires on the ferry barge. This prevents electric locomotives accessing the barge itself. The flat cars located in the spur near the barge may be required as spacer cars when unloading and loading freight cars.
All movements can be made as switching movements, with the locomotive at either the head or the rear of the train. If the latter, the brakeman must ride on the lead car. The locomotive must not be placed in the middle of the consist.
An oncoming AI train will stop at the signal with two yellow arms in the crossing loop provided the Player has entered the single track section before the AI train reaches the yellow armed signal. This will give the Player full control of the switches and allow access to the yard.
Obey signal indications.
Do not proceed past the gates.
The line speed is 20 mph.
Sessions
The sessions are listed in increasing order of difficulty.
At the beginning of each session you are given the option of using Realistic (Cab) or Easy (DCC) Mode. You are encouraged to use the former.
The “User rules menu” / “QuickDrive” (top right) allows the control type and environment to be changed. This includes selecting Realistic or Easy Control, the weather, and setting the time of day.
The “Additional tools menu” (top right) allows information screens to be toggled on/off.
The popup screen when it appears (top left) can be dismissed by pressing “Esc”.
The pantograph on an electric locomotive is raised and lowered with the “End” key in the numeric key pad with “Num Lock” activated.
In cab view (the 1-key view), pressing “Alt-C” will transfer the view from one cab to the other in a locomotive with two cabs.
Session 1 - A Spectator
Central Portal Control has been configured to emit AI trains at very frequent intervals. In this session you observe their progress around the route.
Note that at the crossing loops the AI trains always take the right track.
Signal Link has been configured so that when a train enters a single track section the signal with the two yellow arms in the loop in advance shows a stop indication. This will be useful when you, the Player, start interacting with the AI trains. Stopping an oncoming AI train at that yellow signal will allow you full access to the yard.
Now go into the External Camera View by pressing the 4-key and use the mouse to move around the layout and observe the AI trains working from one portal to the other.
Press “F6” to dismiss the driver bar at the bottom of the screen.
Press “Esc” to close the popup screen. The session will then begin.
Session 2 - An Explorer
Now it is time to go out and mix it with the AI trains. They run less frequently than in the session, A Spectator.
Freight cars have been spotted around the layout to be used as you please.
Take time to explore the layout. Use the Map View (“Ctrl M”) and the External Camera View (4-key) to look out forAI trainz.
Remember that the AI trains always takes the right track in the crossing loops and that you can take control of a single track section by entering it before an oncoming AI train gets to the signal with two yellow arms.
Resist the temptation to speed. The line speed is 20 mph.
Now raise the pantograph (“End” key in the numeric key pad with “Num Lock” activated) and explore the layout.
Help (the red and green arrows above switches) has been turned off. Toggle on and off with “Ctrl H”.
Session 3 - Easy Street
“Chuck and Joe, Dispatcher here.
The barge with tank cars and hoppers has just arrived.
Unload the feedstock in the tank cars at Soul Vents and the coal in the hoppers at the Klean Koal Electricity Plant.
Return the empty tank cars and hoppers to the barge. You must spot them on the center track.
Keep clear of the Class 1 railroad trains.
I will contact you when you have finished.
Dispatcher out.”
In this session the portals emit AI trains at 10 minute intervals, plus or minus 2 minutes.
Sometimes it may be necessary to take manual control of an AI train.
Make a save before attempting any heroic manoeuvre with an AI train.

