SAR Yangya
From TrainzOnline
(Difference between revisions)
(added internal links) |
m |
||
| Line 3: | Line 3: | ||
<td width=750> | <td width=750> | ||
| − | <table | + | <table bgcolor="lightgrey" bordercolor="lightgrey" width=750> <!-- BEGIN Location details table --> |
| − | + | ||
| − | + | ||
| − | + | ||
| − | + | ||
| − | + | ||
| − | |||
| − | |||
| − | |||
| − | |||
| − | |||
| − | |||
| − | |||
| − | |||
| − | |||
| − | |||
| − | |||
| − | |||
| − | |||
| − | |||
| − | |||
<tr valign="middle"> | <tr valign="middle"> | ||
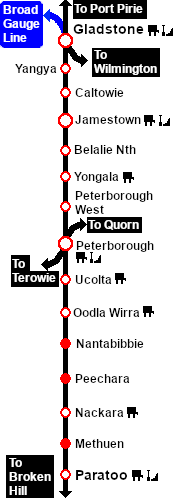
<td width=220 align="right">[[Image:SAR_PortPirie-BrokenHill_Line.png|link=SAR_Port_Pirie-Broken_Hill|alt=PortPirie-BrokenHill|Show Port Pirie-Broken Hill]]</td> | <td width=220 align="right">[[Image:SAR_PortPirie-BrokenHill_Line.png|link=SAR_Port_Pirie-Broken_Hill|alt=PortPirie-BrokenHill|Show Port Pirie-Broken Hill]]</td> | ||
| Line 41: | Line 21: | ||
</table></td> <!-- END Commodities Table 1 --> | </table></td> <!-- END Commodities Table 1 --> | ||
</tr> | </tr> | ||
| + | |||
</table> <!-- END Location details table --> | </table> <!-- END Location details table --> | ||
| + | |||
| + | <table> <!-- BEGIN Information Table --> | ||
| + | |||
| + | <tr valign="top"> | ||
| + | <td width=750> | ||
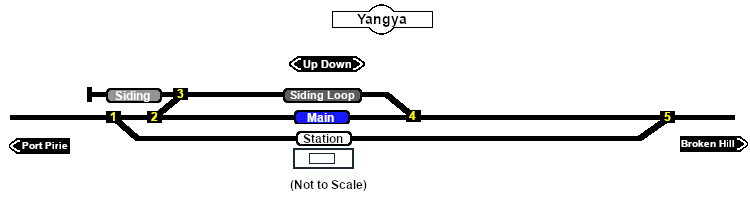
| + | Short station and siding loops. Unmanned station on the <span style="font-weight: 700; color: white; background-color: black;"> Port Pirie-Broken Hill Line </span>. This location was bypassed when the line was converted to standard gauge in 1969. | ||
| + | </td> | ||
| + | </tr> | ||
| + | |||
| + | </table> <!-- END Information Table --> | ||
| + | |||
| + | <table width=700> <!-- BEGIN Track Title Link --> | ||
| + | <tr valign="top"> | ||
| + | <td width=500>{{Anchor|TrackData}}<span style="font-weight: 700; font-size: 18px; background-color: blue; color: white;"> Track Diagram </span></td> | ||
| + | <td align=right width=200>[[image:ToPathsDown.png|link=#PathData]] [[file:BackToTop.png|link=#top]]</td> | ||
| + | </tr> | ||
| + | </table> <!-- END Track Title Link --> | ||
| + | |||
| + | [[Image:SAR_Yangya_Basic.png|link=|alt=Yangya Track Diagram]]<br> <!-- Track map --> | ||
<table bgcolor="LightYellow" width=750> <!-- BEGIN Track Markers table --> | <table bgcolor="LightYellow" width=750> <!-- BEGIN Track Markers table --> | ||
| + | <tr valign="top"> | ||
| + | <td colspan=4 align="center">[[Image:line740.png|link=]]</td> | ||
| + | </tr> | ||
<tr valign="middle"> | <tr valign="middle"> | ||
<td colspan=3 align="center"><span style="font-weight: 700;font-size: 17px; background-color: red; color: white;"> Track Markers </span></td> | <td colspan=3 align="center"><span style="font-weight: 700;font-size: 17px; background-color: red; color: white;"> Track Markers </span></td> | ||
| Line 120: | Line 123: | ||
<table width=750> <!-- BEGIN Switch Sets Station table --> | <table width=750> <!-- BEGIN Switch Sets Station table --> | ||
| − | |||
<tr valign="top"> | <tr valign="top"> | ||
| Line 147: | Line 149: | ||
</tr> | </tr> | ||
</table> <!-- END Switch Sets Loop table --> | </table> <!-- END Switch Sets Loop table --> | ||
| − | |||
| + | <table> <!-- BEGIN Switch Mainline table --> | ||
<tr valign="top"> | <tr valign="top"> | ||
| Line 167: | Line 169: | ||
<td colspan=6 align="center">[[Image:line740.png|link=]]</td> | <td colspan=6 align="center">[[Image:line740.png|link=]]</td> | ||
</tr> | </tr> | ||
| + | |||
</table> <!-- END Switches table --> | </table> <!-- END Switches table --> | ||
| Line 175: | Line 178: | ||
<table width=700> <!-- BEGIN Path Title Link --> | <table width=700> <!-- BEGIN Path Title Link --> | ||
<tr valign="top"> | <tr valign="top"> | ||
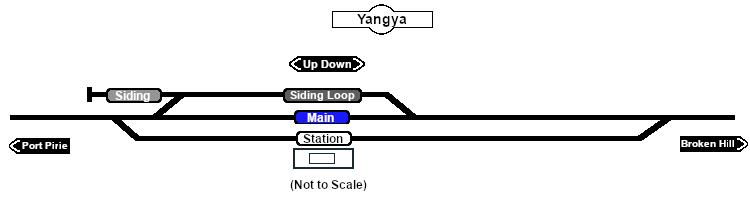
| − | <td width= | + | <td width=500>{{Anchor|PathData}}<span style="font-weight: 700; font-size: 18px; background-color: blue; color: white;"> Path Diagrams </span></td> |
| − | <td align=right width= | + | <td align=right width=200>[[image:ToTracksUp.png|link=#TrackData]] [[file:BackToTop.png|link=#top]]</td> |
</tr> | </tr> | ||
</table> <!-- END Path Title Link --> | </table> <!-- END Path Title Link --> | ||
| − | [[Image:SAR_Yangya.png|link=|alt=Yangya]]<br> | + | [[Image:SAR_Yangya.png|link=|alt=Yangya Path Map]]<br> <!-- Path map --> |
| + | |||
</td> | </td> | ||
</tr> | </tr> | ||
| Line 186: | Line 190: | ||
<table bgcolor="LightYellow"> <!-- BEGIN Paths Table --> | <table bgcolor="LightYellow"> <!-- BEGIN Paths Table --> | ||
| + | |||
<tr valign="top"> | <tr valign="top"> | ||
<td colspan=4 align="center">[[Image:line740.png|link=]]</td> | <td colspan=4 align="center">[[Image:line740.png|link=]]</td> | ||
| Line 210: | Line 215: | ||
<td colspan=4 align="center">[[Image:line740.png|link=]]</td> | <td colspan=4 align="center">[[Image:line740.png|link=]]</td> | ||
</tr> | </tr> | ||
| + | |||
</table> <!-- END Paths Table --> | </table> <!-- END Paths Table --> | ||
Revision as of 13:27, 11 November 2020
|
 |
|||||||||||||||||||||||||||||||||||||||||||||||||||||||||||||||||||||||||||||||||||||||||||||||||||||||||||||||||||||||||||||||||||||||||||||