SAR Scenario Wilmington Freight
m |
|||
| (18 intermediate revisions by one user not shown) | |||
| Line 1: | Line 1: | ||
| + | <!-- V1.0 --> | ||
<table width=1000> <!-- BEGIN Title table --> | <table width=1000> <!-- BEGIN Title table --> | ||
<tr valign="top"> | <tr valign="top"> | ||
| Line 18: | Line 19: | ||
<span style="font-weight: 700; font-size: 15px; color: white; background-color: black;"> The Historical Bit </span><br> | <span style="font-weight: 700; font-size: 15px; color: white; background-color: black;"> The Historical Bit </span><br> | ||
| − | The 1964 Working Timetable for the <span style="color: white; background-color: black; font-weight: 700;"> Wilmington Line </span> contained only two regular freight services through to '''Wilmington''', running on Mondays and Fridays only. An additional service to '''Wilmington''' ran only " | + | The 1964 Working Timetable for the <span style="color: white; background-color: black; font-weight: 700;"> Wilmington Line </span> contained only two regular freight services through to '''Wilmington''', running on Mondays and Fridays only. An additional service to '''Wilmington''' ran only "when required". On Wednesdays there was a freight service to '''Booleroo Centre''', with two additional services available "when required".<br> |
| − | The | + | The '''1982 Working Timetable''' consisted of a single weekly freight service to '''Wilmington'''. By 1984 the freight and livestock facilities at most of the locations along the line had been permanently closed.<br> |
| − | The | + | The line had no signals beyond '''Gladstone Yard''' and train order working was in operation. The line was closed in 1990 and the track has been removed. Most of the track right of way is now a walking and cycling Rail Trail .<br> |
----- | ----- | ||
<table width=1000> <!-- BEGIN Scenario image and loco/consist table --> | <table width=1000> <!-- BEGIN Scenario image and loco/consist table --> | ||
| Line 28: | Line 29: | ||
<td width=450>[[image:SAR T 257 Wilmington.png|link=|alt=Wilmington Local Freight]]</td> | <td width=450>[[image:SAR T 257 Wilmington.png|link=|alt=Wilmington Local Freight]]</td> | ||
<td> | <td> | ||
| − | <table width=550> <!-- BEGIN Loco/consist sub table --> | + | <table width=550 bgcolor="black"> <!-- BEGIN Loco/consist sub table --> |
| + | <tr valign="top"> | ||
| + | <td> | ||
| + | <table width=546 bgcolor="white"> | ||
<tr valign="top"> | <tr valign="top"> | ||
<td width=75><span style="font-size: 15px; font-weight: 700; color: white; background-color: black;"> Era: </span></td> | <td width=75><span style="font-size: 15px; font-weight: 700; color: white; background-color: black;"> Era: </span></td> | ||
| Line 35: | Line 39: | ||
<tr valign="top"> | <tr valign="top"> | ||
<td><span style="font-size: 15px; font-weight: 700; color: white; background-color: black;"> Duration: </span></td> | <td><span style="font-size: 15px; font-weight: 700; color: white; background-color: black;"> Duration: </span></td> | ||
| − | <td>3 hours</td> | + | <td>'''3 hours'''</td> |
</tr> | </tr> | ||
<tr valign="top"> | <tr valign="top"> | ||
<td><span style="font-size: 15px; font-weight: 700; color: white; background-color: black;"> Loco: </span></td> | <td><span style="font-size: 15px; font-weight: 700; color: white; background-color: black;"> Loco: </span></td> | ||
<td>'''[[SAR_Scenario_Rolling_Stock#SAR_T_Class|SAR T 257]]''' on <span style="font-weight: 700;">Gladstone <span style="color: black; background-color: cyan;"> Yard 2 </span></span><br> | <td>'''[[SAR_Scenario_Rolling_Stock#SAR_T_Class|SAR T 257]]''' on <span style="font-weight: 700;">Gladstone <span style="color: black; background-color: cyan;"> Yard 2 </span></span><br> | ||
| − | + | See [[image:Loco_Roster_Label.png|link=SAR Peterborough Division Loco Roster]] for a full list of locos.</td> | |
| − | + | ||
</tr> | </tr> | ||
<tr valign="top"> | <tr valign="top"> | ||
<td><span style="font-size: 15px; font-weight: 700; color: white; background-color: black;"> Consist: </span></td> | <td><span style="font-size: 15px; font-weight: 700; color: white; background-color: black;"> Consist: </span></td> | ||
| − | <td>Attached to '''[[SAR_Scenario_Rolling_Stock#SAR_T_Class|SAR T 257]]''' | + | <td>Attached to '''[[SAR_Scenario_Rolling_Stock#SAR_T_Class|SAR T 257]]''' |
| + | *'''[[SAR_Scenario_Rolling_Stock#QR_MTW|MTW Flat]]''' wagons | ||
| + | *'''[[SAR_Scenario_Rolling_Stock#QR_QLX|QLX Box]]''' vans | ||
| + | *'''[[SAR_Scenario_Rolling_Stock#QR_WHE|WHE Gondola]]''' covered wagons | ||
| + | *1 '''[[SAR_Scenario_Rolling_Stock#Guard_Vans|Guard Van]]''' | ||
</td> | </td> | ||
</tr> | </tr> | ||
<tr valign="top"> | <tr valign="top"> | ||
| − | <td colspan=2> | + | <td colspan=2>The wagons have been placed in the order of their destinations with '''Laura''' at the front (loco) end and '''Wilmington''' at the rear. Each wagon has its destination as part of its name e.g. '''QLX Wirrabara''' indicating its destination is '''Wirrabara'''. |
| − | + | </td> | |
| − | + | ||
| − | + | ||
| − | + | ||
| − | + | ||
| − | + | ||
| − | + | ||
</tr> | </tr> | ||
| − | </table | + | </table> |
</td> | </td> | ||
</tr> | </tr> | ||
| Line 65: | Line 66: | ||
</tr> | </tr> | ||
</table> <!-- END Scenario image and loco/consist table --> | </table> <!-- END Scenario image and loco/consist table --> | ||
| − | + | <table bgcolor="lightcyan" width=1000> <!-- BEGIN Location Data table --> | |
| + | <tr> | ||
| + | <td> | ||
| + | [[Image:Location Index.png|link=SAR Index|alt=Location Index|Location Index]] | ||
| + | </td> | ||
| + | <td>'''Each location in the layout has a detailed set of track diagrams that provide a variety of useful information'''<br> | ||
| + | The <span style="font-weight: 700; color: white; background-color: black;"> Getting Started </span> guide below gives a summary of what is available.<br> | ||
| + | To display this information click any [[image:Line_Index_Label.png|link=SAR_Index|Location Index]] graphic, or go to the bottom of the page for all the session links (all links will open in this window).</td> | ||
| + | </tr> | ||
| + | </table> <!-- END Location Data table --> | ||
<table cellpadding="2" bgcolor="black" width=1000> <!-- BEGIN Black border for Getting Started table --> | <table cellpadding="2" bgcolor="black" width=1000> <!-- BEGIN Black border for Getting Started table --> | ||
<tr valign="top"> | <tr valign="top"> | ||
| Line 74: | Line 84: | ||
# If you have already closed the opening message window then the first step is to pause the session by pressing the <span style="font-weight: 700; font-size: 15px; color: white; background-color: black;"> P </span> key. | # If you have already closed the opening message window then the first step is to pause the session by pressing the <span style="font-weight: 700; font-size: 15px; color: white; background-color: black;"> P </span> key. | ||
# Next locate your loco. '''Either''':- | # Next locate your loco. '''Either''':- | ||
| − | # | + | #*Open the '''Finder Tool''' (press <span style="font-weight: 700; font-size: 15px; color: white; background-color: black;"> Ctrl </span> <span style="font-weight: 700; font-size: 15px; color: white; background-color: black;"> F </span>) and type, in the '''Name''' field, the name of the loco, in this case '''SAR T 257''' (or just '''T 257''' should be enough). Click the '''tick''' icon, '''OR''' |
| − | # | + | #*Open the '''Driver List''' (bottom left of the screen) and then scroll through the list to find the '''loco name''' ('''SAR T 257''') then click the drivers '''Eye''' icon [[image:Driver_Eye.png|link=]] to take control of the loco |
# Take a few moments to get your bearings. Click [[image:Line_Index_Gladstone.png|link=SAR_Gladstone|Gladstone Data]] (this link will open in this window) to show the location details and track plans for '''Gladstone'''. In each location details page:- | # Take a few moments to get your bearings. Click [[image:Line_Index_Gladstone.png|link=SAR_Gladstone|Gladstone Data]] (this link will open in this window) to show the location details and track plans for '''Gladstone'''. In each location details page:- | ||
#*the [[image:Tab_HM_White.png|link=|75px]] tab gives an overall summary of each location with a "potted" history (where available). | #*the [[image:Tab_HM_White.png|link=|75px]] tab gives an overall summary of each location with a "potted" history (where available). | ||
| Line 113: | Line 123: | ||
<tr valign="top"> | <tr valign="top"> | ||
<td width=716> | <td width=716> | ||
| − | # | + | # Proceed onto the '''Wilmington Line''' to all locations identified in the names of each wagon dropping the wagons as required. |
| − | + | # Position '''WHE''' covered wagons at the <span style="font-weight: 700; color: black; background-color: #dbc7aa;"> Grain Silos </span>, '''QLX''' wagons at the <span style="font-weight: 700; color: black; background-color: yellow;"> Goods Sheds </span>, '''MTW''' flat wagons at the <span style="font-weight: 700; color: black; background-color: yellow;"> Goods Cranes </span>. | |
| − | # | + | # Leave each wagon at its unloading point |
| + | # Take water at '''Booleroo Centre'''. | ||
# Turn the loco on the <span style="font-weight: 700; color: white; background-color: black;"> WYE </span> at '''Wilmington'''. | # Turn the loco on the <span style="font-weight: 700; color: white; background-color: black;"> WYE </span> at '''Wilmington'''. | ||
# Coal and water the loco at the <span style="font-weight: 700;">Wilmington <span style="color: white; background-color: black;"> Loco Coal & Water </span> Stage</span>. | # Coal and water the loco at the <span style="font-weight: 700;">Wilmington <span style="color: white; background-color: black;"> Loco Coal & Water </span> Stage</span>. | ||
| Line 132: | Line 143: | ||
<tr valign="top"> | <tr valign="top"> | ||
<td> | <td> | ||
| + | A summary of the facilities and product loads at all locations along the line is provided in the link [[Image:SAR_Gladstone-Wilmington_Line.png|link=SAR Gladstone-Wilmington|alt=Gladstone-Wilmington Line|Show Gladstone-Wilmington Line]] | ||
*The '''Wilmington Line''' is '''not signalled''' beyond '''Gladstone Yard'''. Train Order working is in operation on the line. | *The '''Wilmington Line''' is '''not signalled''' beyond '''Gladstone Yard'''. Train Order working is in operation on the line. | ||
*You have been issued with orders and the authorisation for the entire '''Wilmington Line'''. | *You have been issued with orders and the authorisation for the entire '''Wilmington Line'''. | ||
Latest revision as of 20:36, 31 January 2024
| 3 Gladstone to Wilmington Local Freight | ||
| A scenario in the SAR Peterborough Base Session | ||
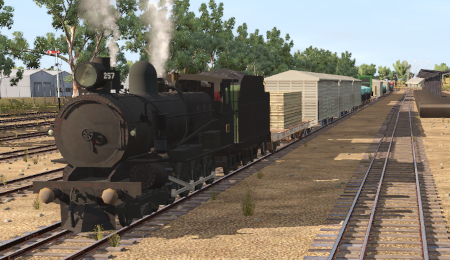
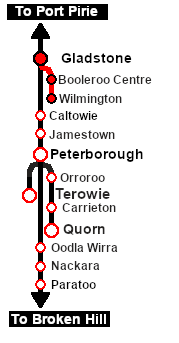
| A twice weekly freight service from Gladstone to Wilmington dropping wagons at locations as required. |
The Historical Bit
The 1964 Working Timetable for the Wilmington Line contained only two regular freight services through to Wilmington, running on Mondays and Fridays only. An additional service to Wilmington ran only "when required". On Wednesdays there was a freight service to Booleroo Centre, with two additional services available "when required".
The 1982 Working Timetable consisted of a single weekly freight service to Wilmington. By 1984 the freight and livestock facilities at most of the locations along the line had been permanently closed.
The line had no signals beyond Gladstone Yard and train order working was in operation. The line was closed in 1990 and the track has been removed. Most of the track right of way is now a walking and cycling Rail Trail .
 |
|
|||||||||||
Tutorial:
|
|
|
| Links: All links will open in this window | ||||||||
 Session Scenarios |
 Location List |
 Drive Tutorial |
 Rolling Stock |
 Loco Roster |
 Active Industries |
|||
This page was created by Trainz user pware in February 2021 and was last updated as shown below.


