SAR Scenario Paratoo Empty Ore
From TrainzOnline
(Difference between revisions)
m |
m |
||
| (9 intermediate revisions by one user not shown) | |||
| Line 1: | Line 1: | ||
<table width=1000> <!-- BEGIN Title table --> | <table width=1000> <!-- BEGIN Title table --> | ||
<tr valign="top"> | <tr valign="top"> | ||
| − | <td width=50 align="left">[[image: | + | <td width=50 align="left">[[image:ArrowLeftBtn.png|link=SAR Scenario Gladstone Bulk Ore|30px]]</td> |
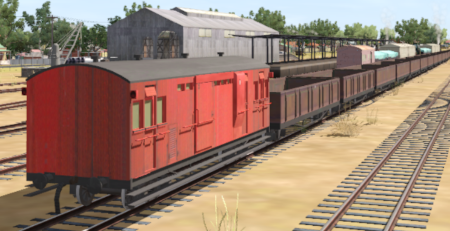
<td width=900 align="center"><span style="font-size: 21px; font-weight: 700;"> <span style="background-color: black; color: white;"> 6 </span> <span style="background-color: black; color: white;"> Gladstone to Peterborough Empty Ore </span></span><br> | <td width=900 align="center"><span style="font-size: 21px; font-weight: 700;"> <span style="background-color: black; color: white;"> 6 </span> <span style="background-color: black; color: white;"> Gladstone to Peterborough Empty Ore </span></span><br> | ||
<span style="font-size: 21px; font-weight: 700; background-color: black; color: white;"> Gladstone to Paratoo Empty Ore </span></td> | <span style="font-size: 21px; font-weight: 700; background-color: black; color: white;"> Gladstone to Paratoo Empty Ore </span></td> | ||
| − | <td width=50 align="right">[[image: | + | <td width=50 align="right">[[image:ArrowRightBtn.png|link=SAR Scenario Quorn-Peterborough Freight|30px]]</td> |
</tr> | </tr> | ||
<tr valign="top"> | <tr valign="top"> | ||
| Line 34: | Line 34: | ||
<td><span style="font-size: 15px; font-weight: 700; color: white; background-color: black;"> Loco: </span></td> | <td><span style="font-size: 15px; font-weight: 700; color: white; background-color: black;"> Loco: </span></td> | ||
<td>'''[[SAR_Scenario_Rolling_Stock#SAR_T_Class|SAR T 201]]''' at <span style="font-weight: 700;">Gladstone <span style="color: white; background-color: black;"> Loco </span> Depot</span><br> | <td>'''[[SAR_Scenario_Rolling_Stock#SAR_T_Class|SAR T 201]]''' at <span style="font-weight: 700;">Gladstone <span style="color: white; background-color: black;"> Loco </span> Depot</span><br> | ||
| − | '''Other | + | '''Other Available Locos:''' [[image:Loco_Roster_Label.png|link=SAR Peterborough Division Loco Roster]] |
*'''[[SAR_Scenario_Rolling_Stock#SAR_T_Class|SAR T 210]]''' at <span style="font-weight: 700;">Gladstone <span style="color: white; background-color: black;"> Loco </span> Depot</span> | *'''[[SAR_Scenario_Rolling_Stock#SAR_T_Class|SAR T 210]]''' at <span style="font-weight: 700;">Gladstone <span style="color: white; background-color: black;"> Loco </span> Depot</span> | ||
*'''[[SAR_Scenario_Rolling_Stock#SAR_T_Class|SAR T 23]]''' on <span style="font-weight: 700;">Peterborough Depot <span style="color: white; background-color: black;"> Siding 1 </span></span> | *'''[[SAR_Scenario_Rolling_Stock#SAR_T_Class|SAR T 23]]''' on <span style="font-weight: 700;">Peterborough Depot <span style="color: white; background-color: black;"> Siding 1 </span></span> | ||
| Line 42: | Line 42: | ||
<tr valign="top"> | <tr valign="top"> | ||
<td><span style="font-size: 15px; font-weight: 700; color: white; background-color: black;"> Consist: </span></td> | <td><span style="font-size: 15px; font-weight: 700; color: white; background-color: black;"> Consist: </span></td> | ||
| − | <td> | + | <td>22 '''[[SAR_Scenario_Rolling_Stock#TGR_CCC|CCC Gondola]]''' wagons, 1 '''[[SAR_Scenario_Rolling_Stock#TGR_DB|Guard Van]]''' on <span style="font-weight: 700;">Gladstone <span style="color: black; background-color: cyan;"> Yard 1 </span></span> |
| − | + | ||
| − | + | ||
</td> | </td> | ||
</tr> | </tr> | ||
| Line 64: | Line 62: | ||
</tr> | </tr> | ||
</table> <!-- END Scenario image and loco/consist table --> | </table> <!-- END Scenario image and loco/consist table --> | ||
| − | + | <br> | |
<table cellpadding="2" bgcolor="black" width=1000> <!-- BEGIN Black border for Getting Started table --> | <table cellpadding="2" bgcolor="black" width=1000> <!-- BEGIN Black border for Getting Started table --> | ||
<tr valign="top"> | <tr valign="top"> | ||
| Line 82: | Line 80: | ||
# Each location details page has direct links to the adjacent locations so you can explore along the route. | # Each location details page has direct links to the adjacent locations so you can explore along the route. | ||
# When you are ready to start, reload the '''Peterborough Base Session''' page (click the '''Scenarios''' button on your current location page) and select this '''Scenario''' again or just use the '''Back''' button on your browser - whichever is quicker. | # When you are ready to start, reload the '''Peterborough Base Session''' page (click the '''Scenarios''' button on your current location page) and select this '''Scenario''' again or just use the '''Back''' button on your browser - whichever is quicker. | ||
| − | # Switch back to ''' | + | # Switch back to '''Driver Mode''' and either close the opening message window or press the <span style="font-weight: 700; font-size: 15px; color: white; background-color: black;"> P </span> key to start the session. |
</td> | </td> | ||
</tr> | </tr> | ||
| Line 103: | Line 101: | ||
</table> <!-- END Blue Border for Tutorial table --> | </table> <!-- END Blue Border for Tutorial table --> | ||
<br> | <br> | ||
| − | <table width=1000> <!-- BEGIN Yard (if | + | <table width=1000> <!-- BEGIN Yard (if applicable), Orders, Strip Map and Driving Notes tables --> |
<tr valign="top"> | <tr valign="top"> | ||
<td> | <td> | ||
| − | <table bgcolor=# | + | <table bgcolor=#000000 width=820 cellpadding=2> <!-- BEGIN Black Border for Orders Table --> |
<tr valign="top"> | <tr valign="top"> | ||
| − | <td> | + | <td><span style="font-size: 15px; font-weight: 700; color: white">Orders:</span><br> |
| − | <table width= | + | <table bgcolor=#e8e8e8 width=816> <!-- BEGIN Orders and Logo Table --> |
<tr valign="top"> | <tr valign="top"> | ||
| − | <td width= | + | <td width=716> |
# Run the loco light engined from the <span style="font-weight: 700;"><span style="color: white; background-color: black;"> Loco </span> Depot</span> to couple to the train on <span style="font-weight: 700;">Gladstone <span style="color: black; background-color: cyan;"> Yard 1 </span></span>. | # Run the loco light engined from the <span style="font-weight: 700;"><span style="color: white; background-color: black;"> Loco </span> Depot</span> to couple to the train on <span style="font-weight: 700;">Gladstone <span style="color: black; background-color: cyan;"> Yard 1 </span></span>. | ||
# Deliver the wagons to <span style="font-weight: 700;">Peterborough <span style="color: white; background-color: #008100;"> Loop </span></span> or <span style="font-weight: 700;">Peterborough <span style="color: black; background-color: cyan;"> Yard 1 </span></span>. | # Deliver the wagons to <span style="font-weight: 700;">Peterborough <span style="color: white; background-color: #008100;"> Loop </span></span> or <span style="font-weight: 700;">Peterborough <span style="color: black; background-color: cyan;"> Yard 1 </span></span>. | ||
# Coal and water the loco at the <span style="font-weight: 700;">Peterborough Main <span style="color: white; background-color: black;"> Loco </span> Depot</span> or <span style="font-weight: 700;">Peterborough Sub <span style="color: white; background-color: black;"> Loco </span> Depot</span>. | # Coal and water the loco at the <span style="font-weight: 700;">Peterborough Main <span style="color: white; background-color: black;"> Loco </span> Depot</span> or <span style="font-weight: 700;">Peterborough Sub <span style="color: white; background-color: black;"> Loco </span> Depot</span>. | ||
| − | # '''Option:''' Reattach the loco to the train and continue to '''Paratoo'''. | + | # '''Option:''' Reattach the loco, or another available loco, to the train and continue to '''Paratoo'''. |
</td> | </td> | ||
<td width=100>[[image:SAR Train Order Rotated.png|100px|link=|alt=Logo]]</td> | <td width=100>[[image:SAR Train Order Rotated.png|100px|link=|alt=Logo]]</td> | ||
</tr> | </tr> | ||
| − | </table> | + | </table> <!-- END Orders and Logo Table --> |
</td> | </td> | ||
</tr> | </tr> | ||
| − | </table> | + | </table> <!-- END Black Border for Orders Table --> |
| − | + | <br> | |
<table cellpadding="2" bgcolor="black" width=820> <!-- BEGIN Black border for Driving Notes sub table --> | <table cellpadding="2" bgcolor="black" width=820> <!-- BEGIN Black border for Driving Notes sub table --> | ||
<tr valign="top"> | <tr valign="top"> | ||
| Line 130: | Line 128: | ||
<tr valign="top"> | <tr valign="top"> | ||
<td> | <td> | ||
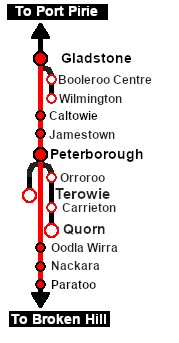
| + | A summary of the facilities and product loads at all locations along the line is provided in the link [[Image:SAR_PortPirie-BrokenHill_Line.png|link=SAR Port Pirie-Broken Hill|alt=Port Pirie-Broken Hill Line|Show Port Pirie-Broken Hill Line]] | ||
*The length of the train restricts its use of passing loops and yard loops to those located at:- | *The length of the train restricts its use of passing loops and yard loops to those located at:- | ||
**'''Caltowie Station Loop''' | **'''Caltowie Station Loop''' | ||
| Line 145: | Line 144: | ||
*Trackmarks and industries have been provided for AI '''Drive To Trackmark''', '''Drive via Trackmark''' and '''Drive to <span style="background-color: yellow;"> Industry </span>''' commands. Click [[image:Line_Index_Label.png|link=SAR_Index|Location Index]] for details. | *Trackmarks and industries have been provided for AI '''Drive To Trackmark''', '''Drive via Trackmark''' and '''Drive to <span style="background-color: yellow;"> Industry </span>''' commands. Click [[image:Line_Index_Label.png|link=SAR_Index|Location Index]] for details. | ||
*Manual (no AI) driving is possible. As a visual driving aid, a '''Caution''' warning sign has been placed at the location of the '''Main Approach Dn''' and '''Main Approach Up''' trackmarks. Click [[image:Line_Index_Label.png|link=SAR_Index|Location Index]] for details. | *Manual (no AI) driving is possible. As a visual driving aid, a '''Caution''' warning sign has been placed at the location of the '''Main Approach Dn''' and '''Main Approach Up''' trackmarks. Click [[image:Line_Index_Label.png|link=SAR_Index|Location Index]] for details. | ||
| + | *If driving manually in yards, you are responsible for correctly setting any '''catch points'''. | ||
</td> | </td> | ||
</tr> | </tr> | ||
| Line 168: | Line 168: | ||
</tr> | </tr> | ||
<tr valign="center"> | <tr valign="center"> | ||
| − | <td width=63 align="left">[[image: | + | <td width=63 align="left">[[image:ArrowLeftBtn.png|link=SAR Scenario Gladstone Bulk Ore|30px]]</td> |
<td width=125 align="center">[[image:Session Scenario Index.png|link=SAR Peterborough Base Session|alt=Scenarios|Scenario Index]]<br>'''[[SAR Peterborough Base Session|Session Scenarios]]'''</td> | <td width=125 align="center">[[image:Session Scenario Index.png|link=SAR Peterborough Base Session|alt=Scenarios|Scenario Index]]<br>'''[[SAR Peterborough Base Session|Session Scenarios]]'''</td> | ||
<td width=125 align="center">[[Image:Location Index.png|link=SAR Index|alt=Location Index|Location Index]]<br>'''[[SAR Index|Location List]]'''</td> | <td width=125 align="center">[[Image:Location Index.png|link=SAR Index|alt=Location Index|Location Index]]<br>'''[[SAR Index|Location List]]'''</td> | ||
| Line 176: | Line 176: | ||
<td width=125 align="center">[[image:Industry Index.png|link=SAR Scenario Industries|alt=Industries]]<br>'''[[SAR Scenario Industries|Active Industries]]'''</td> | <td width=125 align="center">[[image:Industry Index.png|link=SAR Scenario Industries|alt=Industries]]<br>'''[[SAR Scenario Industries|Active Industries]]'''</td> | ||
<td width=125 align="center">[[image:BackToTop.png|link=#top|alt=Top|Top]]</td> | <td width=125 align="center">[[image:BackToTop.png|link=#top|alt=Top|Top]]</td> | ||
| − | <td width=62 align="left">[[image: | + | <td width=62 align="left">[[image:ArrowRightBtn.png|link=SAR Scenario Quorn-Peterborough Freight|30px]]</td> |
</tr> | </tr> | ||
</table> <!-- END End Links Table --> | </table> <!-- END End Links Table --> | ||
Revision as of 11:15, 3 August 2022
| 6 Gladstone to Peterborough Empty Ore Gladstone to Paratoo Empty Ore |
||
| A scenario in the SAR Peterborough Base Session | ||
| Moving empty ore wagons from Port Pirie to Broken Hill. |
 |
|
||||||||||||
Getting Started:
|
Tutorial:
|
|
|


| Links: All links will open in this window | ||||||||
 Session Scenarios |
 Location List |
 Drive Tutorial |
 Rolling Stock |
 Loco Roster |
 Active Industries |
|||
This page was created by Trainz user pware in February 2021 and was last updated as shown below.