SAR Scenario Paratoo-Gladstone/Terowie Express Freight
From TrainzOnline
(Difference between revisions)
m |
m (fixed scenario number error) |
||
| Line 1: | Line 1: | ||
<table width=1000> <!-- BEGIN Title table --> | <table width=1000> <!-- BEGIN Title table --> | ||
<tr valign="top"> | <tr valign="top"> | ||
| − | <td width=50 align="left">[[image:ArrowLeft.png|link=SAR Scenario | + | <td width=50 align="left">[[image:ArrowLeft.png|link=SAR Scenario Paratoo Mixed Passenger Freight|30px]]</td> |
| − | <td width=900 align="center"><span style="font-size: 21px; font-weight: 700;"> <span style="background-color: black; color: white;"> | + | <td width=900 align="center"><span style="font-size: 21px; font-weight: 700;"> <span style="background-color: black; color: white;"> 10 </span> <span style="background-color: black; color: white;"> Paratoo to Gladstone/Terowie Express Freight </span></span></td> |
| − | <td width=50 align="right">[[image:ArrowRight.png|link=SAR Scenario | + | <td width=50 align="right">[[image:ArrowRight.png|link=SAR Scenario Orroroo Grain|30px]]</td> |
</tr> | </tr> | ||
<tr valign="top"> | <tr valign="top"> | ||
| Line 11: | Line 11: | ||
<table width=1000> <!-- BEGIN Summary table --> | <table width=1000> <!-- BEGIN Summary table --> | ||
<tr valign="top"> | <tr valign="top"> | ||
| − | <td align="left"> | + | <td align="left">Express freight from '''Broken Hill''' to '''Port Pirie''' and '''Terowie'''. At '''Peterborough''' the train is divided into two and each part is combined with additional rolling stock before continuing separately to '''Terowie''' and '''Gladstone'''.</td> |
<td align="right">[[file:BackToBottom.png|link=#bottom|alt=Bottom|Bottom]]</td> | <td align="right">[[file:BackToBottom.png|link=#bottom|alt=Bottom|Bottom]]</td> | ||
</tr> | </tr> | ||
| − | </table> | + | </table> <!-- END Title and summary tables --> |
----- | ----- | ||
<table width=1000> <!-- BEGIN Scenario image and loco/consist table --> | <table width=1000> <!-- BEGIN Scenario image and loco/consist table --> | ||
<tr valign="top"> | <tr valign="top"> | ||
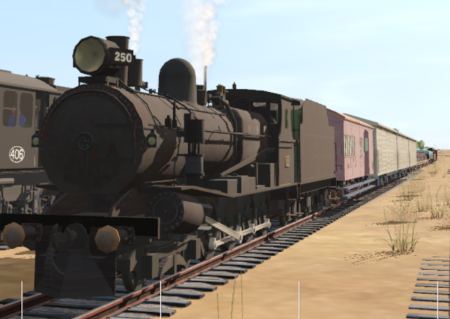
| − | <td width=450>[[image:SAR T | + | <td width=450>[[image:SAR T 250 Paratoo Through Freight.png|link=|alt=Through Freight]]</td> |
<td> | <td> | ||
<table width=550> <!-- BEGIN Loco/consist sub table --> | <table width=550> <!-- BEGIN Loco/consist sub table --> | ||
<tr valign="top"> | <tr valign="top"> | ||
<td width=75><span style="font-size: 15px; font-weight: 700; color: white; background-color: black;"> Duration: </span></td> | <td width=75><span style="font-size: 15px; font-weight: 700; color: white; background-color: black;"> Duration: </span></td> | ||
| − | <td> | + | <td>'''Paratoo''' to '''Terowie''' 2 hours 15 minutes<br> |
| + | '''Paratoo''' to '''Gladstone''' 3 hours</td> | ||
</tr> | </tr> | ||
<tr valign="top"> | <tr valign="top"> | ||
<td><span style="font-size: 15px; font-weight: 700; color: white; background-color: black;"> Loco: </span></td> | <td><span style="font-size: 15px; font-weight: 700; color: white; background-color: black;"> Loco: </span></td> | ||
| − | <td>'''SAR T | + | <td>'''SAR T 250''' on <span style="font-weight: 700;">Paratoo <span style="color: black; background-color: yellow;"> Goods Loop </span></span><br> |
| − | '''Other Unrostered Locos:''' [[image:Loco_Roster_Label.png|link=SAR Peterborough Division Loco Roster]] | + | *'''Other Unrostered Locos:''' [[image:Loco_Roster_Label.png|link=SAR Peterborough Division Loco Roster]] |
| + | *'''SAR T 23''' on <span style="font-weight: 700;">Peterborough Depot <span style="color: white; background-color: black;"> Siding 1 </span></span> | ||
*'''SAR T 233''' on <span style="font-weight: 700;">Peterborough Depot <span style="color: white; background-color: black;"> Loco Road 1 </span></span> | *'''SAR T 233''' on <span style="font-weight: 700;">Peterborough Depot <span style="color: white; background-color: black;"> Loco Road 1 </span></span> | ||
*'''SAR 407''' on <span style="font-weight: 700;">Peterborough Depot <span style="color: white; background-color: black;"> Repair Shop Road 4 </span></span></td> | *'''SAR 407''' on <span style="font-weight: 700;">Peterborough Depot <span style="color: white; background-color: black;"> Repair Shop Road 4 </span></span></td> | ||
| Line 34: | Line 36: | ||
<tr valign="top"> | <tr valign="top"> | ||
<td><span style="font-size: 15px; font-weight: 700; color: white; background-color: black;"> Consist: </span></td> | <td><span style="font-size: 15px; font-weight: 700; color: white; background-color: black;"> Consist: </span></td> | ||
| − | <td>Attached to '''SAR T | + | <td>Attached to '''SAR T 250'''. 3 '''QLX''' wagons, 4 '''MTW''' flat wagons, 2 '''CCC''' gondola wagons, 2 '''WHE''' wagons, 3 '''Tank''' wagons, 2 '''DB''' Guard Vans (at either end). Waiting at '''Perterborough''' are 4 '''QLX''' wagons and 3 '''MTW''' flat wagons. Each freight wagon has its destination as part of its name e.g. '''CCC Gladstone''' or '''MTW Terowie'''. </td> |
</tr> | </tr> | ||
<tr valign="top"> | <tr valign="top"> | ||
| Line 62: | Line 64: | ||
# If you have already closed the opening message window then the first step is to pause the session by pressing the <span style="font-weight: 700; font-size: 15px; color: white; background-color: black;"> P </span> key. | # If you have already closed the opening message window then the first step is to pause the session by pressing the <span style="font-weight: 700; font-size: 15px; color: white; background-color: black;"> P </span> key. | ||
# Next locate your loco. '''Either''':- | # Next locate your loco. '''Either''':- | ||
| − | ## Open the '''Finder Tool''' (press <span style="font-weight: 700; font-size: 15px; color: white; background-color: black;"> Ctrl </span> <span style="font-weight: 700; font-size: 15px; color: white; background-color: black;"> F </span>) and type, in the '''Name''' field, the name of the loco. For example '''SAR T | + | ## Open the '''Finder Tool''' (press <span style="font-weight: 700; font-size: 15px; color: white; background-color: black;"> Ctrl </span> <span style="font-weight: 700; font-size: 15px; color: white; background-color: black;"> F </span>) and type, in the '''Name''' field, the name of the loco. For example '''SAR T 250''' (or just '''T 250''' should be enough). Click the '''tick''' icon, '''OR''' |
## Open the '''Driver List''' (bottom left of the screen) and select the loco from there - click the drivers '''Eye''' icon to jump to the loco. | ## Open the '''Driver List''' (bottom left of the screen) and select the loco from there - click the drivers '''Eye''' icon to jump to the loco. | ||
| − | # Take a few moments to get your bearings. Use the [[image:Line_Index_Label.png|link=SAR_Index|Location Index]] (this link will open in this window) and click on ''' | + | # Take a few moments to get your bearings. Use the [[image:Line_Index_Label.png|link=SAR_Index|Location Index]] (this link will open in this window) and click on '''Paratoo''' to load its location details and track plans. In each location details page:- |
#*the [[image:Tab_HM_White.png|link=|75px]] tab gives an overall summary of each location with a "potted" history (where available). | #*the [[image:Tab_HM_White.png|link=|75px]] tab gives an overall summary of each location with a "potted" history (where available). | ||
#*the [[image:Tab_TM_Grey.png|link=|75px]] tab reveals the invisible [[image:Trackmark_Right.png|link=|alt=TM|8px]] '''Track Marks''' for '''Drive To''' commands. | #*the [[image:Tab_TM_Grey.png|link=|75px]] tab reveals the invisible [[image:Trackmark_Right.png|link=|alt=TM|8px]] '''Track Marks''' for '''Drive To''' commands. | ||
| Line 99: | Line 101: | ||
<td> | <td> | ||
<span style="font-size: 15px; font-weight: 700; color: white; background-color: black;"> Tasks: </span><br> | <span style="font-size: 15px; font-weight: 700; color: white; background-color: black;"> Tasks: </span><br> | ||
| − | # | + | # Take the train out of the loop and onto the main line. |
| − | # | + | # Proceed to a suitable vacant road in '''Peterborough Yard'''. |
| − | + | # Coal and water the loco at <span style="font-weight: 700;">Peterborough Main <span style="color: white; background-color: black;"> Loco Coal & Water </span> Stage</span> as needed. | |
| − | # | + | # The train has to be divided at '''Peterborough'''. Those wagons with '''Terowie''' in their names are to be marshalled into one train and combined with wagons stored on <span style="font-weight: 700;">Peterborough <span style="color: black; background-color: yellow;"> Goods Sidings 1 </span></span> that also have '''Terowie''' in their names. |
| − | # ''' | + | # Those wagons with '''Gladstone''' in their names are to be marshalled into another train on a different '''Yard''' road and combined with wagons stored on <span style="font-weight: 700;">Peterborough <span style="color: black; background-color: yellow;"> Goods Sidings 1 </span></span> that also have '''Gladstone''' in their names. |
| + | # Select a suitable and unrostered loco from the main depot and attach it to the front (eastern or '''Terowie''') end of the '''Terowie''' train. | ||
| + | # Reattach '''SAR T 250''' to the front (western or '''Gladstone''') end of the '''Gladstone''' train. | ||
| + | # Proceed with both trains (seperately or simultaneously) to | ||
| + | #*<span style="font-weight: 700;">Gladstone <span style="color: black; background-color: yellow;"> Goods Transfer Narrow Gauge </span></span> and | ||
| + | #*<span style="font-weight: 700;">Terowie <span style="color: white; background-color: #b8860b;"> Relief </span> road</span>. | ||
<br> | <br> | ||
</td> | </td> | ||
| Line 116: | Line 123: | ||
*The approaches to all locations are protected by invisible signals to prevent the '''AI Half Speed Slowdown Problem''' when approaching a signal at stop. | *The approaches to all locations are protected by invisible signals to prevent the '''AI Half Speed Slowdown Problem''' when approaching a signal at stop. | ||
*Trackmarks and industries have been provided for AI '''Drive To Trackmark''', '''Drive via Trackmark''' and '''Drive to <span style="background-color: yellow;"> Industry </span>''' commands. Click [[image:Line_Index_Label.png|link=SAR_Index|Location Index]] for details. | *Trackmarks and industries have been provided for AI '''Drive To Trackmark''', '''Drive via Trackmark''' and '''Drive to <span style="background-color: yellow;"> Industry </span>''' commands. Click [[image:Line_Index_Label.png|link=SAR_Index|Location Index]] for details. | ||
| − | |||
*Manual (no AI) driving is possible. As a visual driving aid, a '''Caution''' warning sign has been placed at the location of the '''Main Approach Dn''' and '''Main Approach Up''' trackmarks. Click [[image:Line_Index_Label.png|link=SAR_Index|Location Index]] for details. | *Manual (no AI) driving is possible. As a visual driving aid, a '''Caution''' warning sign has been placed at the location of the '''Main Approach Dn''' and '''Main Approach Up''' trackmarks. Click [[image:Line_Index_Label.png|link=SAR_Index|Location Index]] for details. | ||
</td> | </td> | ||
| Line 129: | Line 135: | ||
<tr valign="top"> | <tr valign="top"> | ||
<td> | <td> | ||
| − | <td align="center">[[image:SAR Scenario | + | <td align="center">[[image:SAR Scenario Gladstone-Paratoo-Terowie Strip Map.png|link=|alt=Strip Map]]<br>[[image:SAR Scenario Route.png|link=|alt=Route Key]]</td> |
</tr> | </tr> | ||
</table> <!-- END Strip Map Table --> | </table> <!-- END Strip Map Table --> | ||
| Line 141: | Line 147: | ||
</tr> | </tr> | ||
<tr valign="center"> | <tr valign="center"> | ||
| − | <td width=63 align="left">[[image:ArrowLeft.png|link=SAR Scenario | + | <td width=63 align="left">[[image:ArrowLeft.png|link=SAR Scenario Paratoo Mixed Passenger Freight|30px]]</td> |
<td width=125 align="center">[[image:Session Scenario Index.png|link=SAR Peterborough Base Session|alt=Scenarios|Scenario Index]]<br>'''[[SAR Peterborough Base Session|Session Scenarios]]'''</td> | <td width=125 align="center">[[image:Session Scenario Index.png|link=SAR Peterborough Base Session|alt=Scenarios|Scenario Index]]<br>'''[[SAR Peterborough Base Session|Session Scenarios]]'''</td> | ||
<td width=125 align="center">[[Image:Location Index.png|link=SAR Index|alt=Location Index|Location Index]]<br>'''[[SAR Index|Location List]]'''</td> | <td width=125 align="center">[[Image:Location Index.png|link=SAR Index|alt=Location Index|Location Index]]<br>'''[[SAR Index|Location List]]'''</td> | ||
| Line 149: | Line 155: | ||
<td width=125 align="center">[[image:Industry Index.png|link=SAR Scenario Industries|alt=Industries]]<br>'''[[SAR Scenario Industries|Active Industries]]'''</td> | <td width=125 align="center">[[image:Industry Index.png|link=SAR Scenario Industries|alt=Industries]]<br>'''[[SAR Scenario Industries|Active Industries]]'''</td> | ||
<td width=125 align="center">[[image:BackToTop.png|link=#top|alt=Top|Top]]</td> | <td width=125 align="center">[[image:BackToTop.png|link=#top|alt=Top|Top]]</td> | ||
| − | <td width=62 align="left">[[image:ArrowRight.png|link=SAR Scenario | + | <td width=62 align="left">[[image:ArrowRight.png|link=SAR Scenario Orroroo Grain|30px]]</td> |
</tr> | </tr> | ||
</table> <!-- END End Links Table --> | </table> <!-- END End Links Table --> | ||
Revision as of 14:37, 1 June 2021
| 10 Paratoo to Gladstone/Terowie Express Freight | ||
| A scenario in the SAR Peterborough Base Session | ||
| Express freight from Broken Hill to Port Pirie and Terowie. At Peterborough the train is divided into two and each part is combined with additional rolling stock before continuing separately to Terowie and Gladstone. |
 |
|
||||||||||
Getting Started:
|
Tutorial:
|
|
|


| Links: All links will open in this window | ||||||||
 Session Scenarios |
 Location List |
 Drive Tutorial |
 Rolling Stock |
 Loco Roster |
 Active Industries |
|||
This page was created by Trainz user pware in February 2021 and was last updated as shown below.