SAR Scenario Hawker Freight
m |
m |
||
| Line 33: | Line 33: | ||
<tr valign="top"> | <tr valign="top"> | ||
<td><span style="font-size: 15px; font-weight: 700; color: white; background-color: black;"> Loco: </span></td> | <td><span style="font-size: 15px; font-weight: 700; color: white; background-color: black;"> Loco: </span></td> | ||
| − | <td>'''[[ | + | <td>'''[[SAR_Scenario_Rolling_Stock#SAR_T_Class|SAR T 255]]''' at '''Quorn Loco Depot Shed'''<br> |
'''Other Unrostered Locos:''' '''None'''</td> | '''Other Unrostered Locos:''' '''None'''</td> | ||
</tr> | </tr> | ||
<tr valign="top"> | <tr valign="top"> | ||
<td><span style="font-size: 15px; font-weight: 700; color: white; background-color: black;"> Consist: </span></td> | <td><span style="font-size: 15px; font-weight: 700; color: white; background-color: black;"> Consist: </span></td> | ||
| − | <td>x '''[[ | + | <td>1 '''[[SAR_Scenario_Rolling_Stock#Tank|Water Tank]]''' wagon, x '''[[SAR_Scenario_Rolling_Stock#TGR_CCC|TGR CCC Gondola]]''' wagons, x '''[[SAR_Scenario_Rolling_Stock#QR_QLX|QR QLX Van]]''' wagons, x '''[[SAR_Scenario_Rolling_Stock#QR_MTW|QR MTW Flat ]]''' wagons, x '''[[SAR_Scenario_Rolling_Stock#8T|8T Livestock]]''' wagons, 1 '''[[SAR_Scenario_Rolling_Stock#CR_NH|CR NH Guard Van]]''' on <span style="font-weight: 700;">Quorn <span style="color: black; background-color: cyan;"> Yard 1 </span></span>. Each wagon has its destination as part of its name e.g. '''QLX Gordon 2''' indicating it is the 2nd QLX wagon for '''Gordon'''.</td> |
</tr> | </tr> | ||
<tr valign="top"> | <tr valign="top"> | ||
| Line 105: | Line 105: | ||
# Drive the loco from the depot <span style="font-weight: 700; color: white; background-color: black;"> Loco Shed </span> and couple to the consist on '''Yard x'''. | # Drive the loco from the depot <span style="font-weight: 700; color: white; background-color: black;"> Loco Shed </span> and couple to the consist on '''Yard x'''. | ||
# Pull the consist into the station yard area and run the loco around the train. | # Pull the consist into the station yard area and run the loco around the train. | ||
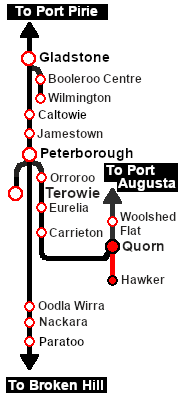
| − | # Drive to | + | # Drive to each stopping location, '''Willochra''', '''Wilson''', '''Gordon''' and '''Hawker''' dropping off wagons as required. |
| + | # Deliver wagons according to their destination names. '''QLX Van''' wagons and '''QR MTW Flat''' wagons are delivered to <span style="font-weight: 700; color: black; background-color: yellow;"> Goods Sheds </span>. '''8T Cattle''' wagons to <span style="font-weight: 700; color: white; background-color: red;"> Stockyards </span> and the '''TGR CCC''' coal wagon to the <span style="font-weight: 700; color: white; background-color: black;"> Loco Depot </span> at '''Hawker'''. The '''Tank''' wagon stays with the train. | ||
| + | # On ariival at '''Hawker''' turn the loco on the turntable. | ||
| + | # '''Option:''' Return to '''Quorn''' picking up the empty and loaded wagons on the way. | ||
</td> | </td> | ||
</tr> | </tr> | ||
| Line 117: | Line 120: | ||
*The '''Hawker Line''' is '''not signalled'''. Normally only one train is allowed on the line at any one time. | *The '''Hawker Line''' is '''not signalled'''. Normally only one train is allowed on the line at any one time. | ||
*You have been issued with an authority ticket for the '''Hawker Line'''. | *You have been issued with an authority ticket for the '''Hawker Line'''. | ||
| + | *The water tank wagon is to be coupled directly behind the tender to replemish the loco as there are often no guaranteed water supplies on the line. | ||
*The approaches to all locations are protected by invisible signals to prevent the '''AI Half Speed Slowdown Problem''' when approaching a signal at stop. | *The approaches to all locations are protected by invisible signals to prevent the '''AI Half Speed Slowdown Problem''' when approaching a signal at stop. | ||
*Trackmarks and industries have been provided for AI '''Drive To Trackmark''', '''Drive via Trackmark''' and '''Drive to <span style="background-color: yellow;"> Industry </span>''' commands. Click [[image:Line_Index_Label.png|link=SAR_Index|Location Index]] for details. | *Trackmarks and industries have been provided for AI '''Drive To Trackmark''', '''Drive via Trackmark''' and '''Drive to <span style="background-color: yellow;"> Industry </span>''' commands. Click [[image:Line_Index_Label.png|link=SAR_Index|Location Index]] for details. | ||
| Line 146: | Line 150: | ||
<td width=125 align="center">[[image:Session Scenario Index.png|link=SAR Peterborough Base Session|alt=Scenarios|Scenario Index]]<br>'''[[SAR Peterborough Base Session|Session Scenarios]]'''</td> | <td width=125 align="center">[[image:Session Scenario Index.png|link=SAR Peterborough Base Session|alt=Scenarios|Scenario Index]]<br>'''[[SAR Peterborough Base Session|Session Scenarios]]'''</td> | ||
<td width=125 align="center">[[Image:Location Index.png|link=SAR Index|alt=Location Index|Location Index]]<br>'''[[SAR Index|Location List]]'''</td> | <td width=125 align="center">[[Image:Location Index.png|link=SAR Index|alt=Location Index|Location Index]]<br>'''[[SAR Index|Location List]]'''</td> | ||
| − | <td width=125 align="center">[[image:SAR Tutorial.png|link=SAR | + | <td width=125 align="center">[[image:SAR Tutorial.png|link=SAR Scenarios Tutorial|alt=Tutorial]]<br>'''[[SAR Scenarios Tutorial|Drive Tutorial]]'''</td> |
<td width=125 align="center">[[image:Rolling Stock Index.png|link=SAR Scenario Rolling Stock|alt=Rolling Stock]]<br>'''[[SAR Scenario Rolling Stock|Rolling Stock]]'''</td> | <td width=125 align="center">[[image:Rolling Stock Index.png|link=SAR Scenario Rolling Stock|alt=Rolling Stock]]<br>'''[[SAR Scenario Rolling Stock|Rolling Stock]]'''</td> | ||
<td width=125 align="center">[[image:Loco Index.png|link=SAR Peterborough Division Loco Roster|alt=Loco Roster]]<br>'''[[SAR Peterborough Division Loco Roster|Loco Roster]]'''</td> | <td width=125 align="center">[[image:Loco Index.png|link=SAR Peterborough Division Loco Roster|alt=Loco Roster]]<br>'''[[SAR Peterborough Division Loco Roster|Loco Roster]]'''</td> | ||
Revision as of 15:26, 1 November 2021
| 17 Quorn - Hawker Weekly Freight | ||
| A scenario in the SAR Peterborough Base Session | ||
| The weekly Commonwealth Railways freight service from Quorn to Hawker. |
The Historical Bit
Up until 1956 the Central Australia Line from Port Augusta north to Maree and on to Alice Springs ran via Quorn and Hawker. In 1956 a new standard gauge (4ft 8.5inch, 1435mm) line to Maree was opened which followed a more direct route bypassing Quorn and Hawker. The narrow gauge line sections from Port Augusta to Quorn and from Hawker to Maree were closed leaving only the section between Quorn and Hawker open for traffic.
The Commonwealth Railways, the operator of the Central Australia Line, ran a weekly freight service on this section until 1972 when the service was cancelled and the line closed. It was the only scheduled service running on the line. They used SAR locos and a mixture of CR and SAR rolling stock.
| File:SAR Hawker Freight.png |
|
||||||||||
Getting Started:
|
Tutorial:
|
|
|

| Links: All links will open in this window | ||||||||
 Session Scenarios |
 Location List |
 Drive Tutorial |
 Rolling Stock |
 Loco Roster |
 Active Industries |
|||
This page was created by Trainz user pware in October 2021 and was last updated as shown below.