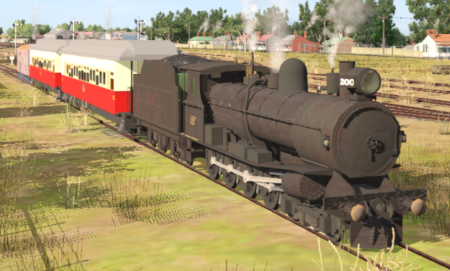
SAR Scenario Gladstone-Terowie Passenger
From TrainzOnline
(Difference between revisions)
m |
|||
| Line 56: | Line 56: | ||
<table cellpadding="2" bgcolor="black" width=1000> <!-- BEGIN Black border for Getting Started table --> | <table cellpadding="2" bgcolor="black" width=1000> <!-- BEGIN Black border for Getting Started table --> | ||
| − | |||
<tr valign="top"> | <tr valign="top"> | ||
<td><span style="font-size: 15px; font-weight: 700; color: white">Getting Started:</span><br> | <td><span style="font-size: 15px; font-weight: 700; color: white">Getting Started:</span><br> | ||
| − | <table bgcolor="lightyellow"> <!-- BEGIN Getting Started table --> | + | <table bgcolor="lightyellow" width=996> <!-- BEGIN Getting Started table --> |
<tr valign="top"> | <tr valign="top"> | ||
<td> | <td> | ||
| Line 80: | Line 79: | ||
</tr> | </tr> | ||
</table> <!-- END Black border for Getting Started table --> | </table> <!-- END Black border for Getting Started table --> | ||
| − | + | <br> | |
| − | <table bgcolor=" | + | <table cellpadding="2" bgcolor="blue" width=1000> <!-- BEGIN Blue border for Tutorial table --> |
<tr valign="top"> | <tr valign="top"> | ||
| − | <td width= | + | <td><span style="font-size: 15px; font-weight: 700; color: white">Tutorial:</span><br> |
| + | <table bgcolor="lightcyan" width=996> <!-- BEGIN Tutorial link table --> | ||
| + | <tr valign="top"> | ||
| + | <td width=70 align="right">[[image:Using EITs.png|link=SAR Scenario EIT and AI Tutorial|alt=EITs]]</td> | ||
| + | <td width=750>A tutorial on driving using the '''Enhanced Interlocking Towers (EITs)''', the '''AI''' (e.g. '''Drive To Trackmark''') and driving manually in these scenarios is provided in the link on the left. The link will open in this window.</td> | ||
| + | </tr> | ||
| + | </table> <!-- END Tutorial link table --> | ||
| + | </td> | ||
| + | </tr> | ||
| + | </table> <!-- END Blue Border for Tutorial table --> | ||
| + | <br> | ||
| + | <table width=1000> <!-- BEGIN Yard (if appliciable), Tasks, Strip Map and Driving Notes tables --> | ||
| + | <tr valign="top"> | ||
| + | <td> | ||
| + | <table bgcolor="LightYellow" width=820> <!-- BEGIN Tasks Table --> | ||
| + | <tr valign="top"> | ||
| + | <td> | ||
<span style="font-size: 15px; font-weight: 700; color: white; background-color: black;"> Tasks: </span><br> | <span style="font-size: 15px; font-weight: 700; color: white; background-color: black;"> Tasks: </span><br> | ||
# Reverse the train into '''Gladstone''' <span style="font-weight: 700; color: black; background-color: white;"> Station </span>. | # Reverse the train into '''Gladstone''' <span style="font-weight: 700; color: black; background-color: white;"> Station </span>. | ||
| Line 89: | Line 104: | ||
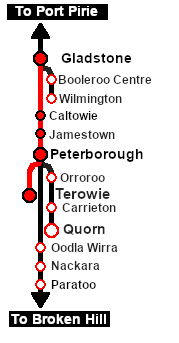
# On Tuesdays, Thursdays, Saturdays proceed to the <span style="font-weight: 700; color: black; background-color: white;"> Stations </span> at '''Yangya''' (request stop), '''Caltowie''', '''Jamestown''', '''Belalie North''', '''Yongala''', '''Peterborough''' and '''Terowie'''. Terminate at '''Terowie'''. | # On Tuesdays, Thursdays, Saturdays proceed to the <span style="font-weight: 700; color: black; background-color: white;"> Stations </span> at '''Yangya''' (request stop), '''Caltowie''', '''Jamestown''', '''Belalie North''', '''Yongala''', '''Peterborough''' and '''Terowie'''. Terminate at '''Terowie'''. | ||
# Coal (if needed) and water at the destination. | # Coal (if needed) and water at the destination. | ||
| − | <br | + | <br> |
| − | + | </td> | |
</tr> | </tr> | ||
| − | < | + | </table> <!-- END Tasks Table --> |
| − | < | + | |
<table cellpadding="2" bgcolor="black" width=820> <!-- BEGIN Black border for Driving Notes sub table --> | <table cellpadding="2" bgcolor="black" width=820> <!-- BEGIN Black border for Driving Notes sub table --> | ||
<tr valign="top"> | <tr valign="top"> | ||
<td><span style="font-size: 15px; font-weight: 700; color: white">Driving Notes:</span><br> | <td><span style="font-size: 15px; font-weight: 700; color: white">Driving Notes:</span><br> | ||
| − | <table bgcolor="lightyellow"> <!-- BEGIN Driving Notes sub table --> | + | <table bgcolor="lightyellow" width=816> <!-- BEGIN Driving Notes sub table --> |
<tr valign="top"> | <tr valign="top"> | ||
<td> | <td> | ||
| Line 103: | Line 117: | ||
*'''Enhanced Interlocking Towers''' with set paths are available for your optional use at '''Gladstone''' (departure), '''Jamestown''' (arrival and departure), '''Peterborough''' (arrival and departure) and at '''Terowie''' (arrival). Click [[image:Line_Index_Label.png|link=SAR_Index|Location Index]] for details. | *'''Enhanced Interlocking Towers''' with set paths are available for your optional use at '''Gladstone''' (departure), '''Jamestown''' (arrival and departure), '''Peterborough''' (arrival and departure) and at '''Terowie''' (arrival). Click [[image:Line_Index_Label.png|link=SAR_Index|Location Index]] for details. | ||
*Trackmarks and industries have been provided for AI '''Drive To Trackmark''', '''Drive via Trackmark''' and '''Drive to <span style="background-color: yellow;"> Industry </span>''' commands. Click [[image:Line_Index_Label.png|link=SAR_Index|Location Index]] for details. | *Trackmarks and industries have been provided for AI '''Drive To Trackmark''', '''Drive via Trackmark''' and '''Drive to <span style="background-color: yellow;"> Industry </span>''' commands. Click [[image:Line_Index_Label.png|link=SAR_Index|Location Index]] for details. | ||
| − | *Manual (no AI) driving is possible. For those locations without home or approach semaphore signals, a '''Caution''' warning sign has been placed at the location of the '''Main Approach Dn''' and '''Main Approach Up''' trackmarks. Click [[image:Line_Index_Label.png|link=SAR_Index|Location Index]] for details.</td> | + | *Manual (no AI) driving is possible. For those locations without home or approach semaphore signals, a '''Caution''' warning sign has been placed at the location of the '''Main Approach Dn''' and '''Main Approach Up''' trackmarks. Click [[image:Line_Index_Label.png|link=SAR_Index|Location Index]] for details. |
| + | </td> | ||
</tr> | </tr> | ||
</table> <!-- END Driving Notes sub table --> | </table> <!-- END Driving Notes sub table --> | ||
| Line 109: | Line 124: | ||
</tr> | </tr> | ||
</table> <!-- END Black border for Driving Notes sub table --> | </table> <!-- END Black border for Driving Notes sub table --> | ||
| + | </td> | ||
| + | <td> | ||
| + | <table width=180> <!-- BEGIN Strip Map Table --> | ||
| + | <tr valign="top"> | ||
| + | <td> | ||
| + | <td align="center">[[image:SAR Scenario Gladstone-Terowie Strip Map.png|link=|alt=Strip Map]]</td> | ||
| + | </tr> | ||
| + | </table> <!-- END Strip Map Table --> | ||
</td> | </td> | ||
</tr> | </tr> | ||
| − | </table> <!-- END Yard, Tasks and Driving Notes tables --> | + | </table> <!-- END Yard, Tasks, Strip Map and Driving Notes tables --> |
----- | ----- | ||
<table width=1000> <!-- BEGIN End Links Table --> | <table width=1000> <!-- BEGIN End Links Table --> | ||
Revision as of 20:55, 7 March 2021
| Gladstone to Jamestown School Run Gladstone to Terowie Passenger |
|
| A scenario in the SAR Peterborough Base Session | |
| A morning school run from Gladstone to Jamestown on Mondays, Wednesdays, Fridays. Combined school run and morning passenger service from Gladstone to Terowie on Tuesdays, Thursdays, Saturdays. |
|
Getting Started:
|
Tutorial:
|
|
|
| Links: All links will open in this window | ||||
 Session Scenarios List |
 Location List |
 Rolling Stock |
 Active Industries |
|
This page was created by Trainz user pware in February 2021 and was last updated as shown below.

