SAR Scenario Broad Gauge Express
From TrainzOnline
(Difference between revisions)
m |
m |
||
| (2 intermediate revisions by one user not shown) | |||
| Line 3: | Line 3: | ||
<td width=50 align="left">[[image:ArrowLeftBtn.png|link=SAR Scenario Gladstone Pickup Grain|30px]]</td> | <td width=50 align="left">[[image:ArrowLeftBtn.png|link=SAR Scenario Gladstone Pickup Grain|30px]]</td> | ||
<td width=900 align="center"><span style="font-size: 21px; font-weight: 700;"> <span style="background-color: black; color: white;"> 21 </span> <span style="background-color: black; color: white;"> Broad Gauge Adelaide Express Refuel and Shunt </span></span></td> | <td width=900 align="center"><span style="font-size: 21px; font-weight: 700;"> <span style="background-color: black; color: white;"> 21 </span> <span style="background-color: black; color: white;"> Broad Gauge Adelaide Express Refuel and Shunt </span></span></td> | ||
| − | <td width=50 align="right">[[image:ArrowRightBtn.png|link=SAR Scenario | + | <td width=50 align="right">[[image:ArrowRightBtn.png|link=SAR Scenario Laura Test Run|30px]]</td> |
</tr> | </tr> | ||
<tr valign="top"> | <tr valign="top"> | ||
| Line 33: | Line 33: | ||
<td><span style="font-size: 15px; font-weight: 700; color: white; background-color: black;"> Loco: </span></td> | <td><span style="font-size: 15px; font-weight: 700; color: white; background-color: black;"> Loco: </span></td> | ||
<td>'''[[SAR_Scenario_Rolling_Stock#SAR_621_Class|SAR 621]]''' at '''Terowie Platform 2'''<br> | <td>'''[[SAR_Scenario_Rolling_Stock#SAR_621_Class|SAR 621]]''' at '''Terowie Platform 2'''<br> | ||
| − | '''Other | + | '''Other Available Locos:''' '''None'''</td> |
</tr> | </tr> | ||
<tr valign="top"> | <tr valign="top"> | ||
| Line 75: | Line 75: | ||
# Each location details page has direct links to the adjacent locations so you can explore along the route. | # Each location details page has direct links to the adjacent locations so you can explore along the route. | ||
# When you are ready to start, reload the '''Peterborough Base Session''' page (click the '''Scenarios''' button on your current location page) and select this '''Scenario''' again or just use the '''Back''' button on your browser - whichever is quicker. | # When you are ready to start, reload the '''Peterborough Base Session''' page (click the '''Scenarios''' button on your current location page) and select this '''Scenario''' again or just use the '''Back''' button on your browser - whichever is quicker. | ||
| − | # Switch back to ''' | + | # Switch back to '''Driver Mode''' and either close the opening message window or press the <span style="font-weight: 700; font-size: 15px; color: white; background-color: black;"> P </span> key to start the session. |
</td> | </td> | ||
</tr> | </tr> | ||
| Line 99: | Line 99: | ||
<tr valign="top"> | <tr valign="top"> | ||
<td> | <td> | ||
| − | <table bgcolor=# | + | <table bgcolor=#000000 width=820 cellpadding=2> <!-- BEGIN Black Border for Orders Table --> |
<tr valign="top"> | <tr valign="top"> | ||
| − | <td> | + | <td><span style="font-size: 15px; font-weight: 700; color: white">Orders:</span><br> |
| − | <table width= | + | <table bgcolor=#e8e8e8 width=816> <!-- BEGIN Orders and Logo Table --> |
<tr valign="top"> | <tr valign="top"> | ||
| − | <td width= | + | <td width=716> |
# Uncouple the loco and tender from the passenger consist | # Uncouple the loco and tender from the passenger consist | ||
# Proceed to the <span style="font-weight:700; color: white; background-color: black;"> Coal & Water Stage Broad Gauge </span> at the <span style="font-weight:700; color: white; background-color: black;"> Loco Depot </span> to load coal and water | # Proceed to the <span style="font-weight:700; color: white; background-color: black;"> Coal & Water Stage Broad Gauge </span> at the <span style="font-weight:700; color: white; background-color: black;"> Loco Depot </span> to load coal and water | ||
| Line 116: | Line 116: | ||
</td> | </td> | ||
</tr> | </tr> | ||
| − | </table> | + | </table> <!-- END Black Border for Orders Table --> |
<br> | <br> | ||
<table cellpadding="2" bgcolor="black" width=820> <!-- BEGIN Black border for Driving Notes sub table --> | <table cellpadding="2" bgcolor="black" width=820> <!-- BEGIN Black border for Driving Notes sub table --> | ||
| Line 158: | Line 158: | ||
<td width=125 align="center">[[image:Industry Index.png|link=SAR Scenario Industries|alt=Industries]]<br>'''[[SAR Scenario Industries|Active Industries]]'''</td> | <td width=125 align="center">[[image:Industry Index.png|link=SAR Scenario Industries|alt=Industries]]<br>'''[[SAR Scenario Industries|Active Industries]]'''</td> | ||
<td width=125 align="center">[[image:BackToTop.png|link=#top|alt=Top|Top]]</td> | <td width=125 align="center">[[image:BackToTop.png|link=#top|alt=Top|Top]]</td> | ||
| − | <td width=50 align="right">[[image:ArrowRightBtn.png|link=SAR Scenario | + | <td width=50 align="right">[[image:ArrowRightBtn.png|link=SAR Scenario Laura Test Run|30px]]</td> |
</tr> | </tr> | ||
</table> <!-- END End Links Table --> | </table> <!-- END End Links Table --> | ||
Revision as of 22:38, 4 July 2022
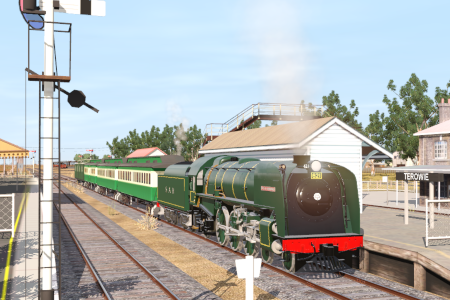
| 21 Broad Gauge Adelaide Express Refuel and Shunt | ||
| A scenario in the SAR Peterborough Base Session v2.0 | ||
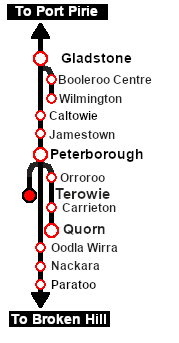
| The Terowie Express from Adelaide has arrived on Platform 2 at Terowie. Passengers continuing onto Peterborough (with a connection to Broken Hill and Sydney), Quorn (with a connection to the Central Australia Line ) and Port Augusta (with a connection to the Trans Australia Line service to Kalgoolie and Perth) change trains here to the narrow gauge East-West Express service leaving from Platform 3. The loco must be watered and coaled at the Loco Depot and turned. The guard van must be repositioned on the consist in preparation for the return Adelaide Express service. |
 |
|
||||||||||||
Getting Started:
|
Tutorial:
|
|
|


| Links: All links will open in this window | ||||||||
 Session Scenarios |
 Location List |
 Drive Tutorial |
 Rolling Stock |
 Loco Roster |
 Active Industries |
|||
This page was created by Trainz user pware in May 2022 and was last updated as shown below.