SAR Gladstone
m |
m |
||
| Line 1: | Line 1: | ||
| + | <!-- V1.0 and V2.0 variations included --> | ||
| + | |||
<table> <!-- BEGIN TOP TABLE --> | <table> <!-- BEGIN TOP TABLE --> | ||
<tr valign="top"> | <tr valign="top"> | ||
| Line 27: | Line 29: | ||
</tr> | </tr> | ||
| − | </table> <!-- | + | </table> <!-- END Location link table with LINE and STATION NAMES --> |
[[image:SAR_Gladstone.png|link=|alt=Gladstone map]] | [[image:SAR_Gladstone.png|link=|alt=Gladstone map]] | ||
| Line 36: | Line 38: | ||
<td><span style="font-weight: 700; background-color: black; color: white;"> Commodities: </span> | <td><span style="font-weight: 700; background-color: black; color: white;"> Commodities: </span> | ||
| − | <table width=300> <!-- BEGIN Commodities table (5 items) --> | + | <table width=300> <!-- BEGIN Commodities sub-table (5 items) --> |
<tr valign="top"> | <tr valign="top"> | ||
| Line 46: | Line 48: | ||
</tr> | </tr> | ||
| − | </table> <!-- END Commodities | + | </table> <!-- END Commodities sub-table --> |
</td> | </td> | ||
<td style="background-color: black;"><span style="color: white; font-weight: 700;"> Loco Services: </span> | <td style="background-color: black;"><span style="color: white; font-weight: 700;"> Loco Services: </span> | ||
| − | <table width=175> <!-- BEGIN Loco table (3 items) --> | + | <table width=175> <!-- BEGIN Loco sub-table (3 items) --> |
<tr valign="top"> | <tr valign="top"> | ||
| Line 59: | Line 61: | ||
</tr> | </tr> | ||
| − | </table> <!-- END Loco table --> | + | </table> <!-- END Loco sub-table --> |
</td> | </td> | ||
<td><span style="font-weight: 700;"><span style="background-color: black; color: white;"> Facilities: </span></span> | <td><span style="font-weight: 700;"><span style="background-color: black; color: white;"> Facilities: </span></span> | ||
| − | <table width=250> <!-- BEGIN Facilities table (4 items) --> | + | <table width=250> <!-- BEGIN Facilities sub-table (4 items) --> |
<tr valign="top"> | <tr valign="top"> | ||
| Line 73: | Line 75: | ||
</tr> | </tr> | ||
| − | </table> <!-- END Facilities | + | </table> <!-- END Facilities sub-table --> |
</td> | </td> | ||
| Line 93: | Line 95: | ||
<tr valign="top"> | <tr valign="top"> | ||
<td>[[image:No_13.png|link=|alt=13]] '''[[SAR Scenario Gladstone Shunter|Gladstone Shunter]]'''</td> | <td>[[image:No_13.png|link=|alt=13]] '''[[SAR Scenario Gladstone Shunter|Gladstone Shunter]]'''</td> | ||
| + | |||
<!-- V1.0 --> | <!-- V1.0 --> | ||
| + | |||
<td> </td> | <td> </td> | ||
| + | |||
<!-- END V1.0 --> | <!-- END V1.0 --> | ||
| − | <!-- V2.0 | + | <!-- V2.0 |
| + | |||
<td>[[image:No_16.png|link=|alt=16]] '''[[SAR Scenario Booleroo Passenger|Booleroo Railmotor]]'''</td> | <td>[[image:No_16.png|link=|alt=16]] '''[[SAR Scenario Booleroo Passenger|Booleroo Railmotor]]'''</td> | ||
| − | + | ||
| + | END V2.0 --> | ||
| + | |||
</tr> | </tr> | ||
</table> <!-- END Scenarios Table --> | </table> <!-- END Scenarios Table --> | ||
| Line 107: | Line 115: | ||
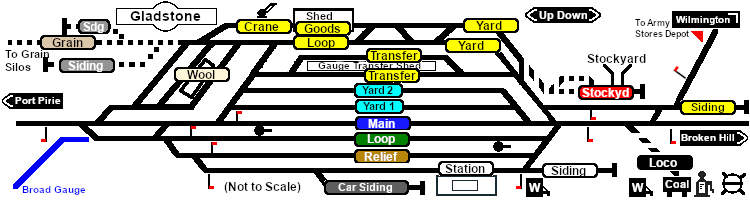
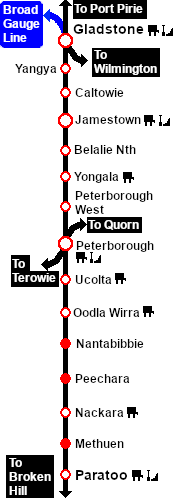
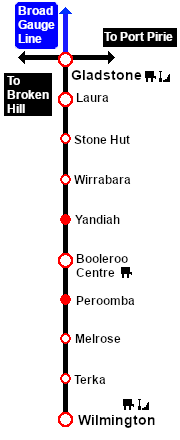
A major manned station, junction and a break-of-gauge location on the narrow gauge <span style="font-weight: 700; color: white; background-color: black;"> Port Pirie-Broken Hill Line </span> and <span style="font-weight: 700; color: white; background-color: black;"> Gladstone-Wilmington Line </span>, and the broad gauge <span style="font-weight: 700; color: white; background-color: blue;"> Gladstone-Hamley Bridge-Adelaide Line </span>.<br> | A major manned station, junction and a break-of-gauge location on the narrow gauge <span style="font-weight: 700; color: white; background-color: black;"> Port Pirie-Broken Hill Line </span> and <span style="font-weight: 700; color: white; background-color: black;"> Gladstone-Wilmington Line </span>, and the broad gauge <span style="font-weight: 700; color: white; background-color: blue;"> Gladstone-Hamley Bridge-Adelaide Line </span>.<br> | ||
| − | Multiple loops, yards and sidings for goods, grain, livestock, station, transfer platforms and loco servicing facilities. Many of the tracks were dual gauge and later, triple gauge | + | Multiple loops, yards and sidings for goods, grain, livestock, station, transfer platforms and loco servicing facilities. Many of the tracks were dual gauge and, much later, triple gauge. For simplicity only a few "token" dual-gauge tracks are shown in this layout.<br> |
'''Port Pirie''' is 32km (20mi) directly North West of '''Gladstone''' or 51km (31.5mi) by rail.<br> | '''Port Pirie''' is 32km (20mi) directly North West of '''Gladstone''' or 51km (31.5mi) by rail.<br> | ||
| − | The '''Port Pirie-Broken Hill Line''' was converted to standard gauge during 1969-1970 and '''Gladstone''' then became a triple gauge location until the closure of the narrow and broad gauge lines.<br> | + | The '''Port Pirie-Broken Hill Line''' was converted to standard gauge during 1969-1970 and '''Gladstone''' then became a triple gauge location until the closure of the narrow and broad gauge lines by 1990.<br> |
| − | '''Gladstone''' now | + | '''Gladstone''' is now just a passing loop and a grain terminal. The station building still stands but is no longer in use. The loco servicing facilities have been removed. |
</td> | </td> | ||
</tr> | </tr> | ||
Revision as of 09:41, 24 May 2022
|
 |
|||||||||||||||||||||||||||||||||