SAR Gladstone
m |
m |
||
| (23 intermediate revisions by one user not shown) | |||
| Line 1: | Line 1: | ||
| − | < | + | <!-- V1.0 and V2.0 variations included --> |
| + | <!-- new scenarios added --> | ||
| + | <!-- BEGIN V1.0 --> | ||
| + | <table> | ||
<tr valign="top"> | <tr valign="top"> | ||
<td width=750> | <td width=750> | ||
| − | <table width=750 | + | <table width=750> |
<tr valign="top"> | <tr valign="top"> | ||
<td align="center">[[Image:line740.png|link=]]</td> | <td align="center">[[Image:line740.png|link=]]</td> | ||
</tr> | </tr> | ||
<tr valign="top"> | <tr valign="top"> | ||
| − | <td align="center">[[image:Tab_HM_White.png|link=]] [[image:Tab_IN_Grey.png|link=SAR_Gladstone_Industry]] [[image:Tab_TM_Grey.png|link=SAR_Gladstone_TrackMarks]] [[image: | + | <td align="center">[[image:Tab_HM_White.png|link=]] [[image:Tab_IN_Grey.png|link=SAR_Gladstone_Industry]] [[image:Tab_TM_Grey.png|link=SAR_Gladstone_TrackMarks]] [[image:Tab_SW_Grey.png|link=SAR_Gladstone_Switches]] [[image:Tab_Blank_Grey.png|link=]]</td> |
</tr> | </tr> | ||
<tr valign="top"> | <tr valign="top"> | ||
<td align="center">[[Image:line740.png|link=]]</td> | <td align="center">[[Image:line740.png|link=]]</td> | ||
</tr> | </tr> | ||
| − | </table | + | </table> |
| − | <table bgcolor="lightgrey" bordercolor="lightgrey" width=750 | + | <table bgcolor="lightgrey" bordercolor="lightgrey" width=750> |
<tr valign="middle"> | <tr valign="middle"> | ||
| Line 21: | Line 24: | ||
[[Image:BroadGaugeLine.png|link=|alt=Broad Gauge Line]]</td> | [[Image:BroadGaugeLine.png|link=|alt=Broad Gauge Line]]</td> | ||
<td width=110 align="center"> </td> | <td width=110 align="center"> </td> | ||
| − | <td width=90 align="center">[[Image:Location Index.png|link=SAR Index|alt=Location Index|Location Index]]</td> | + | <td width=90 align="center">[[Image:Location Index.png|link=SAR Index|alt=Location Index|Location Index]]<br>[[image:Scenario Index.png|link=SAR Peterborough Base Session|alt=Scenarios|Scenario Index]]</td> |
<td width=110 align="center">[[Image:Next Right.png|link=|alt=]]<br>[[Image:SAR_Yangya_Name.png|link=SAR Yangya|alt=Yangya|Next Down Location]]<br>[[Image:SAR_Laura_Name.png|link=SAR Laura|alt=Laura|Next Down Location]]</td> | <td width=110 align="center">[[Image:Next Right.png|link=|alt=]]<br>[[Image:SAR_Yangya_Name.png|link=SAR Yangya|alt=Yangya|Next Down Location]]<br>[[Image:SAR_Laura_Name.png|link=SAR Laura|alt=Laura|Next Down Location]]</td> | ||
<td width=220 align="left">[[Image:SAR_PortPirie-BrokenHill Line.png|link=SAR_Port_Pirie-Broken_Hill|alt=PortPirie-BrokenHill|Show Port Pirie-Broken Hill]]<br> | <td width=220 align="left">[[Image:SAR_PortPirie-BrokenHill Line.png|link=SAR_Port_Pirie-Broken_Hill|alt=PortPirie-BrokenHill|Show Port Pirie-Broken Hill]]<br> | ||
| Line 27: | Line 30: | ||
</tr> | </tr> | ||
| − | </table | + | </table> |
[[image:SAR_Gladstone.png|link=|alt=Gladstone map]] | [[image:SAR_Gladstone.png|link=|alt=Gladstone map]] | ||
| − | <table bgcolor="lightgrey" bordercolor="lightgrey" width=750 | + | <table bgcolor="lightgrey" bordercolor="lightgrey" width=750> |
<tr valign="top"> | <tr valign="top"> | ||
<td><span style="font-weight: 700; background-color: black; color: white;"> Commodities: </span> | <td><span style="font-weight: 700; background-color: black; color: white;"> Commodities: </span> | ||
| − | <table width=300 | + | <table width=300> |
<tr valign="top"> | <tr valign="top"> | ||
| Line 46: | Line 49: | ||
</tr> | </tr> | ||
| − | </table | + | </table> |
</td> | </td> | ||
<td style="background-color: black;"><span style="color: white; font-weight: 700;"> Loco Services: </span> | <td style="background-color: black;"><span style="color: white; font-weight: 700;"> Loco Services: </span> | ||
| − | <table width=175 | + | <table width=175> |
<tr valign="top"> | <tr valign="top"> | ||
| − | <td align="center" width=50>[[image: | + | <td align="center" width=50>[[image:Bunker_Oil_Icon.png|link=|alt=Fuel]]<br><span style="font-size: 10px; color: white; font-weight: 700;">Bunker Oil</span><br>[[image:Loco_Label.png|link=]]</td> |
<td align="center" width=50>[[Image:Coal_Icon.png|link=|alt=Coal]]<br><span style="font-size: 10px; color: white; font-weight: 700;">Coal</span><br>[[image:Loco_Label.png|link=]]</td> | <td align="center" width=50>[[Image:Coal_Icon.png|link=|alt=Coal]]<br><span style="font-size: 10px; color: white; font-weight: 700;">Coal</span><br>[[image:Loco_Label.png|link=]]</td> | ||
<td align="center" width=50>[[Image:Water_Icon.png|link=|alt=Water]]<br><span style="font-size: 10px; color: white; font-weight: 700;">Water</span><br>[[image:Loco_Label.png|link=]]<br>[[image:Main_Label.png|link=]]<br>[[image:Loop_Label.png|link=]]</td> | <td align="center" width=50>[[Image:Water_Icon.png|link=|alt=Water]]<br><span style="font-size: 10px; color: white; font-weight: 700;">Water</span><br>[[image:Loco_Label.png|link=]]<br>[[image:Main_Label.png|link=]]<br>[[image:Loop_Label.png|link=]]</td> | ||
</tr> | </tr> | ||
| − | </table | + | </table> |
</td> | </td> | ||
<td><span style="font-weight: 700;"><span style="background-color: black; color: white;"> Facilities: </span></span> | <td><span style="font-weight: 700;"><span style="background-color: black; color: white;"> Facilities: </span></span> | ||
| − | <table width=250 | + | <table width=250> |
<tr valign="top"> | <tr valign="top"> | ||
| Line 70: | Line 73: | ||
<td align="center" width=50>[[Image:Loop_Icon.png|link=|alt=Loop]]<br><span style="font-size: 10px; font-weight: 700;">Loop</span><br>[[image:Loop_Label.png|link=]]</td> | <td align="center" width=50>[[Image:Loop_Icon.png|link=|alt=Loop]]<br><span style="font-size: 10px; font-weight: 700;">Loop</span><br>[[image:Loop_Label.png|link=]]</td> | ||
<td align="center" width=50>[[Image:Turntable_Icon.png|link=|alt=Turntable]]<br><span style="font-size: 10px; font-weight: 700;">Turntable</span><br>[[image:Loco_Label.png|link=]]</td> | <td align="center" width=50>[[Image:Turntable_Icon.png|link=|alt=Turntable]]<br><span style="font-size: 10px; font-weight: 700;">Turntable</span><br>[[image:Loco_Label.png|link=]]</td> | ||
| − | <td align="center" width=50> </td | + | <td align="center" width=50> </td> |
</tr> | </tr> | ||
| − | </table | + | </table> |
</td> | </td> | ||
</tr> | </tr> | ||
| − | </table | + | </table> |
| − | <table> | + | <table bgcolor="lightcyan" width=750> |
| + | <tr valign="top"> | ||
| + | <td colspan=2><span style="font-weight: 700;"><span style="background-color: black; color: white;"> Scenario Sessions Starting at Gladstone: </span></span></td> | ||
| + | </tr> | ||
| + | <tr valign="top"> | ||
| + | <td width=375>[[image:No_1.png|link=|alt=1]] '''[[SAR Scenario Depot Fuel Run|Depot Fuel Run]]'''</td> | ||
| + | <td width=375>[[image:No_3.png|link=|alt=3]] '''[[SAR Scenario Wilmington Freight|Wilmington Local Freight]]'''</td> | ||
| + | </tr> | ||
| + | <tr valign="top"> | ||
| + | <td>[[image:No_4.png|link=|alt=4]] '''[[SAR Scenario Gladstone-Terowie Passenger|Jamestown and Terowie Passenger]]'''</td> | ||
| + | <td>[[image:No_6.png|link=|alt=6]] '''[[SAR Scenario Paratoo Empty Ore|Paratoo Empty Ore]]'''</td> | ||
| + | </tr> | ||
| + | <tr valign="top"> | ||
| + | <td>[[image:No_13.png|link=|alt=13]] '''[[SAR Scenario Gladstone Shunter|Gladstone Shunter]]'''</td> | ||
| + | <td> </td> | ||
| + | </tr> | ||
| + | </table> | ||
| + | |||
| + | <table width=750> | ||
| + | <tr valign="top"> | ||
| + | <td align="center">[[Image:line740.png|link=]]</td> | ||
| + | </tr> | ||
| + | <tr valign="top"> | ||
| + | <td> | ||
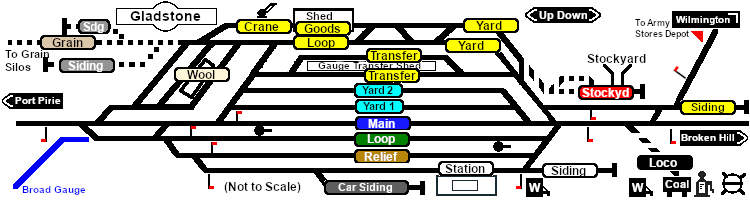
| + | A major manned station, junction and a break-of-gauge location on the narrow gauge <span style="font-weight: 700; color: white; background-color: black;"> Port Pirie-Broken Hill Line </span> and <span style="font-weight: 700; color: white; background-color: black;"> Gladstone-Wilmington Line </span>, and the broad gauge <span style="font-weight: 700; color: white; background-color: blue;"> Gladstone-Hamley Bridge-Adelaide Line </span>.<br> | ||
| + | |||
| + | Multiple loops, yards and sidings for goods, grain, livestock, station, transfer platforms and loco servicing facilities. Many of the tracks were dual gauge and, much later, triple gauge. For simplicity only a few "token" dual-gauge tracks are shown in this layout.<br> | ||
| + | |||
| + | '''Port Pirie''' is 32km (20mi) directly North West of '''Gladstone''' or 51km (31.5mi) by rail.<br> | ||
| + | |||
| + | The '''Port Pirie-Broken Hill Line''' was converted to standard gauge during 1969-1970 and '''Gladstone''' then became a triple gauge location until the closure of the narrow and broad gauge lines by 1990.<br> | ||
| + | |||
| + | At its peak, before standardisation, '''Gladstone''' employed over 1,000 workers in servicing locomotives and the break-of-gauge facilities.<br> | ||
| + | |||
| + | '''Gladstone''' is now just a passing loop and a grain terminal. The loco servicing facilities have been removed. The station building still stands but is no longer in use and is slowly decaying. Rail passenger services no longer stop at '''Gladstone''' and passengers now rely on a bus service | ||
| + | </td> | ||
| + | </tr> | ||
| + | <tr valign="top"> | ||
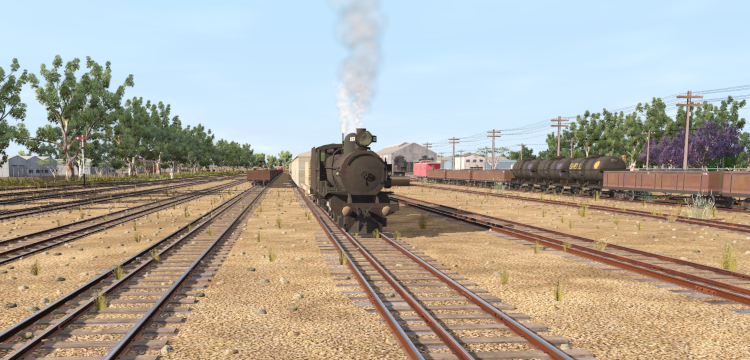
| + | <td align="center">[[Image:Gladstone_Image.png|link=|alt=Gladstone Yard]]</td> | ||
| + | </tr> | ||
| + | <tr valign="top"> | ||
| + | <td align="center">[[Image:line740.png|link=]]</td> | ||
| + | </tr> | ||
| + | </table> | ||
| + | |||
| + | </td> | ||
| + | <td> | ||
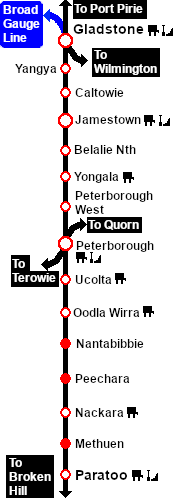
| + | [[Image:SAR_PortPirie-BrokenHill Line.png|link=SAR Port Pirie-Broken Hill|alt=Port Pirie-Broken Hill Line|Show Port Pirie-Broken Hill Line]]<br>[[Image:SAR_Gladstone-Paratoo Strip Map.png|link=|alt=Gladstone-Paratoo Strip Map]]<br><br> | ||
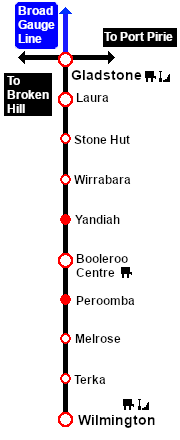
| + | [[Image:SAR_Gladstone-Wilmington_Line.png|link=SAR Gladstone-Wilmington|alt=Gladstone-Wilmington|Show Gladstone-Wilmington]]<br>[[Image:SAR_Gladstone-Wilmington Strip Map.png|link=|alt=Gladstone-Wilmington Strip Map]]</td> | ||
| + | </tr> | ||
| + | </table> | ||
| + | |||
| + | <!-- END V1.0 --> | ||
| + | <!-- BEGIN V2.0 | ||
| + | |||
| + | <table> | ||
<tr valign="top"> | <tr valign="top"> | ||
<td width=750> | <td width=750> | ||
| − | |||
| − | + | <table width=750> | |
| + | <tr valign="top"> | ||
| + | <td align="center">[[Image:line740.png|link=]]</td> | ||
| + | </tr> | ||
| + | <tr valign="top"> | ||
| + | <td align="center">[[image:Tab_HM_White.png|link=]] [[image:Tab_IN_Grey.png|link=SAR_Gladstone_Industry]] [[image:Tab_TM_Grey.png|link=SAR_Gladstone_TrackMarks]] [[image:Tab_SW_Grey.png|link=SAR_Gladstone_Switches]] [[image:Tab_Blank_Grey.png|link=]]</td> | ||
| + | </tr> | ||
| + | <tr valign="top"> | ||
| + | <td align="center">[[Image:line740.png|link=]]</td> | ||
| + | </tr> | ||
| + | </table> | ||
| + | |||
| + | <table bgcolor="lightgrey" bordercolor="lightgrey" width=750> | ||
| + | |||
| + | <tr valign="middle"> | ||
| + | <td width=220 align="right">[[Image:SAR_PortPirie-BrokenHill Line.png|link=SAR Port Pirie-Broken Hill|alt=Port Pirie-Broken Hill Line|Show Port Pirie-Broken Hill Line]]<br> | ||
| + | [[Image:BroadGaugeLine.png|link=|alt=Broad Gauge Line]]</td> | ||
| + | <td width=110 align="center"> </td> | ||
| + | <td width=90 align="center">[[Image:Location Index.png|link=SAR Index|alt=Location Index|Location Index]]<br>[[image:Scenario Index.png|link=SAR Peterborough Base Session|alt=Scenarios|Scenario Index]]</td> | ||
| + | <td width=110 align="center">[[Image:Next Right.png|link=|alt=]]<br>[[Image:SAR_Yangya_Name.png|link=SAR Yangya|alt=Yangya|Next Down Location]]<br>[[Image:SAR_Laura_Name.png|link=SAR Laura|alt=Laura|Next Down Location]]</td> | ||
| + | <td width=220 align="left">[[Image:SAR_PortPirie-BrokenHill Line.png|link=SAR_Port_Pirie-Broken_Hill|alt=PortPirie-BrokenHill|Show Port Pirie-Broken Hill]]<br> | ||
| + | [[Image:SAR_Gladstone-Wilmington_Line.png|link=SAR Gladstone-Wilmington|alt=Gladstone-Wilmington|Show Gladstone-Wilmington]]</td> | ||
| + | </tr> | ||
| + | |||
| + | </table> | ||
| + | |||
| + | [[image:SAR_Gladstone.png|link=|alt=Gladstone map]] | ||
| + | |||
| + | <table bgcolor="lightgrey" bordercolor="lightgrey" width=750> | ||
| + | |||
| + | <tr valign="top"> | ||
| + | <td><span style="font-weight: 700; background-color: black; color: white;"> Commodities: </span> | ||
| + | |||
| + | <table width=300> | ||
| + | <tr valign="top"> | ||
| + | |||
| + | <td align="center" width=50>[[Image:Passenger_Icon.png|link=|alt=Passengers]]<br><span style="font-size: 10px; font-weight: 700;">Passengers</span><br>[[image:Station_Label.png|link=]]</td> | ||
| + | <td align="center" width=50>[[Image:Goods_Icon.png|link=|alt=Goods]]<br><span style="font-size: 10px; font-weight: 700;">Goods</span><br>[[image:Goods_Label.png|link=]]</td> | ||
| + | <td align="center" width=50>[[Image:Grain_Icon.png|link=|alt=Grain]]<br><span style="font-size: 10px; font-weight: 700;">Grain</span><br>[[image:Grain_Label.png|link=]]</td> | ||
| + | <td align="center" width=50>[[Image:Livestock_Icon.png|link=|alt=Livestock]]<br><span style="font-size: 10px; font-weight: 700;">Livestock</span><br>[[image:Stockyard_Label.png|link=]]</td> | ||
| + | <td align="center" width=50>[[Image:Wool_icon.png|link=|alt=Wool]]<br><span style="font-size: 10px; font-weight: 700;">Wool</span><br>[[image:Wool_Label.png|link=]]</td> | ||
| + | |||
| + | </tr> | ||
| + | </table> | ||
| − | |||
</td> | </td> | ||
| + | <td style="background-color: black;"><span style="color: white; font-weight: 700;"> Loco Services: </span> | ||
| + | |||
| + | <table width=175> | ||
| + | <tr valign="top"> | ||
| + | |||
| + | <td align="center" width=50>[[image:Bunker_Oil_Icon.png|link=|alt=Fuel]]<br><span style="font-size: 10px; color: white; font-weight: 700;">Bunker Oil</span><br>[[image:Loco_Label.png|link=]]</td> | ||
| + | <td align="center" width=50>[[Image:Coal_Icon.png|link=|alt=Coal]]<br><span style="font-size: 10px; color: white; font-weight: 700;">Coal</span><br>[[image:Loco_Label.png|link=]]</td> | ||
| + | <td align="center" width=50>[[Image:Water_Icon.png|link=|alt=Water]]<br><span style="font-size: 10px; color: white; font-weight: 700;">Water</span><br>[[image:Loco_Label.png|link=]]<br>[[image:Main_Label.png|link=]]<br>[[image:Loop_Label.png|link=]]</td> | ||
| + | |||
</tr> | </tr> | ||
| + | </table> | ||
| + | |||
| + | </td> | ||
| + | <td><span style="font-weight: 700;"><span style="background-color: black; color: white;"> Facilities: </span></span> | ||
| + | |||
| + | <table width=250> | ||
| + | <tr valign="top"> | ||
| + | |||
| + | <td align="center" width=50>[[Image:Shed_Icon.png|link=|alt=Shed]]<br><span style="font-size: 10px; font-weight: 700;">Depot</span><br>[[image:Loco_Label.png|link=]]</td> | ||
| + | <td align="center" width=50>[[Image:Loop_Icon.png|link=|alt=Loop]]<br><span style="font-size: 10px; font-weight: 700;">Loop</span><br>[[image:Loop_Label.png|link=]]</td> | ||
| + | <td align="center" width=50>[[Image:Turntable_Icon.png|link=|alt=Turntable]]<br><span style="font-size: 10px; font-weight: 700;">Turntable</span><br>[[image:Loco_Label.png|link=]]</td> | ||
| + | <td align="center" width=50> </td> | ||
| + | |||
| + | </tr> | ||
| + | </table> | ||
| + | |||
| + | </td> | ||
| + | </tr> | ||
| + | </table> | ||
| + | |||
| + | <table bgcolor="lightcyan" width=750> | ||
| + | <tr valign="top"> | ||
| + | <td colspan=2><span style="font-weight: 700;"><span style="background-color: black; color: white;"> Scenario Sessions Starting at Gladstone: </span></span></td> | ||
| + | </tr> | ||
| + | <tr valign="top"> | ||
| + | <td width=375>[[image:No_1.png|link=|alt=1]] '''[[SAR Scenario Depot Fuel Run|Depot Fuel Run]]'''</td> | ||
| + | <td width=375>[[image:No_3.png|link=|alt=3]] '''[[SAR Scenario Wilmington Freight|Wilmington Local Freight]]'''</td> | ||
| + | </tr> | ||
| + | <tr valign="top"> | ||
| + | <td>[[image:No_4.png|link=|alt=4]] '''[[SAR Scenario Gladstone-Terowie Passenger|Jamestown and Terowie Passenger]]'''</td> | ||
| + | <td>[[image:No_6.png|link=|alt=6]] '''[[SAR Scenario Paratoo Empty Ore|Paratoo Empty Ore]]'''</td> | ||
| + | </tr> | ||
| + | <tr valign="top"> | ||
| + | <td>[[image:No_13.png|link=|alt=13]] '''[[SAR Scenario Gladstone Shunter|Gladstone Shunter]]'''</td> | ||
| + | <td> </td> | ||
| + | </tr> | ||
| + | <tr valign="top"> | ||
| + | <td colspan=2 align="center"><span style="font-weight: 700;">In SAR Peterborough Base Session <span style="color: blue;">V2.0</span></span></td> | ||
| + | </tr> | ||
| + | <tr valign="top"> | ||
| + | <td>[[image:No_16.png|link=|alt=16]] '''[[SAR Scenario Booleroo Passenger|Booleroo Railmotor]]'''</td> | ||
| + | <td>[[image:No_22.png|link=|alt=22]] '''[[SAR Scenario Laura Test Run|Laura Test Run]]'''</td> | ||
| + | </tr> | ||
| + | </table> | ||
| + | |||
| + | <table width=750> | ||
<tr valign="top"> | <tr valign="top"> | ||
<td align="center">[[Image:line740.png|link=]]</td> | <td align="center">[[Image:line740.png|link=]]</td> | ||
</tr> | </tr> | ||
| + | <tr valign="top"> | ||
| + | <td> | ||
| + | A major manned station, junction and a break-of-gauge location on the narrow gauge <span style="font-weight: 700; color: white; background-color: black;"> Port Pirie-Broken Hill Line </span> and <span style="font-weight: 700; color: white; background-color: black;"> Gladstone-Wilmington Line </span>, and the broad gauge <span style="font-weight: 700; color: white; background-color: blue;"> Gladstone-Hamley Bridge-Adelaide Line </span>.<br> | ||
| − | < | + | Multiple loops, yards and sidings for goods, grain, livestock, station, transfer platforms and loco servicing facilities. Many of the tracks were dual gauge and, much later, triple gauge. For simplicity only a few "token" dual-gauge tracks are shown in this layout.<br> |
| + | '''Port Pirie''' is 32km (20mi) directly North West of '''Gladstone''' or 51km (31.5mi) by rail.<br> | ||
| + | |||
| + | The '''Port Pirie-Broken Hill Line''' was converted to standard gauge during 1969-1970 and '''Gladstone''' then became a triple gauge location until the closure of the narrow and broad gauge lines by 1990.<br> | ||
| + | |||
| + | At its peak, before standardisation, '''Gladstone''' employed over 1,000 workers in servicing locomotives and the break-of-gauge facilities.<br> | ||
| + | |||
| + | '''Gladstone''' is now just a passing loop and a grain terminal. The loco servicing facilities have been removed. The station building still stands but is no longer in use and is slowly decaying. Rail passenger services no longer stop at '''Gladstone''' and passengers now rely on a bus service | ||
| + | </td> | ||
| + | </tr> | ||
| + | <tr valign="top"> | ||
| + | <td align="center">[[Image:Gladstone_Image.png|link=|alt=Gladstone Yard]]</td> | ||
| + | </tr> | ||
| + | <tr valign="top"> | ||
| + | <td align="center">[[Image:line740.png|link=]]</td> | ||
| + | </tr> | ||
| + | </table> | ||
</td> | </td> | ||
<td> | <td> | ||
| Line 100: | Line 273: | ||
[[Image:SAR_Gladstone-Wilmington_Line.png|link=SAR Gladstone-Wilmington|alt=Gladstone-Wilmington|Show Gladstone-Wilmington]]<br>[[Image:SAR_Gladstone-Wilmington Strip Map.png|link=|alt=Gladstone-Wilmington Strip Map]]</td> | [[Image:SAR_Gladstone-Wilmington_Line.png|link=SAR Gladstone-Wilmington|alt=Gladstone-Wilmington|Show Gladstone-Wilmington]]<br>[[Image:SAR_Gladstone-Wilmington Strip Map.png|link=|alt=Gladstone-Wilmington Strip Map]]</td> | ||
</tr> | </tr> | ||
| − | </table> | + | </table> |
| + | END V2.0 --> | ||
Revision as of 22:01, 11 August 2022
|
 |
|||||||||||||||||||||||||||||||||||