How to Use Bulk Asset Update/Replace Tool
(→Sample Application: Added second application example) |
m (→Things it Will NOT Do) |
||
| (23 intermediate revisions by one user not shown) | |||
| Line 1: | Line 1: | ||
| + | The information in this Wiki Page applies to '''TANE''', '''TRS19''' and '''Trainz Plus'''. | ||
| + | |||
__TOC__ | __TOC__ | ||
='''What is the Bulk Asset Update/Replace Tool?'''= | ='''What is the Bulk Asset Update/Replace Tool?'''= | ||
| Line 4: | Line 6: | ||
<table cellpadding="4" bgcolor=#c1e7e7> | <table cellpadding="4" bgcolor=#c1e7e7> | ||
<tr valign="top"> | <tr valign="top"> | ||
| − | <td>[[file:DotPoint.JPG]]</td> | + | <td>[[file:DotPoint.JPG|link=]]</td> |
<td>'''The ''Bulk Asset Update/Replace Tool'' allows the replacement, deletion and modification of multiple instances of one or more different assets, including textures.'''</td> | <td>'''The ''Bulk Asset Update/Replace Tool'' allows the replacement, deletion and modification of multiple instances of one or more different assets, including textures.'''</td> | ||
</tr> | </tr> | ||
</table> | </table> | ||
| − | + | <br> | |
| − | + | ||
| − | + | ||
<table cellpadding="4" bgcolor=#ffffb0> | <table cellpadding="4" bgcolor=#ffffb0> | ||
<tr valign="top"> | <tr valign="top"> | ||
| − | <td>[[file:NotePad.PNG]]</td> | + | <td>[[file:NotePad.PNG|link=]]</td> |
| − | <td><font size | + | <td><span style="font-size: 17px;">'''Notes:'''</span><br> |
*The tool automates the tedious process of deleting and replacing objects one at a time, as well as other tasks. It allow the mass:- | *The tool automates the tedious process of deleting and replacing objects one at a time, as well as other tasks. It allow the mass:- | ||
**deletion of scenery objects | **deletion of scenery objects | ||
| Line 26: | Line 26: | ||
</table> | </table> | ||
<br> | <br> | ||
| − | <table cellpadding="4" bgcolor=# | + | ='''Things it Will NOT Do'''= |
| + | |||
| + | <table cellpadding="4" bgcolor=#fcbcbc> | ||
<tr valign="top"> | <tr valign="top"> | ||
| − | <td>[[file: | + | <td>[[file:Stop.PNG|link=]]</td> |
| − | <td>''' | + | <td>'''The ''Bulk Asset Update/Replace Tool'' <span style="text-decoration: underline;">CANNOT</span> be used on''':- |
| + | *'''spline objects''' (tracks are '''not''' counted as splines so you can replace tracks) | ||
| + | *objects that are in a '''locked layer''' (easily fixed by unlocking the layer) | ||
| + | *'''bridge splines''' | ||
| + | *'''tunnel splines''' | ||
| + | *'''multiple track splines''' | ||
| + | *'''consists/trains''' | ||
| + | *objects of '''mixed types''' e.g. replacing non-splines with splines | ||
| + | </td> | ||
| + | </tr> | ||
| + | </table> | ||
| + | <table width="100%"> | ||
| + | <tr valign="top"> | ||
| + | <td align="right">[[file:BackToTop.png|link=#top|alt=Top|Top]]</td> | ||
</tr> | </tr> | ||
</table> | </table> | ||
| − | + | ='''Selecting Assets and Options'''= | |
| + | |||
| + | The tool is located in the '''Surveyor Main Menu''' in '''TANE''' (below left) and in the '''Surveyor Tools Menu''' in '''TRS19''' and '''Trainz Plus''' (below right).<br> | ||
| + | |||
| + | [[file:UpdateStartTANE.png|link=]] [[file:UpdateStartTRS19SP1.png|link=]] | ||
| + | <br> | ||
<table> | <table> | ||
<tr valign="top"> | <tr valign="top"> | ||
| − | <td>[[file: | + | <td>[[file:BulkAssetWindowReplacementTools.JPG|link=]]</td> |
| − | <td><br> | + | <td> |
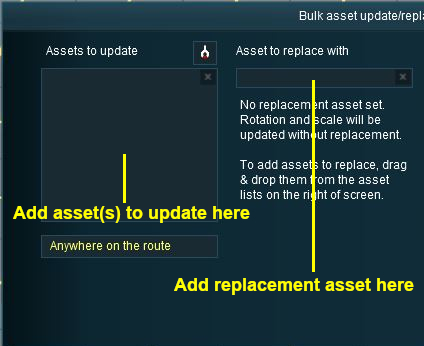
| − | <table cellpadding="4" bgcolor=#ffffff> | + | *The large data box on the left of the tool window, the '''Assets to update''' list, is used to store the names of the objects that are going to be updated or replaced |
| + | *The smaller entry box on its right. the '''Asset to replace with''' list, is to store a '''single''' object that will replace the object or objects in the '''Assets to update''' list | ||
| + | </td> | ||
| + | </tr> | ||
| + | </table> | ||
| + | <br> | ||
| + | |||
| + | <table cellpadding="4" bgcolor=#ffffff> <!-- BEGIN Step table --> | ||
<tr> | <tr> | ||
<td colspan="2"> | <td colspan="2"> | ||
| Line 44: | Line 71: | ||
</tr> | </tr> | ||
<tr valign="top"> | <tr valign="top"> | ||
| − | <td>[[file: | + | <td>[[file:Steps.PNG|link=]]<br><br> |
| − | <td><font size=" | + | <span style="font-size: 17px; font-weight: 700;">Steps</span></td> |
| − | + | <td>[[file:DotPoint1.JPG|link=]] <span style="font-size: 17px; font-weight: 700;">Select the Assets to Update:</span><br> | |
| − | + | <table> <!-- BEGIN Step 1 table --> | |
| + | <tr valign="top"> | ||
| + | <td>There are two alternate methods of filling the '''Assets to update''' list | ||
| + | <table border=2> <!-- BEGIN Step 1 Alternatives outer table --> | ||
| + | <tr valign="top"> | ||
| + | <td> | ||
| + | <table width=400> <!-- BEGIN Step 1 Alternative 1 inner table --> | ||
| + | <tr valign="top"> | ||
| + | <td>[[file:DotPoint1Blue.png|link=]]</td> | ||
| + | <td> | ||
| + | #click on the '''Get Tool''' (shown below), then | ||
| + | #click on the object in the Surveyor screen. | ||
| + | [[file:BulkAssetAddGetTool.JPG|link=]]<br> | ||
| + | The object will be added to the list, as shown in the example above.<br> | ||
| + | </td> | ||
| + | </tr> | ||
| + | </table> <!-- END Step 1 Alternative 1 inner table --> | ||
| + | </td> | ||
| + | <td> | ||
| + | <table width=660> <!-- BEGIN Step 1 Alternative 2 inner table --> | ||
| + | <tr valign="top"> | ||
| + | <td>[[file:DotPoint2Blue.png|link=]]</td> | ||
| + | <td> | ||
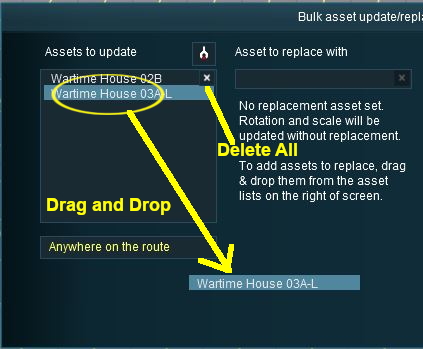
| + | #''drag and drop'' an object from the '''Object Tool Selection Window''' as shown below<br> | ||
| + | [[file:BulkAssetAddDrag.JPG|link=]] | ||
| + | </td> | ||
| + | </tr> | ||
| + | </table> <!-- END Step 1 Alternative 2 inner table --> | ||
| + | </td> | ||
| + | </tr> | ||
| + | </table> <!-- END Step 1 Alternatives outer table --> | ||
| + | This can be repeated for multiple objects, using '''either''' or '''both''' methods, to build the list of '''Assets to update'''. | ||
| + | </td> | ||
</tr> | </tr> | ||
<tr> | <tr> | ||
| Line 53: | Line 112: | ||
----</td> | ----</td> | ||
</tr> | </tr> | ||
| − | </table></td> | + | </table> <!-- END Step 1 table --> |
| − | </ | + | <tr valign="top"> |
| − | < | + | <td> </td> |
| − | < | + | <td>[[file:DotPoint2.JPG|link=]] <span style="font-size: 17px; font-weight: 700;">(Optional) Set Control Options:</span><br> |
| + | <table> <!-- BEGIN Step 2 table --> | ||
| + | <tr valign="top"> | ||
| + | <td>Once the '''Assets to update''' list has been completed, the <span style="font-weight: 700; text-decoration: underline;">optional</span> '''Rotate''', '''Move to layer''' and '''Delete''' options can be used and the '''Scope''' can be set. | ||
| − | =''' | + | See the sections [[file:PageLink.PNG|link=]] '''[[#Setting the Options - for Non Texture Objects|Setting the Options - for Non Texture Objects]]''', [[file:PageLink.PNG|link=]] '''[[#Setting the Options - for Texture Objects|Setting the Options - for Texture Objects]]''' and [[file:PageLink.PNG|link=]] '''[[#Setting the Scope|Setting the Scope]]''' below for more details. |
| − | + | </td> | |
| − | < | + | </tr> |
| + | <tr> | ||
| + | <td colspan="2"> | ||
| + | ----</td> | ||
| + | </tr> | ||
| + | </table> <!-- END Step 2 table --> | ||
| + | </td> | ||
| + | </tr> | ||
<tr valign="top"> | <tr valign="top"> | ||
| − | <td>[[file: | + | <td> </td> |
| − | <td>''' | + | <td>[[file:DotPoint3.JPG|link=]] <span style="font-size: 17px; font-weight: 700;">(Optional) Add a Replacement Asset:</span><br> |
| − | *objects | + | <table> <!-- BEGIN Step 3 table --> |
| − | * | + | <tr valign="top"> |
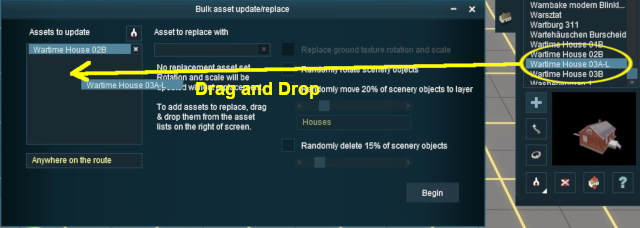
| − | + | <td>The same method of ''Drag and Drop'' is used to add an object to the '''Asset to replace with''' list.<br> | |
| − | + | <table cellpadding="4" bgcolor=#c1e7e7> <!-- BEGIN Step 3 Dot Point --> | |
| − | + | <tr valign="top"> | |
| − | *objects of | + | <td>[[file:DotPoint.JPG|link=]]</td> |
| + | <td>'''Only a single object can be added to the ''Asset to replace with'' list.''' If a second object is dragged into the list it will delete and replace the first object.</td> | ||
| + | </tr> | ||
| + | <tr valign="top"> | ||
| + | <td>[[file:DotPoint.JPG|link=]]</td> | ||
| + | <td>'''When objects are being replaced they must be replaced by objects of the same general type''' - both lists must contain:- | ||
| + | *non-spline scenery objects, or | ||
| + | *track (single track only and no bridges or tunnels), or | ||
| + | *track objects of the same type (e.g. signals), or | ||
| + | *textures | ||
</td> | </td> | ||
</tr> | </tr> | ||
| − | </table> | + | </table> <!-- END Step 3 Dot Point --> |
| − | <br> | + | [[file:BulkAssetAddDragReplace.JPG|link=]]<br> |
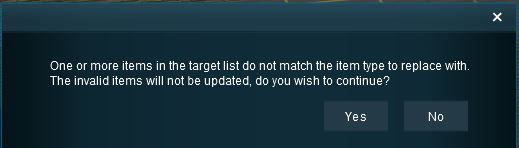
| − | + | If you attempt to replace ''one type'' of object with a ''different type'' you will receive an error message. | |
| − | + | <table> <!-- BEGIN Step 3 Error Message Table --> | |
| − | + | ||
| − | <table> | + | |
<tr valign="top"> | <tr valign="top"> | ||
| − | <td>[[file: | + | <td>[[file:BulkAssetReplaceTypeError.JPG|link=]]</td> |
| − | <td> | + | <td><br> |
| − | + | <table cellpadding="4" bgcolor=#ffffff> <!-- BEGIN Step 3 Choices Table --> | |
| − | + | ||
| − | <table cellpadding="4" bgcolor=#ffffff> | + | |
<tr> | <tr> | ||
<td colspan="2"> | <td colspan="2"> | ||
| Line 89: | Line 163: | ||
</tr> | </tr> | ||
<tr valign="top"> | <tr valign="top"> | ||
| − | <td>[[file: | + | <td>[[file:Choices.PNG|link=]]</td> |
| − | <td><font size | + | <td><span style="font-size: 17px;">'''Choices:'''</span><br> |
| − | + | *Clicking '''No''' will cancel the update | |
| − | + | *Clicking '''Yes''' will proceed with the update but the mismatched objects will not be replaced</td> | |
| − | + | ||
</tr> | </tr> | ||
<tr> | <tr> | ||
| Line 99: | Line 172: | ||
----</td> | ----</td> | ||
</tr> | </tr> | ||
| − | </table> | + | </table> <!-- END Step 3 Choices Table --> |
| − | + | ||
| − | + | ||
| − | + | ||
| − | + | ||
</td> | </td> | ||
</tr> | </tr> | ||
| − | </table> | + | </table> <!-- END Step 3 Error Message Table --> |
| − | < | + | <tr> |
| − | < | + | <td colspan="2"> |
| − | < | + | ----</td> |
| − | + | ||
| − | + | ||
</tr> | </tr> | ||
| − | </table> | + | </table> <!-- END Step 3 table --> |
| − | + | </td> | |
| − | <table> | + | |
| − | + | ||
| − | + | ||
| − | + | ||
</tr> | </tr> | ||
| − | |||
| − | |||
| − | |||
| − | |||
| − | |||
<tr valign="top"> | <tr valign="top"> | ||
| − | <td>[[file: | + | <td> </td> |
| − | <td> | + | <td>[[file:DotPoint4.JPG|link=]] <span style="font-size: 17px; font-weight: 700;">Perform the Update:</span><br> |
| + | <table> <!-- BEGIN Step 4 table --> | ||
| + | <tr valign="top"> | ||
| + | <td>Once all required options and values have been entered, click the <span style="font-size: 17px; font-weight: 700;">Begin</span> button. | ||
| + | </td> | ||
</tr> | </tr> | ||
| − | </table> | + | <tr> |
| + | <td colspan="2"> | ||
| + | ----</td> | ||
| + | </tr> | ||
| + | </table> <!-- END Step 4 table --> | ||
| + | </td> | ||
| + | </tr> | ||
| + | </table> <!-- END Steps Table --> | ||
| − | <table> | + | <table width="100%"> |
<tr valign="top"> | <tr valign="top"> | ||
| − | <td>[[file: | + | <td align="right">[[file:BackToTop.png|link=#top|alt=Top|Top]]</td> |
| − | + | ||
| − | + | ||
| − | + | ||
| − | + | ||
| − | + | ||
| − | + | ||
</tr> | </tr> | ||
</table> | </table> | ||
| − | |||
| − | |||
| − | |||
| − | |||
='''Deleting Assets from the Lists'''= | ='''Deleting Assets from the Lists'''= | ||
| Line 151: | Line 210: | ||
<table cellpadding="4" bgcolor=#c1e7e7> | <table cellpadding="4" bgcolor=#c1e7e7> | ||
<tr valign="top"> | <tr valign="top"> | ||
| − | <td>[[file:DotPoint.JPG]]</td> | + | <td>[[file:DotPoint.JPG|link=]]</td> |
<td>Use the ''Drag and Drop'' method to remove individual objects from the lists or click the '''x''' button in each data entry box to remove all its objects.</td> | <td>Use the ''Drag and Drop'' method to remove individual objects from the lists or click the '''x''' button in each data entry box to remove all its objects.</td> | ||
</tr> | </tr> | ||
| Line 158: | Line 217: | ||
<table> | <table> | ||
<tr valign="top"> | <tr valign="top"> | ||
| − | <td>[[file:BulkAssetDeleteDragOut.JPG]]</td> | + | <td>[[file:BulkAssetDeleteDragOut.JPG|link=]]</td> |
</tr> | </tr> | ||
<table> | <table> | ||
<br> | <br> | ||
| + | <table width="100%"> | ||
| + | <tr valign="top"> | ||
| + | <td align="right">[[file:BackToTop.png|link=#top|alt=Top|Top]]</td> | ||
| + | </tr> | ||
| + | </table> | ||
='''Setting the Scope'''= | ='''Setting the Scope'''= | ||
| Line 167: | Line 231: | ||
<table> | <table> | ||
<tr valign="top"> | <tr valign="top"> | ||
| − | <td>[[file:BulkAssetReplaceLocation.JPG]]</td> | + | <td>[[file:BulkAssetReplaceLocation.JPG|link=]]</td> |
<td> | <td> | ||
<table cellpadding="4" bgcolor=#ffffff> | <table cellpadding="4" bgcolor=#ffffff> | ||
| Line 175: | Line 239: | ||
</tr> | </tr> | ||
<tr valign="top"> | <tr valign="top"> | ||
| − | <td>[[file:Choices.PNG]]</td> | + | <td>[[file:Choices.PNG|link=]]</td> |
| − | <td><font size | + | <td><span style="font-size: 17px;">'''Choices:'''</span><br> |
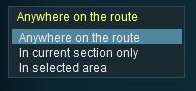
*'''Anywhere on the route''' - the entire layout | *'''Anywhere on the route''' - the entire layout | ||
*'''In current section only''' - the current baseboard | *'''In current section only''' - the current baseboard | ||
| Line 196: | Line 260: | ||
</tr> | </tr> | ||
<tr valign="top"> | <tr valign="top"> | ||
| − | <td>[[file:Steps.PNG]]</td> | + | <td>[[file:Steps.PNG|link=]]</td> |
| − | <td><font size | + | <td><span style="font-size: 17px;">'''Steps:'''</span><br> |
| − | [[file:BulkAssetReplaceLocationArea.JPG]]<br> | + | [[file:BulkAssetReplaceLocationArea.JPG|link=]]<br> |
#Click the '''Red icon''', and | #Click the '''Red icon''', and | ||
#Draw out the area to be used | #Draw out the area to be used | ||
| Line 209: | Line 273: | ||
</table> | </table> | ||
<br> | <br> | ||
| + | <table width="100%"> | ||
| + | <tr valign="top"> | ||
| + | <td align="right">[[file:BackToTop.png|link=#top|alt=Top|Top]]</td> | ||
| + | </tr> | ||
| + | </table> | ||
='''Setting the Options - for Non Texture Objects'''= | ='''Setting the Options - for Non Texture Objects'''= | ||
| Line 221: | Line 290: | ||
</tr> | </tr> | ||
<tr valign="top"> | <tr valign="top"> | ||
| − | <td>[[file:Gears.PNG]]</td> | + | <td>[[file:Gears.PNG|link=]]</td> |
| − | <td><font size | + | <td><span style="font-size: 17px;">'''Settings:'''</span><br> |
*If no '''Replace with''' object is entered then the objects in the '''Assets to update''' list will be '''randomly rotated''' to new orientations | *If no '''Replace with''' object is entered then the objects in the '''Assets to update''' list will be '''randomly rotated''' to new orientations | ||
*If a '''Replace with''' object is entered then the replacement objects in the '''Replace with''' list will be '''randomly rotated''' to new orientations | *If a '''Replace with''' object is entered then the replacement objects in the '''Replace with''' list will be '''randomly rotated''' to new orientations | ||
| Line 240: | Line 309: | ||
</tr> | </tr> | ||
<tr valign="top"> | <tr valign="top"> | ||
| − | <td>[[file:Steps.PNG]]</td> | + | <td>[[file:Steps.PNG|link=]]</td> |
| − | <td><font size | + | <td><span style="font-size: 17px;">'''Steps:'''</span><br> |
| − | [[file:BulkAssetRandomRotate.JPG]]<br> | + | [[file:BulkAssetRandomRotate.JPG|link=]]<br> |
| − | *'''Tick [[file:CheckBox.PNG]] the check box''' to randomly rotate each replacement (or original) scenery object | + | *'''Tick [[file:CheckBox.PNG|link=]] the check box''' to randomly rotate each replacement (or original) scenery object |
| − | *'''Untick [[file:CheckBoxOff.PNG]] the check box''' to keep the original orientation of each scenery object as it is replaced (this will have no effect if there is no '''Replace with''' object) | + | *'''Untick [[file:CheckBoxOff.PNG|link=]] the check box''' to keep the original orientation of each scenery object as it is replaced (this will have no effect if there is no '''Replace with''' object) |
<br> | <br> | ||
'''Click the ''Begin'' button to complete the process''' | '''Click the ''Begin'' button to complete the process''' | ||
| Line 259: | Line 328: | ||
The second option allows the original OR replacement scenery objects to be moved to another layer. | The second option allows the original OR replacement scenery objects to be moved to another layer. | ||
| + | <table cellpadding="4" bgcolor=#fcbcbc> | ||
| + | <tr valign="top"> | ||
| + | <td>[[file:Stop.PNG|link=]]</td> | ||
| + | <td>'''Splines''' are not classified as '''scenery objects''' and cannot be moved to another layer by using the '''Bulk Asset Update/Replace Tool''' | ||
| + | <table cellpadding="4" bgcolor=#ffffb0> | ||
| + | <tr valign="top"> | ||
| + | <td>[[file:PencilTips.PNG|link=]]</td> | ||
| + | <td>To move a spline to another layer set the '''layer property''' in the spline property window to the new layer</td> | ||
| + | </tr> | ||
| + | </table> | ||
| + | </td> | ||
| + | </tr> | ||
| + | </table> | ||
| + | <br> | ||
<table cellpadding="4" bgcolor=#eeeeee> | <table cellpadding="4" bgcolor=#eeeeee> | ||
<tr> | <tr> | ||
| Line 265: | Line 348: | ||
</tr> | </tr> | ||
<tr valign="top"> | <tr valign="top"> | ||
| − | <td>[[file:Gears.PNG]]</td> | + | <td>[[file:Gears.PNG|link=]]</td> |
| − | <td><font size | + | <td><span style="font-size: 17px;">'''Settings:'''</span><br> |
*If no '''Replace with''' object is entered then the '''selected percentage''' of the objects in the '''Assets to update''' list will be '''moved''' to the selected layer | *If no '''Replace with''' object is entered then the '''selected percentage''' of the objects in the '''Assets to update''' list will be '''moved''' to the selected layer | ||
*If a '''Replace with''' object is entered then the '''selected percentage''' of the replacement objects in the '''Replace with''' list will be '''moved''' to the selected layer | *If a '''Replace with''' object is entered then the '''selected percentage''' of the replacement objects in the '''Replace with''' list will be '''moved''' to the selected layer | ||
| Line 286: | Line 369: | ||
</tr> | </tr> | ||
<tr valign="top"> | <tr valign="top"> | ||
| − | <td>[[file:Steps.PNG]]</td> | + | <td>[[file:Steps.PNG|link=]]</td> |
| − | <td><font size | + | <td><span style="font-size: 17px;">'''Steps:'''</span><br> |
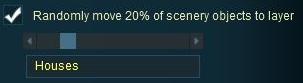
| − | [[file:BulkAssetMoveLayer.JPG]]<br> | + | [[file:BulkAssetMoveLayer.JPG|link=]]<br> |
'''To move objects to another layer:''' | '''To move objects to another layer:''' | ||
| − | #'''Tick [[file:CheckBox.PNG]] the check box''' to randomly move a set % of the replacement (or original) scenery objects to another layer | + | #'''Tick [[file:CheckBox.PNG|link=]] the check box''' to randomly move a set % of the replacement (or original) scenery objects to another layer |
#'''Select a percentage figure''' from 0% (none) to 100% (all) | #'''Select a percentage figure''' from 0% (none) to 100% (all) | ||
#'''Select the layer''' for the objects to move to (the layer must be unlocked) | #'''Select the layer''' for the objects to move to (the layer must be unlocked) | ||
'''To keep the replacement objects in the same layer:''' | '''To keep the replacement objects in the same layer:''' | ||
| − | *'''Untick [[file:CheckBoxOff.PNG]] the check box''' to keep all the replacement scenery objects in the same layer as the original scenery objects. This has no effect if there are no objects in the '''Replace with''' list | + | *'''Untick [[file:CheckBoxOff.PNG|link=]] the check box''' to keep all the replacement scenery objects in the same layer as the original scenery objects. This has no effect if there are no objects in the '''Replace with''' list |
<br> | <br> | ||
'''Click the ''Begin'' button to complete the process'''</td> | '''Click the ''Begin'' button to complete the process'''</td> | ||
| Line 306: | Line 389: | ||
<table cellpadding="4" bgcolor=#fcbcbc> | <table cellpadding="4" bgcolor=#fcbcbc> | ||
<tr valign="top"> | <tr valign="top"> | ||
| − | <td>[[file:Stop.PNG]]</td> | + | <td>[[file:Stop.PNG|link=]]</td> |
<td>'''CAUTION:''' When moving track or track objects (signals, switches, etc) to other layers always make sure that any '''track objects do not end up in a higher layer than the track they are attached to'''.</td> | <td>'''CAUTION:''' When moving track or track objects (signals, switches, etc) to other layers always make sure that any '''track objects do not end up in a higher layer than the track they are attached to'''.</td> | ||
</tr> | </tr> | ||
| Line 313: | Line 396: | ||
<table cellpadding="4" bgcolor=#c1e7e7> | <table cellpadding="4" bgcolor=#c1e7e7> | ||
<tr valign="top"> | <tr valign="top"> | ||
| − | <td>[[file:DotPoint.JPG]]</td> | + | <td>[[file:DotPoint.JPG|link=]]</td> |
<td>'''Option 1 and Option 2 CAN both be checked ON at the same time''' to produce a combined effect</td> | <td>'''Option 1 and Option 2 CAN both be checked ON at the same time''' to produce a combined effect</td> | ||
</tr> | </tr> | ||
| Line 328: | Line 411: | ||
</tr> | </tr> | ||
<tr valign="top"> | <tr valign="top"> | ||
| − | <td>[[file:Gears.PNG]]</td> | + | <td>[[file:Gears.PNG|link=]]</td> |
| − | <td><font size | + | <td><span style="font-size: 17px;">'''Settings:'''</span><br> |
*Select a percent figure from 0% to 100% in steps of 5%. Values other than 0% and 100% will be approximate, not exact. Selecting 0% will delete none of the objects, 100% will delete them all | *Select a percent figure from 0% to 100% in steps of 5%. Values other than 0% and 100% will be approximate, not exact. Selecting 0% will delete none of the objects, 100% will delete them all | ||
All the layers containing the objects must be unlocked. Objects in locked layers will not be deleted. | All the layers containing the objects must be unlocked. Objects in locked layers will not be deleted. | ||
| Line 346: | Line 429: | ||
</tr> | </tr> | ||
<tr valign="top"> | <tr valign="top"> | ||
| − | <td>[[file:Steps.PNG]]</td> | + | <td>[[file:Steps.PNG|link=]]</td> |
| − | <td><font size | + | <td><span style="font-size: 17px;">'''Steps:'''</span><br> |
| − | [[file:BulkAssetDelete.JPG]]<br> | + | [[file:BulkAssetDelete.JPG|link=]]<br> |
| − | #'''Tick [[file:CheckBox.PNG]] the check box''' to randomly delete a set % of the objects | + | #'''Tick [[file:CheckBox.PNG|link=]] the check box''' to randomly delete a set % of the objects |
#'''Select a percentage figure''' from 0% (none) to 100% (all) | #'''Select a percentage figure''' from 0% (none) to 100% (all) | ||
#'''Click the ''Begin'' button to complete the process'''</td> | #'''Click the ''Begin'' button to complete the process'''</td> | ||
| Line 362: | Line 445: | ||
<table cellpadding="4" bgcolor=#c1e7e7> | <table cellpadding="4" bgcolor=#c1e7e7> | ||
<tr valign="top"> | <tr valign="top"> | ||
| − | <td>[[file:DotPoint.JPG]]</td> | + | <td>[[file:DotPoint.JPG|link=]]</td> |
<td>'''Option 2 and Option 3 CANNOT both be checked ON at the same time.'''</td> | <td>'''Option 2 and Option 3 CANNOT both be checked ON at the same time.'''</td> | ||
</tr> | </tr> | ||
<tr valign="top"> | <tr valign="top"> | ||
| − | <td>[[file:DotPoint.JPG]]</td> | + | <td>[[file:DotPoint.JPG|link=]]</td> |
<td>'''Option 1 and Option 3 CAN both be checked ON at the same time''' to rotate all the scenery objects before deleting a set percentage of them.</td> | <td>'''Option 1 and Option 3 CAN both be checked ON at the same time''' to rotate all the scenery objects before deleting a set percentage of them.</td> | ||
</tr> | </tr> | ||
| Line 373: | Line 456: | ||
<table cellpadding="4" bgcolor=#ffffb0> | <table cellpadding="4" bgcolor=#ffffb0> | ||
<tr valign="top"> | <tr valign="top"> | ||
| − | <td>[[file:PencilTips.PNG]]</td> | + | <td>[[file:PencilTips.PNG|link=]]</td> |
| − | <td><font size | + | <td><span style="font-size: 17px;">'''Deleting "Stubborn" Objects:'''</span><br> |
Some objects simply will not delete, for example some non track splines. The workaround for deleting these objects from a layout is:-<br> | Some objects simply will not delete, for example some non track splines. The workaround for deleting these objects from a layout is:-<br> | ||
<table cellpadding="4" bgcolor=#ffffff> | <table cellpadding="4" bgcolor=#ffffff> | ||
| Line 382: | Line 465: | ||
</tr> | </tr> | ||
<tr valign="top"> | <tr valign="top"> | ||
| − | <td>[[file:Steps.PNG]]</td> | + | <td>[[file:Steps.PNG|link=]]</td> |
| − | <td><font size | + | <td><span style="font-size: 17px;">'''Steps:'''</span><br> |
#exit Surveyor | #exit Surveyor | ||
#start '''Content Manager''' | #start '''Content Manager''' | ||
| Line 405: | Line 488: | ||
<table cellpadding="4" bgcolor=#ffffb0> | <table cellpadding="4" bgcolor=#ffffb0> | ||
<tr valign="top"> | <tr valign="top"> | ||
| − | <td>[[file:NotePad.PNG]]</td> | + | <td>[[file:NotePad.PNG|link=]]</td> |
| − | <td><font size | + | <td><span style="font-size: 17px;">'''Notes:'''</span><br> |
This method is an '''All or Nothing''' approach. All instances of the selected asset will be deleted from your layout.</td> | This method is an '''All or Nothing''' approach. All instances of the selected asset will be deleted from your layout.</td> | ||
</tr> | </tr> | ||
| Line 413: | Line 496: | ||
</table> | </table> | ||
<br> | <br> | ||
| + | <table width="100%"> | ||
| + | <tr valign="top"> | ||
| + | <td align="right">[[file:BackToTop.png|link=#top|alt=Top|Top]]</td> | ||
| + | </tr> | ||
| + | </table> | ||
='''Setting the Options - for Texture Objects'''= | ='''Setting the Options - for Texture Objects'''= | ||
| Line 418: | Line 506: | ||
<table cellpadding="4" bgcolor=#ffffb0> | <table cellpadding="4" bgcolor=#ffffb0> | ||
<tr valign="top"> | <tr valign="top"> | ||
| − | <td>[[file:NotePad.PNG]]</td> | + | <td>[[file:NotePad.PNG|link=]]</td> |
| − | <td><font size | + | <td><span style="font-size: 17px;">'''Notes:'''</span><br> |
*You cannot rotate or move textures. The only available texture setting controls the scale and rotation of the replacement texture. | *You cannot rotate or move textures. The only available texture setting controls the scale and rotation of the replacement texture. | ||
*You can select multiple textures to be replaced by a single texture. | *You can select multiple textures to be replaced by a single texture. | ||
| Line 430: | Line 518: | ||
<table> | <table> | ||
<tr valign="top"> | <tr valign="top"> | ||
| − | <td>[[file:BulkAssetTextureReplaceOriginal.JPG]]</td> | + | <td>[[file:BulkAssetTextureReplaceOriginal.JPG|link=]]</td> |
</tr> | </tr> | ||
</table> | </table> | ||
| Line 436: | Line 524: | ||
<table cellpadding="4"> | <table cellpadding="4"> | ||
<tr valign="top"> | <tr valign="top"> | ||
| − | <td width="490" align="left">[[file:BulkAssetTextureReplaceOption.JPG]]<br> | + | <td width="490" align="left">[[file:BulkAssetTextureReplaceOption.JPG|link=]]<br> |
With the '''check box ticked''', the following is the result after clicking the '''Begin''' button.</td> | With the '''check box ticked''', the following is the result after clicking the '''Begin''' button.</td> | ||
<td> </td> | <td> </td> | ||
| − | <td width="490" align="left">[[file:BulkAssetTextureReplaceOptionOFF.JPG]]<br> | + | <td width="490" align="left">[[file:BulkAssetTextureReplaceOptionOFF.JPG|link=]]<br> |
With the '''check box unticked''', the following is the result after clicking the '''Begin''' button.</td> | With the '''check box unticked''', the following is the result after clicking the '''Begin''' button.</td> | ||
</tr> | </tr> | ||
<tr valign="top"> | <tr valign="top"> | ||
| − | <td width="490" align="left">[[file:BulkAssetTextureReplaceScaleRot.JPG]]<br> | + | <td width="490" align="left">[[file:BulkAssetTextureReplaceScaleRot.JPG|link=]]<br> |
The scale and rotation settings that were used in the original have been replaced with the default scale and rotation settings of the replacement texture.</td> | The scale and rotation settings that were used in the original have been replaced with the default scale and rotation settings of the replacement texture.</td> | ||
<td> </td> | <td> </td> | ||
| − | <td width="490" align="left">[[file:BulkAssetTextureReplaceNoScaleRot.JPG]]<br> | + | <td width="490" align="left">[[file:BulkAssetTextureReplaceNoScaleRot.JPG|link=]]<br> |
The same scale and rotation settings that were used in the original have been used with the replacement texture.</td> | The same scale and rotation settings that were used in the original have been used with the replacement texture.</td> | ||
</tr> | </tr> | ||
</table> | </table> | ||
<br> | <br> | ||
| + | <table width="100%"> | ||
| + | <tr valign="top"> | ||
| + | <td align="right">[[file:BackToTop.png|link=#top|alt=Top|Top]]</td> | ||
| + | </tr> | ||
| + | </table> | ||
='''Sample Applications'''= | ='''Sample Applications'''= | ||
| − | ==''' | + | =='''Replacing Some Assets'''== |
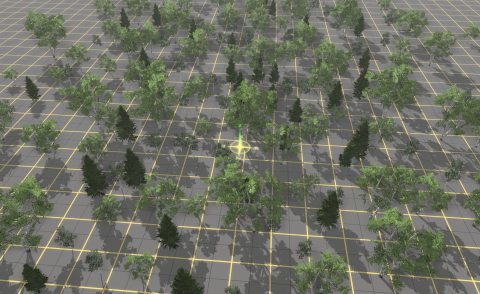
| − | <font size | + | <span style="font-size: 17px;">'''The Problem:'''</span><br> |
A forest has been created using three different trees. A number (30%) of the two smaller tree types are to be replaced with a larger tree of a different type. | A forest has been created using three different trees. A number (30%) of the two smaller tree types are to be replaced with a larger tree of a different type. | ||
<table> | <table> | ||
<tr valign="top"> | <tr valign="top"> | ||
| − | <td>[[file:BulkAssetTreesOriginal.JPG]]</td> | + | <td>[[file:BulkAssetTreesOriginal.JPG|link=]]</td> |
</tr> | </tr> | ||
</table> | </table> | ||
<br> | <br> | ||
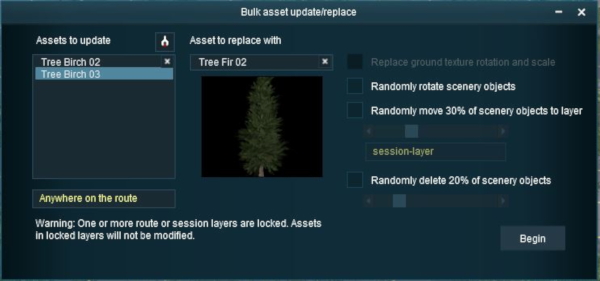
| − | <font size | + | <span style="font-size: 17px;">'''The Solution:'''</span><br> |
The '''Bulk Asset Update/Replace Tool''' does not have a feature that will allow the replacement of only some assets (it is ''all'' or ''none''), so a slightly more indirect approach is needed. | The '''Bulk Asset Update/Replace Tool''' does not have a feature that will allow the replacement of only some assets (it is ''all'' or ''none''), so a slightly more indirect approach is needed. | ||
<table> | <table> | ||
<tr valign="top"> | <tr valign="top"> | ||
| − | <td>[[file:BulkAssetTreesMove.JPG]]</td> | + | <td>[[file:BulkAssetTreesMove.JPG|link=]]</td> |
<td> | <td> | ||
<table cellpadding="4" bgcolor=#ffffff> | <table cellpadding="4" bgcolor=#ffffff> | ||
| Line 475: | Line 568: | ||
</tr> | </tr> | ||
<tr valign="top"> | <tr valign="top"> | ||
| − | <td>[[file:Steps.PNG]]</td> | + | <td>[[file:Steps.PNG|link=]]</td> |
| − | <td><font size | + | <td><span style="font-size: 17px;">'''Steps:'''</span><br> |
#A new layer, named '''Trees''' is created | #A new layer, named '''Trees''' is created | ||
#The '''Bulk Asset Update/Replace Tool''' is used to move 30% of the two smaller tree types to the new layer</td> | #The '''Bulk Asset Update/Replace Tool''' is used to move 30% of the two smaller tree types to the new layer</td> | ||
| Line 485: | Line 578: | ||
</tr> | </tr> | ||
</table> | </table> | ||
| − | < | + | <table cellpadding="4" bgcolor="Aquamarine"> |
| − | + | <tr valign="top"> | |
| + | <td>[[file:LinkWiki.PNG|link=]]</td> | ||
| + | <td> | ||
| + | For information on creating new layers, see the '''Trainz Wiki Page''' at:-<br> | ||
| + | * '''[[How to Use Layers]]'''</td> | ||
| + | </tr> | ||
| + | </table></td> | ||
</tr> | </tr> | ||
</table> | </table> | ||
<table> | <table> | ||
<tr valign="top"> | <tr valign="top"> | ||
| − | <td>[[file:BulkAssetTreesReplace.JPG]]</td> | + | <td>[[file:BulkAssetTreesReplace.JPG|link=]]</td> |
<td> | <td> | ||
<table cellpadding="4" bgcolor=#ffffff> | <table cellpadding="4" bgcolor=#ffffff> | ||
| Line 499: | Line 598: | ||
</tr> | </tr> | ||
<tr valign="top"> | <tr valign="top"> | ||
| − | <td>[[file:Steps.PNG]]</td> | + | <td>[[file:Steps.PNG|link=]]</td> |
| − | <td><font size | + | <td><span style="font-size: 17px;">'''Steps:'''</span><br> |
#The original layer is then locked - this prevents the replacement of those trees that were not moved to the new layer (note the warning about the locked layer on the bottom left of the Bulk Asset Update/Replace window) | #The original layer is then locked - this prevents the replacement of those trees that were not moved to the new layer (note the warning about the locked layer on the bottom left of the Bulk Asset Update/Replace window) | ||
#The replacement tree is added to the '''Replace With''' list | #The replacement tree is added to the '''Replace With''' list | ||
| Line 510: | Line 609: | ||
</tr> | </tr> | ||
</table> | </table> | ||
| − | < | + | <table cellpadding="4" bgcolor="Aquamarine"> |
| − | + | <tr valign="top"> | |
| + | <td>[[file:LinkWiki.PNG|link=]]</td> | ||
| + | <td> | ||
| + | For information on how to lock layers, see the '''Trainz Wiki Page''' at:-<br> | ||
| + | * '''[[How to Use Layers]]'''</td> | ||
| + | </tr> | ||
| + | </table></td> | ||
</tr> | </tr> | ||
</table> | </table> | ||
| Line 518: | Line 623: | ||
<table> | <table> | ||
<tr valign="top"> | <tr valign="top"> | ||
| − | <td>[[file:BulkAssetTreesModified.JPG]]</td> | + | <td>[[file:BulkAssetTreesModified.JPG|link=]]</td> |
<td><br> | <td><br> | ||
<table cellpadding="4" bgcolor=#ffffff> | <table cellpadding="4" bgcolor=#ffffff> | ||
| Line 526: | Line 631: | ||
</tr> | </tr> | ||
<tr valign="top"> | <tr valign="top"> | ||
| − | <td>[[file:Steps.PNG]]</td> | + | <td>[[file:Steps.PNG|link=]]</td> |
| − | <td><font size | + | <td><span style="font-size: 17px;">'''Steps:'''</span><br> |
To complete the process:- | To complete the process:- | ||
*The original layer is unlocked | *The original layer is unlocked | ||
| Line 537: | Line 642: | ||
</tr> | </tr> | ||
</table> | </table> | ||
| − | < | + | <table cellpadding="4" bgcolor="Aquamarine"> |
| − | + | <tr valign="top"> | |
| + | <td>[[file:LinkWiki.PNG|link=]]</td> | ||
| + | <td> | ||
| + | For information on unlocking and merging layers, see the '''Trainz Wiki Page''' at:-<br> | ||
| + | * '''[[How to Use Layers]]'''</td> | ||
| + | </tr> | ||
| + | </table></td> | ||
</tr> | </tr> | ||
</table> | </table> | ||
<br> | <br> | ||
| − | |||
| − | <font size | + | =='''Fixing "Texture Bleeds"'''== |
| + | |||
| + | <span style="font-size: 17px;">'''The Problem:'''</span><br> | ||
<table cellpadding="4"> | <table cellpadding="4"> | ||
<tr valign="top"> | <tr valign="top"> | ||
| − | <td>[[file:MergedTextureBorderProblem.JPG]]</td> | + | <td>[[file:MergedTextureBorderProblem.JPG|link=]]</td> |
<td> | <td> | ||
Sometimes when adding new baseboards or merging a route containing blank baseboards onto a route containing textured baseboards, there can be a "bleed-over" where a texture from the painted route will flow along some of the baseboard boundaries of the unpainted baseboards as shown in the image left.<br> | Sometimes when adding new baseboards or merging a route containing blank baseboards onto a route containing textured baseboards, there can be a "bleed-over" where a texture from the painted route will flow along some of the baseboard boundaries of the unpainted baseboards as shown in the image left.<br> | ||
| Line 556: | Line 668: | ||
The unwanted texture can (usually) be painted over by another texture and this will resolve the problem but there may be a lot of it to paint out and you may prefer a simplier solution. The '''Bulk Asset Update/Replace Tool''' can provide such a solution.<br><br> | The unwanted texture can (usually) be painted over by another texture and this will resolve the problem but there may be a lot of it to paint out and you may prefer a simplier solution. The '''Bulk Asset Update/Replace Tool''' can provide such a solution.<br><br> | ||
| − | <font size | + | <span style="font-size: 17px;">'''The Solution:'''</span><br><br> |
<table> | <table> | ||
<tr valign="top"> | <tr valign="top"> | ||
| − | <td>[[file:Steps.PNG]]</td> | + | <td>[[file:Steps.PNG|link=]]</td> |
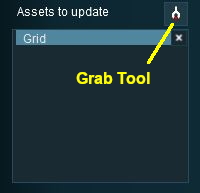
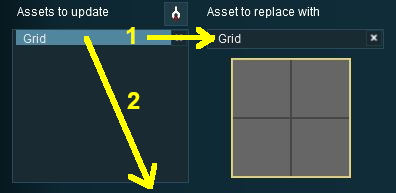
| − | <td><font size | + | <td><span style="font-size: 17px;">'''1: Grab the Grid'''</span><br> |
<table cellpadding="4"> | <table cellpadding="4"> | ||
<tr valign="top"> | <tr valign="top"> | ||
| − | <td>[[file:BulkAssetGridUpdate.JPG]]</td> | + | <td>[[file:BulkAssetGridUpdate.JPG|link=]]</td> |
<td> | <td> | ||
Use the '''Grab Tool''' to click on one of the bare grid lines to place the Grid texture into the '''Assets to update''' list | Use the '''Grab Tool''' to click on one of the bare grid lines to place the Grid texture into the '''Assets to update''' list | ||
| Line 574: | Line 686: | ||
<table cellpadding="4"> | <table cellpadding="4"> | ||
<tr valign="top"> | <tr valign="top"> | ||
| − | <td>[[file:BulkAssetGridUpdateGridReplace.JPG]]</td> | + | <td>[[file:BulkAssetGridUpdateGridReplace.JPG|link=]]</td> |
<td> | <td> | ||
# drag the Grid entry from the '''Update''' list into the '''Replace''' list. This will still leave a copy in the Update list | # drag the Grid entry from the '''Update''' list into the '''Replace''' list. This will still leave a copy in the Update list | ||
| Line 594: | Line 706: | ||
<table> | <table> | ||
<tr valign="top"> | <tr valign="top"> | ||
| − | <td>[[file:Steps.PNG]]</td> | + | <td>[[file:Steps.PNG|link=]]</td> |
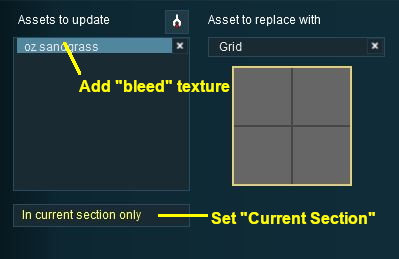
| − | <td><font size | + | <td><span style="font-size: 17px;">'''2: Grab the "Bleed Texture" and Clean'''</span><br> |
<table cellpadding="4"> | <table cellpadding="4"> | ||
<tr valign="top"> | <tr valign="top"> | ||
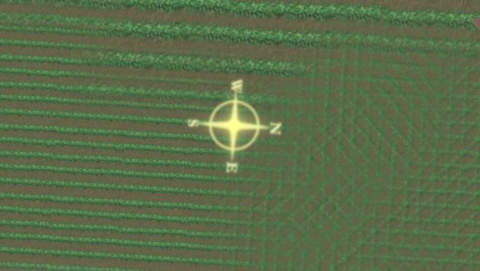
| − | <td>[[file:BulkAssetSandUpdateGridReplace.JPG]]</td> | + | <td>[[file:BulkAssetSandUpdateGridReplace.JPG|link=]]</td> |
<td> | <td> | ||
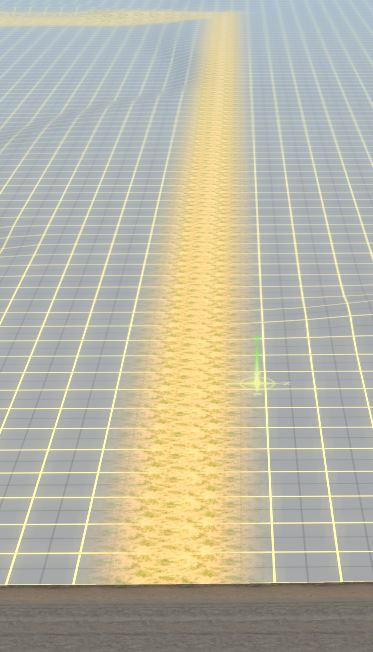
#use the '''Grab Tool''' to select the "bleed" texture and place it into the '''Update''' list | #use the '''Grab Tool''' to select the "bleed" texture and place it into the '''Update''' list | ||
| − | # | + | #<span style="background-color: red; color: white; font-weight: 700"> IMPORTANT: </span> change the scope setting to '''Current section only''' otherwise this texture will be replaced by the grid throughout the entire layout |
#click the '''Begin''' button | #click the '''Begin''' button | ||
| − | If more | + | If more than one baseboard needs this treatment then |
#move the Surveyor cursor to the next baseboard and click '''Begin''' | #move the Surveyor cursor to the next baseboard and click '''Begin''' | ||
#repeat as necessary | #repeat as necessary | ||
| Line 617: | Line 729: | ||
</table> | </table> | ||
<br> | <br> | ||
| + | <table width="100%"> | ||
| + | <tr valign="top"> | ||
| + | <td align="right">[[file:BackToTop.png|link=#top|alt=Top|Top]]</td> | ||
| + | </tr> | ||
| + | </table> | ||
---- | ---- | ||
---- | ---- | ||
| − | |||
='''Trainz Wiki'''= | ='''Trainz Wiki'''= | ||
<table cellpadding="4" bgcolor=#ffffff> | <table cellpadding="4" bgcolor=#ffffff> | ||
<tr valign="top"> | <tr valign="top"> | ||
| − | <td>[[file:TrainzWiki.png]]</td> | + | <td>[[file:TrainzWiki.png|link=]]</td> |
<td> | <td> | ||
| − | <font size | + | <span style="font-size: 17px;">'''More Tutorials and Guides to Using Trainz'''</span><br> |
*'''<span class="plainlinks">[http://online.ts2009.com/mediaWiki/index.php/HowTo How to Guides]</span>''' | *'''<span class="plainlinks">[http://online.ts2009.com/mediaWiki/index.php/HowTo How to Guides]</span>''' | ||
| + | *'''[[Driver Commands List]]''' | ||
*'''[[Session Rule List with Parameters|Session Rules List (Alphabetical) with Parameters]]''' | *'''[[Session Rule List with Parameters|Session Rules List (Alphabetical) with Parameters]]''' | ||
*'''[[Session Rules By Categories With Properties|Session Rules List (Categories) With Parameters]]''' | *'''[[Session Rules By Categories With Properties|Session Rules List (Categories) With Parameters]]''' | ||
| Line 633: | Line 750: | ||
</tr> | </tr> | ||
</table> | </table> | ||
| − | + | ---- | |
| + | This page was created by Trainz user '''<span class="plainlinks">[http://online.ts2009.com/mediaWiki/index.php/User:Pware pware]</span>''' in June 2018 and was last updated as shown below. | ||
| + | ---- | ||
[[Category:How-to guides]] | [[Category:How-to guides]] | ||
Revision as of 13:34, 13 July 2020
The information in this Wiki Page applies to TANE, TRS19 and Trainz Plus.
Contents |
What is the Bulk Asset Update/Replace Tool?
| The Bulk Asset Update/Replace Tool allows the replacement, deletion and modification of multiple instances of one or more different assets, including textures. |
Notes:
|
Things it Will NOT Do
The Bulk Asset Update/Replace Tool CANNOT be used on:-
|
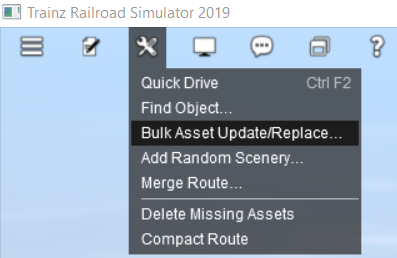
Selecting Assets and Options
The tool is located in the Surveyor Main Menu in TANE (below left) and in the Surveyor Tools Menu in TRS19 and Trainz Plus (below right).

 |
|
|
|
||||||||||||||||
 Steps |
| |||||||||||||||
|
||||||||||||||||
|
||||||||||||||||
|
||||||||||||||||


Deleting Assets from the Lists
| Use the Drag and Drop method to remove individual objects from the lists or click the x button in each data entry box to remove all its objects. |
 |
|||||||||
Setting the Scope
Select the region of the layout where the updates, replacements or deletions will occur:-
 |
|
||||||
If the Selected area option is chosen, then...
|
|
|
|
Steps:
|
|
|
|
Setting the Options - for Non Texture Objects
Option 1: Randomly Rotate Scenery Objects
The first option controls the rotation or orientation of the original OR the replacement scenery objects.
|
|
|
Settings:
All the layers containing the objects must be unlocked. Objects in locked layers will not be rotated. |
|
|
|
|
|
|
|
|
Steps:
|
|
|
|
Option 2: Move Scenery Objects to Another Layer
The second option allows the original OR replacement scenery objects to be moved to another layer.
Splines are not classified as scenery objects and cannot be moved to another layer by using the Bulk Asset Update/Replace Tool
|
|
|
|
Settings:
All the layers containing the objects must be unlocked. Objects in locked layers will not be moved. |
|
|
|
|
|
|
|
|
Steps:
To keep the replacement objects in the same layer:
|
|
|
|
| CAUTION: When moving track or track objects (signals, switches, etc) to other layers always make sure that any track objects do not end up in a higher layer than the track they are attached to. |
| Option 1 and Option 2 CAN both be checked ON at the same time to produce a combined effect |
Option 3: Delete Scenery Objects
The third option allows the deletion of scenery objects from the layout.
|
|
|
Settings:
All the layers containing the objects must be unlocked. Objects in locked layers will not be deleted. |
|
|
|
|
|
|
|
|
Steps:
|
|
|
|

| Option 2 and Option 3 CANNOT both be checked ON at the same time. | |
| Option 1 and Option 3 CAN both be checked ON at the same time to rotate all the scenery objects before deleting a set percentage of them. |
| Deleting "Stubborn" Objects: Some objects simply will not delete, for example some non track splines. The workaround for deleting these objects from a layout is:-
|
|||||||||
Setting the Options - for Texture Objects
Notes:
|
The image below shows a region painted with one texture asset but with different scaling and rotation settings.
 |
With the check box ticked, the following is the result after clicking the Begin button. |
With the check box unticked, the following is the result after clicking the Begin button. |
|
 The scale and rotation settings that were used in the original have been replaced with the default scale and rotation settings of the replacement texture. |
 The same scale and rotation settings that were used in the original have been used with the replacement texture. |
Sample Applications
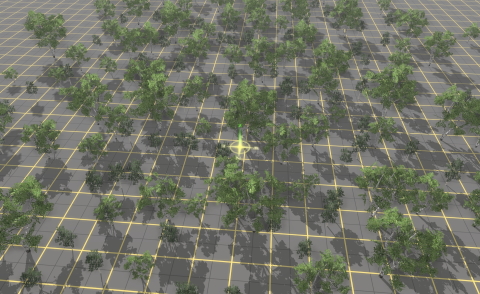
Replacing Some Assets
The Problem:
A forest has been created using three different trees. A number (30%) of the two smaller tree types are to be replaced with a larger tree of a different type.
 |
The Solution:
The Bulk Asset Update/Replace Tool does not have a feature that will allow the replacement of only some assets (it is all or none), so a slightly more indirect approach is needed.
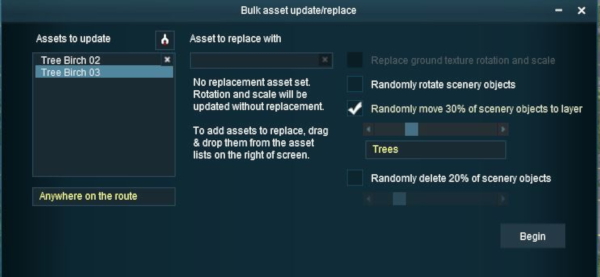 |
|
||||||||

 |
|
||||||||
The final result.
 |
|
||||||||
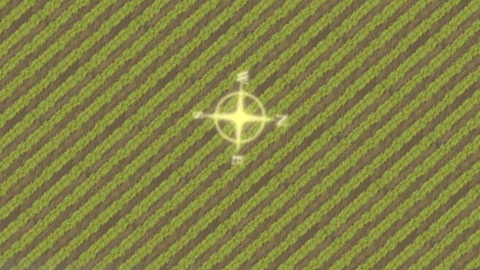
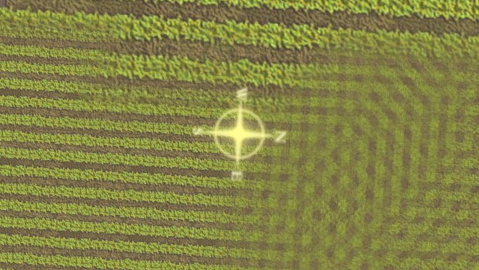
Fixing "Texture Bleeds"
The Problem:
 |
Sometimes when adding new baseboards or merging a route containing blank baseboards onto a route containing textured baseboards, there can be a "bleed-over" where a texture from the painted route will flow along some of the baseboard boundaries of the unpainted baseboards as shown in the image left. As strange as it may seem, this is actually "expected behaviour" and its purpose is to resolve other long standing problems that can occur when baseboards are added. The unwanted texture can (usually) be painted over by another texture and this will resolve the problem but there may be a lot of it to paint out and you may prefer a simplier solution. The Bulk Asset Update/Replace Tool can provide such a solution. The Solution:
|
||||||||
|
2: Grab the "Bleed Texture" and Clean
|
||
|
|
|||
Trainz Wiki
 |
More Tutorials and Guides to Using Trainz |
This page was created by Trainz user pware in June 2018 and was last updated as shown below.