How to Merge Routes
m |
m (replaced all <font> tags with <span style=...> tags, removed all image hyperlinks) |
||
| Line 10: | Line 10: | ||
<table cellpadding="4" bgcolor=#c1e7e7> | <table cellpadding="4" bgcolor=#c1e7e7> | ||
<tr valign="top"> | <tr valign="top"> | ||
| − | <td>[[file:DotPoint.JPG]]</td> | + | <td>[[file:DotPoint.JPG|link=]]</td> |
<td>'''Make sure that you have backup copies of all the routes that you are going to merge.'''</td> | <td>'''Make sure that you have backup copies of all the routes that you are going to merge.'''</td> | ||
</tr> | </tr> | ||
| Line 19: | Line 19: | ||
<table cellpadding="4" bgcolor=#ffffb0> | <table cellpadding="4" bgcolor=#ffffb0> | ||
<tr valign="top"> | <tr valign="top"> | ||
| − | <td>[[file:PencilTips.PNG]]</td> | + | <td>[[file:PencilTips.PNG|link=]]</td> |
| − | <td><font size | + | <td><span style="font-size: 17px;">'''Identify...'''</span><br> |
*the route that will be the '''base route'''. This route will form the ''backbone'' of the merged routes. It will usually be the larger route or the route that contains Session data that you want to keep in the merge. | *the route that will be the '''base route'''. This route will form the ''backbone'' of the merged routes. It will usually be the larger route or the route that contains Session data that you want to keep in the merge. | ||
*the route that will be the '''to-be-merged route'''. This route will be joined to the ''base route''. | *the route that will be the '''to-be-merged route'''. This route will be joined to the ''base route''. | ||
| Line 35: | Line 35: | ||
<table cellpadding="4" bgcolor=#c1e7e7> | <table cellpadding="4" bgcolor=#c1e7e7> | ||
<tr valign="top"> | <tr valign="top"> | ||
| − | <td>[[file:DotPoint.JPG]]</td> | + | <td>[[file:DotPoint.JPG|link=]]</td> |
<td>'''Most route mergers will have problems but most of these problems can be easily fixed.'''</td> | <td>'''Most route mergers will have problems but most of these problems can be easily fixed.'''</td> | ||
</tr> | </tr> | ||
| Line 47: | Line 47: | ||
<td> | <td> | ||
*The easiest and most common problems will be fixed during the merging process itself. | *The easiest and most common problems will be fixed during the merging process itself. | ||
| − | *Sometimes textures from the ''base route'' will bleed into the ''to-be-merged route'' particularly if the latter route is not textured. The solution to this can be found in the Trainz Wiki [[file:WikiLink.PNG]] '''[[How to Use Bulk Asset Update/Replace Tool]]'''. | + | *Sometimes textures from the ''base route'' will bleed into the ''to-be-merged route'' particularly if the latter route is not textured. The solution to this can be found in the Trainz Wiki [[file:WikiLink.PNG|link=]] '''[[How to Use Bulk Asset Update/Replace Tool]]'''. |
*The most common problem in the "hard to fix but do-able" category is merging two routes that have been built at different heights or altitudes. This will create a vertical cliff along the merge line, as shown on the left. The solutions to this will vary depending on the height difference. Common solutions are:- | *The most common problem in the "hard to fix but do-able" category is merging two routes that have been built at different heights or altitudes. This will create a vertical cliff along the merge line, as shown on the left. The solutions to this will vary depending on the height difference. Common solutions are:- | ||
**'''add extra baseboards''' between the two routes to create an easy gradient between them. See the "'''Tips'''" box below. If the height difference is large then many additional baseboards will be needed. If the difference is too big then other options may have to be considered. | **'''add extra baseboards''' between the two routes to create an easy gradient between them. See the "'''Tips'''" box below. If the height difference is large then many additional baseboards will be needed. If the difference is too big then other options may have to be considered. | ||
| Line 58: | Line 58: | ||
<tr valign="top"> | <tr valign="top"> | ||
<td> | <td> | ||
| − | *Another fixable problem can occur if a layer containing track from the ''to-be-merged route'' ends up below the layer that also contains track in the ''base route''. This can be fixed by merging the lower track layer into the higher track layer either during the merging process or afterwards using the [[file:WikiLink.PNG]] '''[[How to Use Layers|Layer Tools]]''' in Surveyor. | + | *Another fixable problem can occur if a layer containing track from the ''to-be-merged route'' ends up below the layer that also contains track in the ''base route''. This can be fixed by merging the lower track layer into the higher track layer either during the merging process or afterwards using the [[file:WikiLink.PNG|link=]] '''[[How to Use Layers|Layer Tools]]''' in Surveyor. |
</td> | </td> | ||
</tr> | </tr> | ||
| Line 65: | Line 65: | ||
<table cellpadding="4" bgcolor=#fcbcbc> | <table cellpadding="4" bgcolor=#fcbcbc> | ||
<tr valign="top"> | <tr valign="top"> | ||
| − | <td>[[file:Stop.PNG]]</td> | + | <td>[[file:Stop.PNG|link=]]</td> |
<td> | <td> | ||
The most common problem in the "impossible to fix" category is when both routes have different orientations (N-S and E-W) and you were hoping to join them end-to-end in the same direction to make an even longer route. Once a route has been created its orientation cannot be changed.</td> | The most common problem in the "impossible to fix" category is when both routes have different orientations (N-S and E-W) and you were hoping to join them end-to-end in the same direction to make an even longer route. Once a route has been created its orientation cannot be changed.</td> | ||
| Line 73: | Line 73: | ||
<table cellpadding="4" bgcolor=#ffffb0> | <table cellpadding="4" bgcolor=#ffffb0> | ||
<tr valign="top"> | <tr valign="top"> | ||
| − | <td>[[file:PencilTips.PNG]]</td> | + | <td>[[file:PencilTips.PNG|link=]]</td> |
<td>A handy tip for merging two routes with different heights is to create a new route that only contains the extra "in-between" baseboards - no scenery, textures or track are needed. The baseboards on one end will have heights that match those of the ''base route'' and the baseboards on the other end will have heights that match those of the ''to-be-merged route''. The merge is performed in two stages:- | <td>A handy tip for merging two routes with different heights is to create a new route that only contains the extra "in-between" baseboards - no scenery, textures or track are needed. The baseboards on one end will have heights that match those of the ''base route'' and the baseboards on the other end will have heights that match those of the ''to-be-merged route''. The merge is performed in two stages:- | ||
*the ''new bridging route'' is merged with the ''Base route''. | *the ''new bridging route'' is merged with the ''Base route''. | ||
| Line 87: | Line 87: | ||
<table cellpadding="4" bgcolor=#bbffff> | <table cellpadding="4" bgcolor=#bbffff> | ||
<tr valign="top"> | <tr valign="top"> | ||
| − | <td>[[file:Question.PNG]]</td> | + | <td>[[file:Question.PNG|link=]]</td> |
<td>'''Should you load the ''Route'' or the ''Session''?''' | <td>'''Should you load the ''Route'' or the ''Session''?''' | ||
---- | ---- | ||
| Line 101: | Line 101: | ||
<table width="700"> | <table width="700"> | ||
<tr valign="top"> | <tr valign="top"> | ||
| − | <td width="190">[[file:MergeMainMenu.JPG]]</td> | + | <td width="190">[[file:MergeMainMenu.JPG|link=]]</td> |
<td> | <td> | ||
<table cellpadding="4" bgcolor=#ffffff> | <table cellpadding="4" bgcolor=#ffffff> | ||
| Line 109: | Line 109: | ||
</tr> | </tr> | ||
<tr valign="top"> | <tr valign="top"> | ||
| − | <td>[[file:Steps.PNG]]</td> | + | <td>[[file:Steps.PNG|link=]]</td> |
| − | <td><font size | + | <td><span style="font-size: 17px;">'''Steps:'''</span><br> |
*'''Select the ''Merge Route'' option in the ''Surveyor Main Menu''''' | *'''Select the ''Merge Route'' option in the ''Surveyor Main Menu''''' | ||
::This will open a '''Route Selection''' window. | ::This will open a '''Route Selection''' window. | ||
| Line 120: | Line 120: | ||
</tr> | </tr> | ||
</table> | </table> | ||
| − | [[file:MergeSelectRoute.JPG]]<br> | + | [[file:MergeSelectRoute.JPG|link=]]<br> |
::This will be the '''to-be-merged route''' and only its Route data will be loaded | ::This will be the '''to-be-merged route''' and only its Route data will be loaded | ||
</td> | </td> | ||
| Line 127: | Line 127: | ||
<table cellpadding="4" bgcolor=#c1e7e7> | <table cellpadding="4" bgcolor=#c1e7e7> | ||
<tr valign="top"> | <tr valign="top"> | ||
| − | <td>[[file:DotPoint.JPG]]</td> | + | <td>[[file:DotPoint.JPG|link=]]</td> |
<td>'''DLC routes cannot be selected for merging'''</td> | <td>'''DLC routes cannot be selected for merging'''</td> | ||
</tr> | </tr> | ||
| Line 137: | Line 137: | ||
<table> | <table> | ||
<tr valign="top"> | <tr valign="top"> | ||
| − | <td>[[file:MergeMiniMapComplexTerrain01.JPG]]</td> | + | <td>[[file:MergeMiniMapComplexTerrain01.JPG|link=]]</td> |
<td> | <td> | ||
The two tabs shown on the left are the:- | The two tabs shown on the left are the:- | ||
| Line 145: | Line 145: | ||
<table cellpadding="4" bgcolor=#ffffb0> | <table cellpadding="4" bgcolor=#ffffb0> | ||
<tr valign="top"> | <tr valign="top"> | ||
| − | <td>[[file:NotePad.PNG]]</td> | + | <td>[[file:NotePad.PNG|link=]]</td> |
| − | <td><font size | + | <td><span style="font-size: 17px;">'''Notes:'''</span><br> |
*You can zoom the MiniMap in and out using the mouse control wheel. There appears to be no keyboard zoom control. | *You can zoom the MiniMap in and out using the mouse control wheel. There appears to be no keyboard zoom control. | ||
*You can move the centre of focus (the centre of the MiniMap view) by moving the mouse pointer to a new position and clicking with the right button. | *You can move the centre of focus (the centre of the MiniMap view) by moving the mouse pointer to a new position and clicking with the right button. | ||
| Line 159: | Line 159: | ||
<table> | <table> | ||
<tr valign="top"> | <tr valign="top"> | ||
| − | <td>[[file:MergeMiniMapComplexTerrain02.JPG]]</td> | + | <td>[[file:MergeMiniMapComplexTerrain02.JPG|link=]]</td> |
<td> | <td> | ||
<table cellpadding="4" bgcolor=#ffffff> | <table cellpadding="4" bgcolor=#ffffff> | ||
<tr valign="top"> | <tr valign="top"> | ||
| − | <td>[[file:Steps.PNG]]</td> | + | <td>[[file:Steps.PNG|link=]]</td> |
| − | <td><font size | + | <td><span style="font-size: 17px;">'''Steps:'''</span><br> |
*Click on the direction arrows shown at the top, bottom and sides of the MiniMap window to move the ''to-be-merged route'' into its correct position | *Click on the direction arrows shown at the top, bottom and sides of the MiniMap window to move the ''to-be-merged route'' into its correct position | ||
*Each click will move the ''to-be-merged route'' one baseboard in the selected direction</td> | *Each click will move the ''to-be-merged route'' one baseboard in the selected direction</td> | ||
| Line 178: | Line 178: | ||
<table cellpadding="4" bgcolor=#c1e7e7> | <table cellpadding="4" bgcolor=#c1e7e7> | ||
<tr valign="top"> | <tr valign="top"> | ||
| − | <td>[[file:DotPoint.JPG]]</td> | + | <td>[[file:DotPoint.JPG|link=]]</td> |
<td>'''A route merge will not proceed until ''ALL'' the terrain and layer conflicts have been eliminated.'''</td> | <td>'''A route merge will not proceed until ''ALL'' the terrain and layer conflicts have been eliminated.'''</td> | ||
</tr> | </tr> | ||
| Line 192: | Line 192: | ||
<table cellpadding="4" bgcolor=#c1e7e7> | <table cellpadding="4" bgcolor=#c1e7e7> | ||
<tr valign="top"> | <tr valign="top"> | ||
| − | <td>[[file:DotPoint.JPG]]</td> | + | <td>[[file:DotPoint.JPG|link=]]</td> |
<td>'''A route merge will not proceed until ''ALL'' the terrain and layer conflicts have been eliminated.'''</td> | <td>'''A route merge will not proceed until ''ALL'' the terrain and layer conflicts have been eliminated.'''</td> | ||
</tr> | </tr> | ||
| Line 202: | Line 202: | ||
<table cellpadding="4" bgcolor=#c1e7e7> | <table cellpadding="4" bgcolor=#c1e7e7> | ||
<tr valign="top"> | <tr valign="top"> | ||
| − | <td>[[file:DotPoint1.JPG]]</td> | + | <td>[[file:DotPoint1.JPG|link=]]</td> |
<td>'''Rename one of the conflicting layers.''' Double click on the layer name to enter a new name.</td> | <td>'''Rename one of the conflicting layers.''' Double click on the layer name to enter a new name.</td> | ||
</tr> | </tr> | ||
| Line 209: | Line 209: | ||
<table> | <table> | ||
<tr valign="top"> | <tr valign="top"> | ||
| − | <td>[[file:MergeMiniMapLayersConflict.JPG]]</td> | + | <td>[[file:MergeMiniMapLayersConflict.JPG|link=]]</td> |
<td> | <td> | ||
| − | [[file:MergeMiniMapLayersConflictRename01.JPG]]<br><br> | + | [[file:MergeMiniMapLayersConflictRename01.JPG|link=]]<br><br> |
After renaming ...<br> | After renaming ...<br> | ||
| − | [[file:MergeMiniMapLayersConflictRename02.JPG]]<br> | + | [[file:MergeMiniMapLayersConflictRename02.JPG|link=]]<br> |
... the conflict has now been resolved.</td> | ... the conflict has now been resolved.</td> | ||
</tr> | </tr> | ||
| Line 220: | Line 220: | ||
<table cellpadding="4" bgcolor=#c1e7e7> | <table cellpadding="4" bgcolor=#c1e7e7> | ||
<tr valign="top"> | <tr valign="top"> | ||
| − | <td>[[file:DotPoint2.JPG]]</td> | + | <td>[[file:DotPoint2.JPG|link=]]</td> |
<td>'''Delete one of the conflicting layers.''' Select the layer and click on the '''Delete icon'''.</td> | <td>'''Delete one of the conflicting layers.''' Select the layer and click on the '''Delete icon'''.</td> | ||
</tr> | </tr> | ||
| Line 226: | Line 226: | ||
<table> | <table> | ||
<tr valign="top"> | <tr valign="top"> | ||
| − | <td>[[file:MergeMiniMapLayersConflictDelete.JPG]]</td> | + | <td>[[file:MergeMiniMapLayersConflictDelete.JPG|link=]]</td> |
<td> | <td> | ||
<br> | <br> | ||
<table cellpadding="4" bgcolor=#fcbcbc> | <table cellpadding="4" bgcolor=#fcbcbc> | ||
<tr valign="top"> | <tr valign="top"> | ||
| − | <td>[[file:Stop.PNG]]</td> | + | <td>[[file:Stop.PNG|link=]]</td> |
<td>'''CAUTION: Deleting a layer will delete all its contents'''.</td> | <td>'''CAUTION: Deleting a layer will delete all its contents'''.</td> | ||
</tr> | </tr> | ||
| Line 239: | Line 239: | ||
<table> | <table> | ||
<tr valign="top"> | <tr valign="top"> | ||
| − | <td>[[file:MergeMiniMapLayersConflictMerge02.JPG]]</td> | + | <td>[[file:MergeMiniMapLayersConflictMerge02.JPG|link=]]</td> |
</tr> | </tr> | ||
</table> | </table> | ||
| Line 248: | Line 248: | ||
<table cellpadding="4" bgcolor=#c1e7e7> | <table cellpadding="4" bgcolor=#c1e7e7> | ||
<tr valign="top"> | <tr valign="top"> | ||
| − | <td>[[file:DotPoint3.JPG]]</td> | + | <td>[[file:DotPoint3.JPG|link=]]</td> |
<td>'''Merge one of the conflicting layers.'''</td> | <td>'''Merge one of the conflicting layers.'''</td> | ||
</tr> | </tr> | ||
| Line 258: | Line 258: | ||
</tr> | </tr> | ||
<tr valign="top"> | <tr valign="top"> | ||
| − | <td>[[file:Steps.PNG]]</td> | + | <td>[[file:Steps.PNG|link=]]</td> |
| − | <td><font size | + | <td><span style="font-size: 17px;">'''Steps:'''</span><br> |
#Select the layer that is to be merged | #Select the layer that is to be merged | ||
#Click on the '''Merge icon''' (next to the '''Delete Icon''') | #Click on the '''Merge icon''' (next to the '''Delete Icon''') | ||
| Line 271: | Line 271: | ||
<table> | <table> | ||
<tr valign="top"> | <tr valign="top"> | ||
| − | <td>[[file:MergeMiniMapLayersConflictMerge01.JPG]]</td> | + | <td>[[file:MergeMiniMapLayersConflictMerge01.JPG|link=]]</td> |
<td><table cellpadding="4" bgcolor=#fcbcbc> | <td><table cellpadding="4" bgcolor=#fcbcbc> | ||
<tr valign="top"> | <tr valign="top"> | ||
| − | <td>[[file:Stop.PNG]]</td> | + | <td>[[file:Stop.PNG|link=]]</td> |
<td>'''CAUTION: When selecting a layer to ''merge into'' be aware that layers containing track objects such as signals, switches, speed signs, etc CANNOT be placed above a layer that contains the track'''.</td> | <td>'''CAUTION: When selecting a layer to ''merge into'' be aware that layers containing track objects such as signals, switches, speed signs, etc CANNOT be placed above a layer that contains the track'''.</td> | ||
</tr> | </tr> | ||
| Line 284: | Line 284: | ||
</tr> | </tr> | ||
<tr valign="top"> | <tr valign="top"> | ||
| − | <td>[[file:Steps.PNG]]</td> | + | <td>[[file:Steps.PNG|link=]]</td> |
| − | <td><font size | + | <td><span style="font-size: 17px;">'''Steps:'''</span><br> |
#Select the layer it will be ''merged into'' | #Select the layer it will be ''merged into'' | ||
| − | #Click the [[file:Tick.PNG]] icon</td> | + | #Click the [[file:Tick.PNG|link=]] icon</td> |
</tr> | </tr> | ||
<tr> | <tr> | ||
| Line 298: | Line 298: | ||
<table> | <table> | ||
<tr valign="top"> | <tr valign="top"> | ||
| − | <td>[[file:MergeMiniMapLayersConflictMerge02.JPG]]</td> | + | <td>[[file:MergeMiniMapLayersConflictMerge02.JPG|link=]]</td> |
</tr> | </tr> | ||
</table> | </table> | ||
| Line 313: | Line 313: | ||
<table> | <table> | ||
<tr valign="top"> | <tr valign="top"> | ||
| − | <td>[[file:MergeCancelAccept.JPG]]</td> | + | <td>[[file:MergeCancelAccept.JPG|link=]]</td> |
</tr> | </tr> | ||
</table> | </table> | ||
<table cellpadding="4" bgcolor=#c1e7e7> | <table cellpadding="4" bgcolor=#c1e7e7> | ||
<tr valign="top"> | <tr valign="top"> | ||
| − | <td>[[file:DotPoint.JPG]]</td> | + | <td>[[file:DotPoint.JPG|link=]]</td> |
<td>'''ACCEPT: Click the ''Tick'' button to accept the merge'''. This icon will not be usable unless ALL conflicts have been resolved.</td> | <td>'''ACCEPT: Click the ''Tick'' button to accept the merge'''. This icon will not be usable unless ALL conflicts have been resolved.</td> | ||
</tr> | </tr> | ||
<tr valign="top"> | <tr valign="top"> | ||
| − | <td>[[file:DotPoint.JPG]]</td> | + | <td>[[file:DotPoint.JPG|link=]]</td> |
<td>'''REJECT: Click the ''Cross'' button to reject the merge'''. The merging will be cancelled, no routes will be lost or altered.</td> | <td>'''REJECT: Click the ''Cross'' button to reject the merge'''. The merging will be cancelled, no routes will be lost or altered.</td> | ||
</tr> | </tr> | ||
</table> | </table> | ||
| + | <br> | ||
| + | |||
---- | ---- | ||
---- | ---- | ||
<br> | <br> | ||
| − | |||
='''Trainz Wiki'''= | ='''Trainz Wiki'''= | ||
<table cellpadding="4" bgcolor=#ffffff> | <table cellpadding="4" bgcolor=#ffffff> | ||
<tr valign="top"> | <tr valign="top"> | ||
| − | <td>[[file:TrainzWiki.png]]</td> | + | <td>[[file:TrainzWiki.png|link=]]</td> |
<td> | <td> | ||
| − | <font size | + | <span style="font-size: 17px;">'''More Tutorials and Guides to Using Trainz'''</span><br> |
*'''<span class="plainlinks">[http://online.ts2009.com/mediaWiki/index.php/HowTo How to Guides]</span>''' | *'''<span class="plainlinks">[http://online.ts2009.com/mediaWiki/index.php/HowTo How to Guides]</span>''' | ||
*'''[[Driver Commands List]]''' | *'''[[Driver Commands List]]''' | ||
Revision as of 08:38, 6 September 2019
Merging Routes
The information in this Wiki Page applies to both TANE and TRS19.
Contents |
The Surveyor Merge Routes command allows two different routes to be joined together edge-to-edge or end-to-end.
Before You Start Merging
| Make sure that you have backup copies of all the routes that you are going to merge. |
Before you start merging there are some important points you will need to consider and there may be some preparation work that will have to be performed.
Identify...
|
Common Problems (and Their Solutions)
| Most route mergers will have problems but most of these problems can be easily fixed. |
Some problems will require you to do a bit (or a lot) of extra work before you can merge two routes into one. But for some problems, the best solution may be to select other routes to merge.

|
|
| The most common problem in the "impossible to fix" category is when both routes have different orientations (N-S and E-W) and you were hoping to join them end-to-end in the same direction to make an even longer route. Once a route has been created its orientation cannot be changed. |
A handy tip for merging two routes with different heights is to create a new route that only contains the extra "in-between" baseboards - no scenery, textures or track are needed. The baseboards on one end will have heights that match those of the base route and the baseboards on the other end will have heights that match those of the to-be-merged route. The merge is performed in two stages:-
|
Selecting and Loading the Routes to Merge
- Load the Base Route into Surveyor
 |
Should you load the Route or the Session?
|
- Select and load the Route to-be-merged with the Base Route.
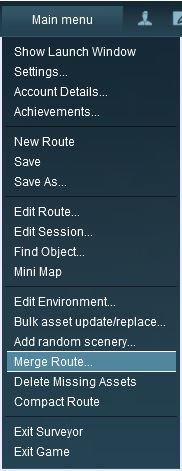 |
|
||||||
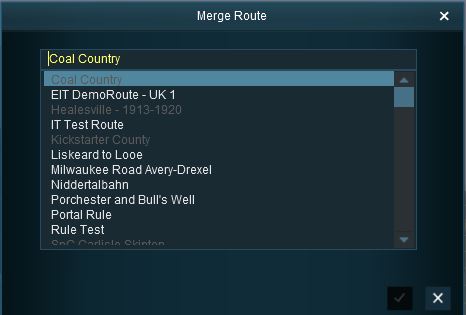
| DLC routes cannot be selected for merging |
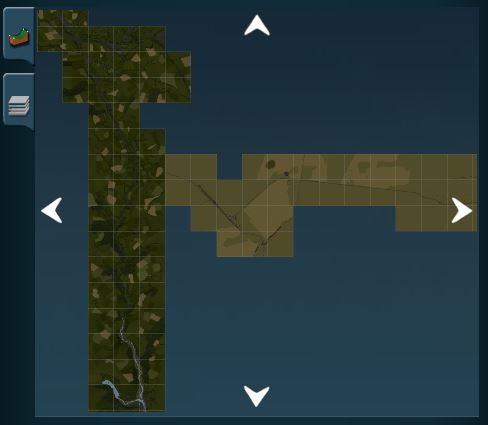
This will display a "minimap" of the proposed merger (nothing will be merged until after the final step) with some control options.
The Merge Map
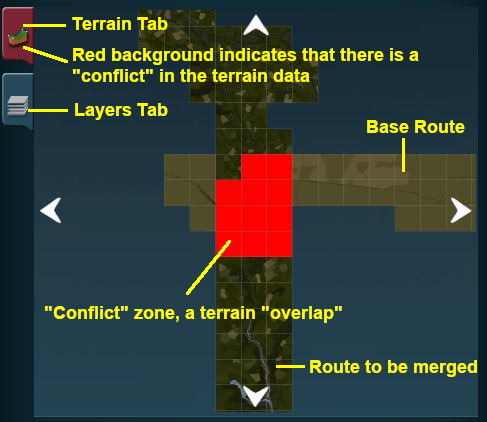 |
The two tabs shown on the left are the:-
|
Move the To-Be-Merged Route into its New Position
 |
|
||||||
The Layers Map
Click the Layers Tab to show the layers loaded from the two routes.
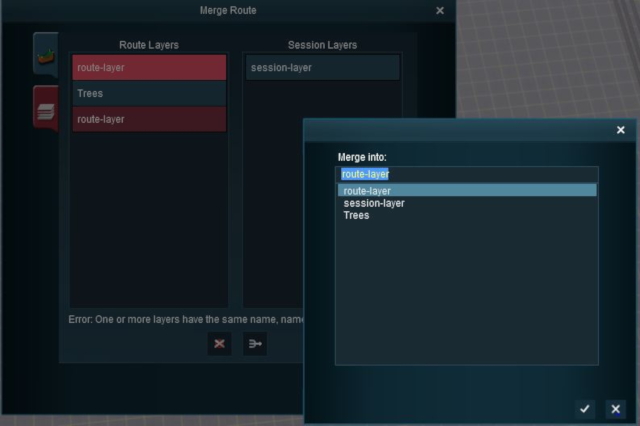
| A route merge will not proceed until ALL the terrain and layer conflicts have been eliminated. |
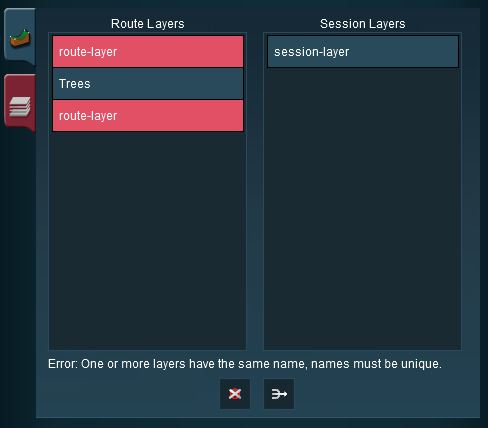
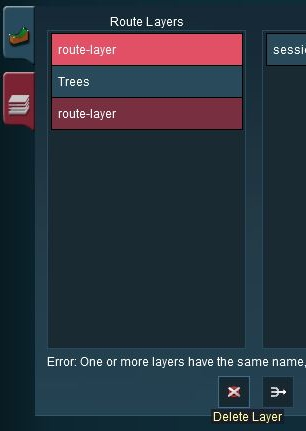
In the example shown below two of the layers, one from each route, are using the same name "route-layer". This causes a conflict that must be resolved before the merge can be completed.
There are three simple options for solving this problem:-
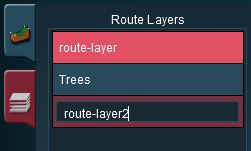
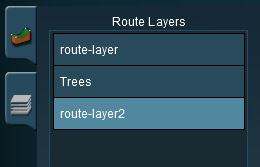
| Rename one of the conflicting layers. Double click on the layer name to enter a new name. |
 |
|
| Delete one of the conflicting layers. Select the layer and click on the Delete icon. |
 |
|
| Merge one of the conflicting layers. |
|
|
|
 |
Steps:
|
|
|
|
 |
... the conflict has now been resolved. |
|||||||||
Accept or Reject
Once all the conflicts have been resolved, the final step in the merging process can take place.
| ACCEPT: Click the Tick button to accept the merge. This icon will not be usable unless ALL conflicts have been resolved. | |
| REJECT: Click the Cross button to reject the merge. The merging will be cancelled, no routes will be lost or altered. |
Trainz Wiki
 |
More Tutorials and Guides to Using Trainz |