HowTo/Create a 3D Avatar
This page explains the process that we go through to create a 3D avatar. Using similar tools and methods, you can follow this guide to create your own 3D image for Trainz.
Contents |
Photo Source Images
The first step is to take a couple of photos. It is important to follow these steps very closely or quality will be reduced.
Lights, Camera, Action
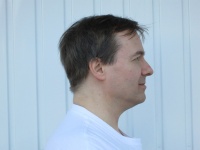
The key to getting a good in-game image is to take good photos. This means having a plain wall behind the subject, and taking a head-shot that includes just the head and part of the shoulders. It is also important to ensure the lighting is neutral. This means no heavy shadows on one side of the face, or bright spots with light reflecting off the skin. Do not use a flash. The photos below were taken on a standard phone with a resolution of 3 Megapixels.
Front and Side Images
We require a Front shot and a Side shot just as shown below. You will need someone to help you take the photo to ensure the subject fits nicely into the frame.
Creating the Head and Texture
To turn our 2D photos into a usable texture, we are using software called Facial Studio. We import the Front and Side images then adjust various control points to customize the head to match the shape of the subject.
Once the head is shaped and texture mapped, the items need to be exported. We export the face texture at 512 x 256, the eyes at 256 x 128 and export the mesh as a .fbx file for importing into 3D Studio Max.
To keep the poly count low, we need to remove the eyes, teeth and mouth. Therefore we also need to do a bit of clean-up on the exported textures to add the eyes. We also need to add a little bit of new gemoetry into the head mesh for the eye textures.
Tidying up the Image
There is likely to be a little bit more touch-up work to ensure the image is of the best possible quality. For some reason the ears always end up with black spots, and of course we need to add some texture to the back of the head and possibly re-touching the skin colours to ensure good colouration and lighting.
Additional work in Max
Once the head is complete, we then need to stitch the head to a body. This process is called welding and it involves welded the head seam to the neck seam of our selected body. We have several different body shapes to choose from. Once all this is done, we are ready to export using the Trainz Exporter plug-in.
Creating Additional LODs
Once the first asset is created, we're ready to lower the poly count and create new Level of Detail meshes. Our top LOD is roughly 2k polys (1k for the head and 1k for the body). So we are aiming for LOD1 = 1k, LOD2 = 500 polys and LOD3 = 50 polys. Of course it makes sense to create the LODs for the bodies separately since they can be re-used with each new avatar created.
Creating a Trainz Asset
Once the new avatar mesh is created, we now need to create the config file that defines how Trainz will deal with the asset. Follow these guidelines

