Texture Atlas
Contents |
Understanding Texture Atlases
We have learned that sharing materials is a good thing, but often one mesh object will require a completely different set of textures to another mesh object (e.g. you won't share Asset 1’s brick texture on Asset 2’s car model).
Instead, what we do with assets that are regularly going to appear in the same scene, is to combine several textures into one and remap the UVs of the meshes to look correct using that new combined texture.
A "texture atlas" is just a fancy name for this technique of packing a number of textures into one larger texture.
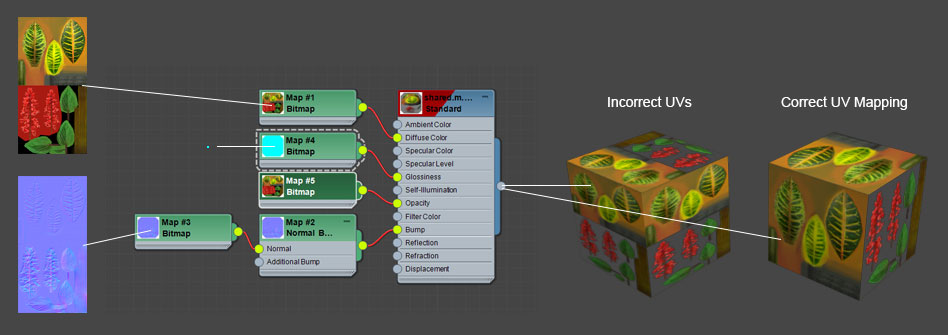
This example shows what happens when we combine two individual 1024x1024 textures into one 1024x2048 texture.
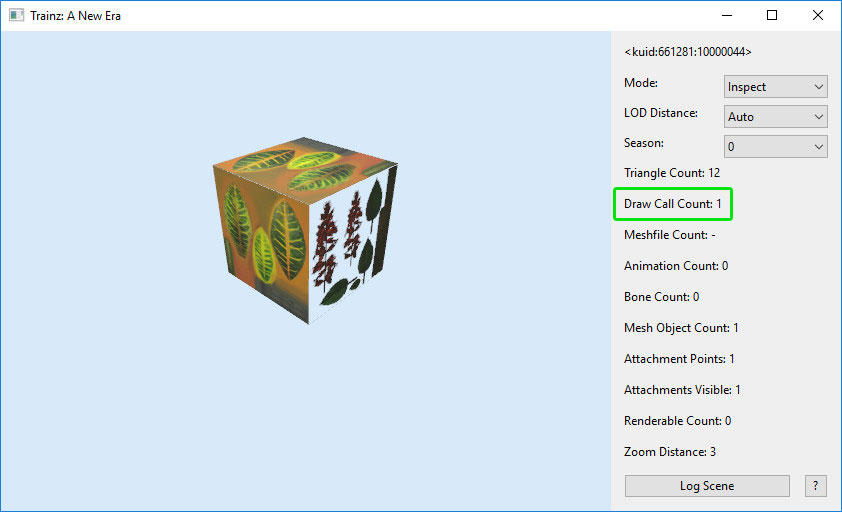
In-game, we are rendering a cube mesh that has the 1 material with the single texture atlas applied. We have "UV mapped" most of the cube with the top half of our texture atlas and one side of our cube with the bottom half of our texture atlas but still only generate 1 draw call.
Note: Combining everything into one large texture isn’t always the best option. This process works best when using a lot of the assets that share the atlas in the same scene. Scene here means what is being rendered at any one time, not what is in the entire route.
If we create 60 assets, all using a single texture atlas but then only use one of those assets in a scene; the large texture is loaded just for that one asset. We're using around 1/60th of the texture atlas, so 98% of our texture space is wasted in this case, so not a great result.
On the flip-side if we use each of those 60 different assets in the one scene, then this requires only a single draw call. That's an improvement from 60 draw calls without the atlas, and it's also not costing any extra texture space!
Using Atlas Textures for LOD
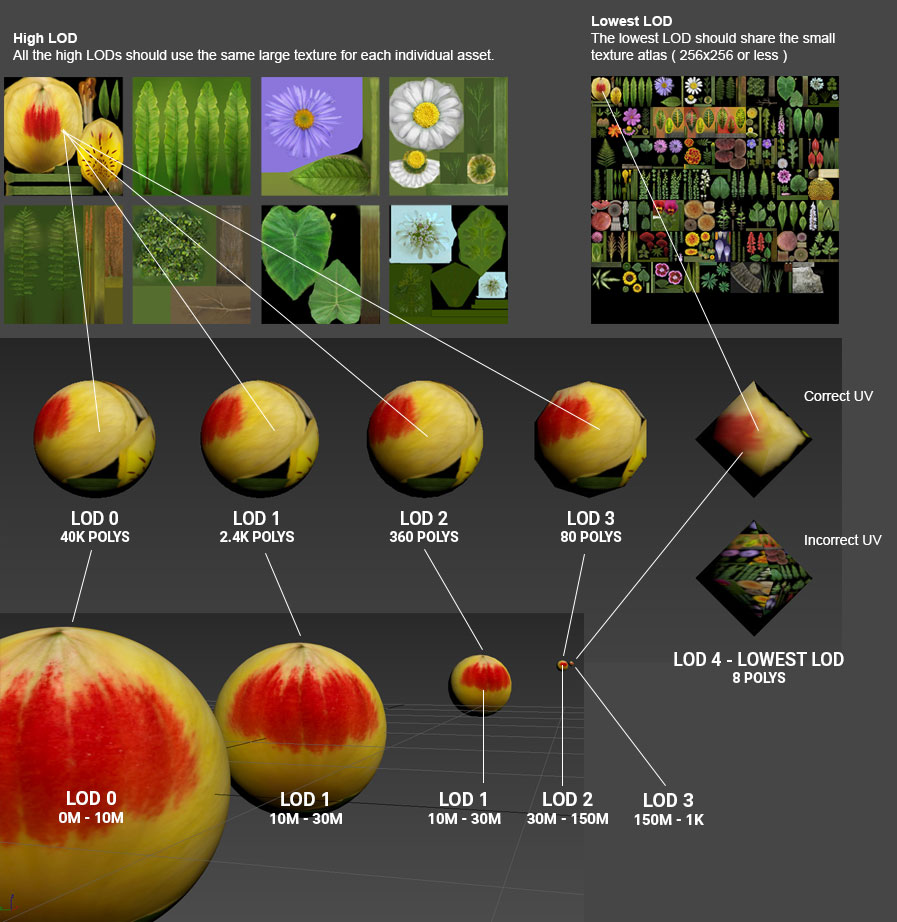
Another effective way to use texture atlases is for lower LODs. You would still use individual textures for your high detail LODs, so you have plenty of texels available to each asset when viewed up close. Then your lowest LOD can use a small (e.g. 256x256 or 512 x 512) texture atlas for a range of assets. This means if 60 assets all at their lowest LOD are sharing the one texture atlas, not only are 60 assets only performing one draw call, you also only have a single small texture in use.
The important message there is not the atlas texture size (although minimising that is certainly beneficial) but the fact that you can get most of the benefits by atlasing only the lower LOD, without having to try and cram your larger LODs into a massive oversized atlas.
Mesh Libraries
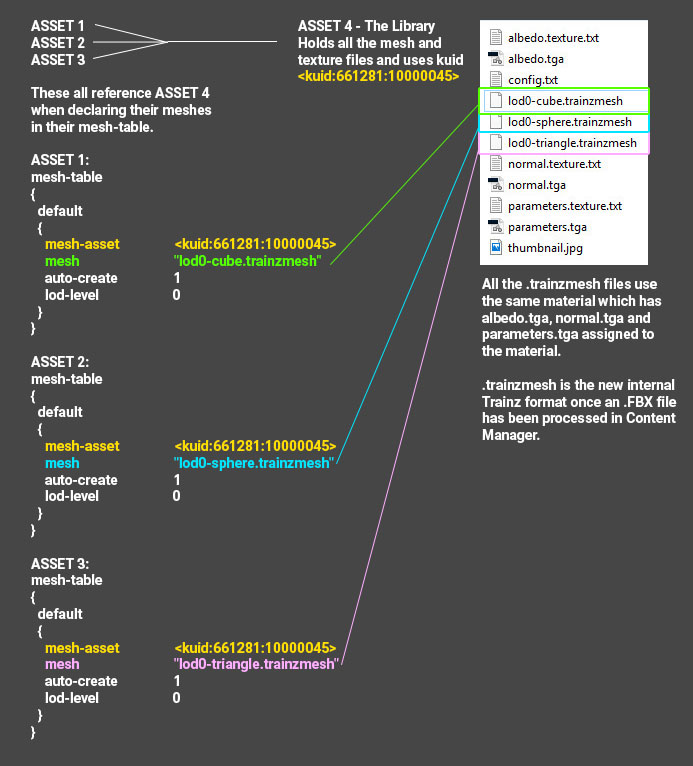
In order to allow several Trainz assets to all reference the same materials you need to create a Mesh Library asset. This process is super simple.
We want Asset 1, Asset 2 and Asset 3 to all share the same textures. The solution is to create a fourth asset called Asset 4 Lib that holds all the meshes and textures.
In the config.txt mesh-table container you will add the following tag so your asset knows where to find the meshes in your Mesh Library asset:
 Mesh-table
 {
   Default
   {
     Mesh-asset <LIBRARY-KUID-GOES-HERE>
     Mesh “trainz-mesh-in-mesh-library.trainzmesh”
   }

   Another
   {
     Mesh-asset <LIBRARY-KUID-GOES-HERE>
     Mesh “trainz-mesh-in-mesh-library.trainzmesh”
   }
 }
"No-Mesh" LOD
One last area to cover before we summarize everything, is the "No-mesh" LOD. This is used to completely remove an item from the scene when it is far enough away from camera that you won't even notice it is missing.
This is achieved by providing one extra LOD transition distance in the new “Mesh-table_LOD mesh-table-lod-transition-distances” tag versus the number of meshes included. E.g. provide three LOD transition distances (indicating four LOD levels) but do not provide a mesh-table entry for the final lod-level.
Techniques vs. Performance
Using our knowledge on Materials, Shared Materials, Texture Atlases and Mesh Libraries, we need to consider the best approaches to use for our assets, depending on the situation. Here is a summary of the right and wrong way to do things...
Best Practice:
The examples here use four LOD levels; adjust as appropriate depending on your asset.
- Use a texture atlas which is shared with a number of other assets likely to be used in the same scene, and use a mesh library to store all the textures and meshes.
- LOD0, LOD1 and LOD2 share a single high-detail material unique to that asset.
- LOD3 is the lowest LOD and will use a shared atlas material.
- LOD0 uses a high detail mesh for up close viewing.
- LOD1 and LOD2 use low detail meshes in the mid-distance.
- For large objects (bigger than a house), LOD3 should be just a few polygons.
- For smaller objects, LOD3 doesn't even require a mesh .
Worst Practice:
- Use multiple materials in a single mesh when the polygon count is low.
- Use only a small part of a large texture.
- Fail to use LOD or use too many polygons on distant (low LOD) meshes.
- Provide LOD but fail to set appropriate draw distances.
- Use a high resolution texture atlas for assets unlikely to be used in the same scene.
- Use script on heavily-used scenery objects.
- Use PFX on heavily-used scenery objects.
- Use animation on heavily-used distant (low LOD) meshes.
- Use .LM on heavily-used scenery meshes without a fallback to a non-LM lower level of detail.


