Help:Surveyor Topology Tools
The Topology Menu provides the tools for creating various types of terrain. In this section you will learn how to make hills, valleys, mountains, lakes and rivers.
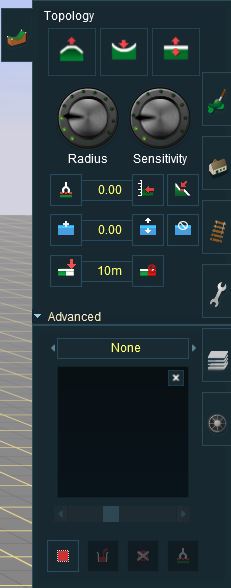
Click on the Topology Tab (or press the F1 key) to open the Topology Menu. Here you will see a number of different tools that can be used to shape the terrain. Hold your mouse cursor over each one to see a short description as well as the appropriate Hotkey to press. To see the whole menu as in the iamge below, click on the “Advanced” button to expand the menu.
- The three top buttons allow you to activate the basic tools to raise and lower terrain.
- The knobs below that alter the area the tool will affect and the sensitivity of the tool.
For an overview of how the topology tools work click here
TANE
 Height up (U)
Use this tool to create mounds, hills and mountains. Click on the Height Up tool icon to change to Height Up mode. Move your cursor from the tool tab onto the 3D world and you will see a "circle of influence". Left click and drag your mouse around the 3D world to raise the terrain. Use Radius and Sensitivity to adjust the size and sensitivity of this tool. To adjust your view of the world as you mould the terrain, right-click on the terrain to move your camera focal point and use your cursor arrow keys to move the camera. Use Undo if you don't like the results you see.
 Height down (D)
Use this tool to modify the terrain height. Make hollows, valleys, rivers, lakes and oceans.
Click on the Height Down tool icon to change to Height Down mode. Move your cursor from the tool tab onto the 3D world and you will see a "circle of influence". Left click and drag your mouse around the 3D world to lower the terrain.
Use Radius and Sensitivity to adjust the size and sensitivity of this tool. To adjust your view of the world as you mould the terrain, right-click on the terrain to move your camera focal point and use your cursor arrow keys to move the camera. Use Undo if you don't like the results you see.
 Adjust height (A)
Adjust Height allows finer control of the up and down movement. Click LMB and hold then push your mouse away from you to raise the terrain. Click LMB and hold then pull the mouse towards you to lower the terrain. Generally used for finer adjustments. Use in conjunction with the Radius and Sensitivity tools.
 Radius
Click LMB on the Radius Tool and move to either side to change the circle of influence. Move the dial right to enlarge the circle (HOTKEY “+”), left to minimize (HOTKEY “-”). The size of the circle determines the outer limit of influence of the tool. Whichever tool you have selected (highlighted) will be applied within the area defined by the circle.
 Sensitivity
Click LMB on the Sensitivity Tool and move to either side to change the amount of height changed each time the circle of influence is affected. Move the dial right to make more sensitive (HOTKEY “+”), left to reduce the sensitivity (HOTKEY “-”).
 Get height (G)
Select Get Height (G), then Click RMB on the side of a hill. Notice that the number in the Height Value field changes. You have captured the height of the terrain at the point your compass appears. Use in conjunction with the plateau tool to flatten an area to a certain height.
 Use height (H)
Click on Use Height (H) then Click LMB to apply the selected Height Value to the terrain. The Use Height tool creates a plateau at your selected height and the radius of your cursor circle determines the amount of land that is leveled at one time. Click and hold LMB then move your mouse around the terrain to level out a broader section. This tool is not affected by the sensitivity dial.
 Plateau (P)
Plateau (P) creates a plateau at the current height of the compass. Click LMB on the side of a hill to create a plateau at that level by raising or lowering the terrain.
This tool is affected by the sensitivty dial. Moving your cursor around over pre-existing hills will create a smoothing effect. Adjust the sensitivity to flatten/smooth areas quicker or slower.
 Height value field
You can manually enter in the height to apply. Click on the number showing between Get Height and Use Height and manually type in a value. To apply the selected Height Value to the terrain, click on the Use Height tool then LMB on the terrain.
 Add water (W)
Click LMB on Add Water (W) and paint the water texture along the desired area by moving your mouse around. The radius of the cursor circle determines the texture panel size.
 Remove water (Q)
Click LMB on Remove Water (Q) and you then delete the water texture one panel at a time by Clicking LMB on each water panel.
 Adjust Water Height (E)
Select the Adjust Water Height tool and Click LMB and hold (on the water texture) then drag your mouse forward and back, adjusting the water texture height until it is the appropriate height.
 Water Height Field
Enter the height at which you wish to apply the water, then click on Use Water Height. LMB and move your cursor around the terrain to paint the water texture at the height entered.
 Add ground (X)
Select the Add Ground (X) tool. Click LMB in the void just off the edge of the baseboard to add another baseboard in that direction.
By default ground sections use a 10m grid, where each adjustable terrain 'point' is 10m apart. If your route requires finer detail you can create sections which use a 5m grid. These ground sections will use four times more memory than the standard 10m grid and should be reserved for when fine detail is absolutely required.
To create a section with a 5m grid, click on the drop down list to the right of the Add Ground button, and select the 5m option. Now add the terrain as normal. You can also update existing sections by clicking on them whilst the 5m grid option is selected.
 Delete ground
Click LMB on the Delete Section button, then Click LMB on any baseboard section to delete it. This action cannot be undone, and should be used with care. Deleting a section may also delete splines that cross section boundaries. If the zoom is too far from the surface, this option might me disabled.
Advanced
The Advanced features menu can be opened and closed by using Shift-F1 or clicking on the Advanced Tab.
 Displacement map
A displacement map is a grayscale image used to create an instant height map.
 Direction
Move the direction dial in the directon you wish the grayscale map to be put down on the baseboard.
 Threshold
Move the Threshold dial to increase the size of the height change set on the displacement map.
 Select area (B)
Click on Select Area (B). Click LMB and drag the mouse to make a large square as shown below. The size of the square (or rectangle) determines the area that will be affected by the next operation.
 Fill area (F)
Scroll through the Displacement Maps, then click on Fill Area (F). The terrain is instantly transformed into the shape determined by the grayscale images of the displacement map chosen.
 Cancel selection (D)
Click LMB on Cancel Selection (D) to cancel the selection.
 Get displacement (B)
Click on Select Area (B). Click LMB on the baseboard and drag the mouse to make a large square that covers an existing area of modified terrain. Now click the “Get Displacement” button and you’ll notice that a displacement map has been derived from the shape of the terrain. This can now be used to apply the same terrain effect in another area.
TRS2019
For a basic overview on the Topology Tools in TRS19 you can view the tutorial video [HERE].
TRS2019 introduces several new features in the Topology tools, mostly relating to the new Clutter and TurfFX effects.
 Height up (U)
Use this tool to create mounds, hills and mountains. Click on the Height Up tool icon to change to Height Up mode. Move your cursor from the tool tab onto the 3D world and you will see a "circle of influence". Left click and drag your mouse around the 3D world to raise the terrain. Use Radius and Sensitivity to adjust the size and sensitivity of this tool. To adjust your view of the world as you mould the terrain, right-click on the terrain to move your camera focal point and use your cursor arrow keys to move the camera. Use Undo if you don't like the results you see.
 Height down (D)
Use this tool to modify the terrain height. Make hollows, valleys, rivers, lakes and oceans.
Click on the Height Down tool icon to change to Height Down mode. Move your cursor from the tool tab onto the 3D world and you will see a "circle of influence". Left click and drag your mouse around the 3D world to lower the terrain.
Use Radius and Sensitivity to adjust the size and sensitivity of this tool. To adjust your view of the world as you mould the terrain, right-click on the terrain to move your camera focal point and use your cursor arrow keys to move the camera. Use Undo if you don't like the results you see.
 Adjust height (A)
Adjust Height allows finer control of the up and down movement. Click LMB and hold then push your mouse away from you to raise the terrain. Click LMB and hold then pull the mouse towards you to lower the terrain. Generally used for finer adjustments. Use in conjunction with the Radius and Sensitivity tools.
 Radius
Click LMB on the Radius Tool and move to either side to change the circle of influence. Move the dial right to enlarge the circle (HOTKEY “+”), left to minimize (HOTKEY “-”). The size of the circle determines the outer limit of influence of the tool. Whichever tool you have selected (highlighted) will be applied within the area defined by the circle.
 Sensitivity
Click LMB on the Sensitivity Tool and move to either side to change the amount of height changed each time the circle of influence is affected. Move the dial right to make more sensitive (HOTKEY “+”), left to reduce the sensitivity (HOTKEY “-”).
 Get height (G)
Select Get Height (G), then Click RMB on the side of a hill. Notice that the number in the Height Value field changes. You have captured the height of the terrain at the point your compass appears. Use in conjunction with the plateau tool to flatten an area to a certain height.
 Use height (H)
Click on Use Height (H) then Click LMB to apply the selected Height Value to the terrain. The Use Height tool creates a plateau at your selected height and the radius of your cursor circle determines the amount of land that is leveled at one time. Click and hold LMB then move your mouse around the terrain to level out a broader section. This tool is not affected by the sensitivity dial.
 Plateau (P)
Plateau (P) creates a plateau at the current height of the compass. Click LMB on the side of a hill to create a plateau at that level by raising or lowering the terrain.
This tool is affected by the sensitivty dial. Moving your cursor around over pre-existing hills will create a smoothing effect. Adjust the sensitivity to flatten/smooth areas quicker or slower.
 Height value field
You can manually enter in the height to apply. Click on the number showing between Get Height and Use Height and manually type in a value. To apply the selected Height Value to the terrain, click on the Use Height tool then LMB on the terrain.
 Add water (W)
Click LMB on Add Water (W) and paint the water texture along the desired area by moving your mouse around. The radius of the cursor circle determines the texture panel size.
 Remove water (Q)
Click LMB on Remove Water (Q) and you then delete the water texture one panel at a time by Clicking LMB on each water panel.
 Adjust Water Height (E)
Select the Adjust Water Height tool and Click LMB and hold (on the water texture) then drag your mouse forward and back, adjusting the water texture height until it is the appropriate height.
 Water Height Field
Enter the height at which you wish to apply the water, then click on Use Water Height. LMB and move your cursor around the terrain to paint the water texture at the height entered.
 Add ground (X)
Select the Add Ground (X) tool. Click LMB in the void just off the edge of the baseboard to add another baseboard in that direction.
By default ground sections use a 10m grid, where each adjustable terrain 'point' is 10m apart. If your route requires finer detail you can create sections which use a 5m grid. These ground sections will use four times more memory than the standard 10m grid and should be reserved for when fine detail is absolutely required.
 Change Grid Size
To create a section with a 5m grid, click on the drop down list to the right of the Add Ground button, and select the 5m option. Now add the terrain as normal. You can also update existing sections by clicking on them whilst the 5m grid option is selected.
 Delete ground
Click LMB on the Delete Section button, then Click LMB on any baseboard section to delete it. This action cannot be undone, and should be used with care. Deleting a section may also delete splines that cross section boundaries. If the zoom is too far from the surface, this option might me disabled.
Advanced
The Advanced features menu can be opened and closed by using Shift-F1 or clicking on the Advanced Tab.
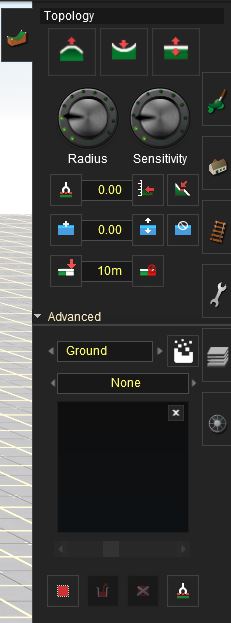
The Advanced tab provides access to the Displacement Map tools, and the new Clutter Effects/TurfFX tools.
Effect Layers
 Effects Layers
Use this drop down menu to select between Displacement Map mode, and Effects Layers mode.
Effect Layers will only be shown if there are Effect Layers configured for the route.
When an Effect Layer is selected, the following tools are used to apply, adjust, or remove the effect layer on the route:
- Height Up (U) tool will paint the effect onto the terrain; with density growing the more it is 'painted' on.
- Height Down (D) tool will erase the effect from the terrain, with density reducing the more it is 'erased'.
- Adjust Height (A) tool will adjust the density of the effect on the terrain.
- Radius sets the radius for the brush to paint the effect onto the terrain.
- Sensitivity sets the density/rate of the brush (the higher the sensitivity, the quicker it will paint the effect up to full density)
- Get Height (G) gets the current density at the location of the compass.
- Use Height (H) applies the selected effect density shown in the 'height value field'
- Plateau (P) applies the effect density from one location to another. To use, left click and hold in one location and then drag to other locations to apply that effect density.
- Height Value Field allows you to set a effect density value between 0 and 1, and then use the Use Height (H) tool to apply that effect density.
- Select Area (B) allows you to select an area, to then use the Fill Area (F) tool to 'fill' that area with the selected effect.
- Fill Area (F) allow you to fill the selected area with the selected effect.
- Cancel Selection (D) allows you to cancel the selection.
See Effect Layers for further information on creating, using, and editing Effect Layers.
 Edit/Add Effect Layers
Opens the Edit/Add Effects Layers tool.
Displacement Maps
 Displacement map
Select 'Ground' in the drop down menu to access the displacement map tools. A displacement map is a Trainz KIND Groundbrush asset that is used to create terrain features quickly and easily. When the displacement map tools are selected there is a second drop down menu that lists the displacement maps that are available. The default is None which is a null displacement. Select an item from the menu to make it the current displacement map: the map will appear in the preview pane. Click the 'x' in the preview pane to reset the map to None.
Direction
Click the direction arrows at the bottom of the Displacement Map preview to change in the direction you wish the grayscale map to be put down on the baseboard.
Displacement Scale
Move the Displacement Scale slider, below the Displacement Map view, to change the height scale for the displacement map.
 Select area (B)
Click on Select Area (B). Click LMB and drag the mouse to select the rectangular area to which the displacement will be applied.
 Fill area (F)
Scroll through the Displacement Maps, then click on Fill Area (F). The terrain is instantly transformed into the shape determined by the grayscale images of the displacement map chosen.
 Cancel selection (D)
Click LMB on Cancel Selection (D) to cancel the selection.
 Get displacement (B)
Click on Select Area (B). Click LMB on the baseboard and drag the mouse to make a large square that covers an existing area of modified terrain. Now click the “Get Displacement” button and you’ll notice that a displacement map has been derived from the shape of the terrain. This can now be used to apply the same terrain effect in another area.
- See Also
Return to TRS19 Help Page

