Help:Surveyor Paint Tools
| Line 1: | Line 1: | ||
| − | + | Click on the Paint Tab (F2) to | |
| + | open the Paint Menu. You | ||
| + | will see a number of default | ||
| + | textures, grouped by region. | ||
| + | Use the slider button to scroll | ||
| + | through the list. | ||
| + | Click on one of the textures or write its name on the text box, and you will see a copy of it | ||
| + | appear in the small current texture window. Click LMB on the | ||
| + | terrain and use your mouse as a paintbrush to paint on the | ||
| + | texture. | ||
| − | + | [[File:Paint.jpg|400px]] | |
| + | {{clear}} | ||
| − | Click on | + | == [[File:Direction.jpg]] Direction Tool == |
| + | {{clear}} | ||
| + | Move the Direction Tool in the directon you wish the texture map to be put down on the baseboard. | ||
| + | |||
| + | == [[File:Scale.jpg]] Scale tool == | ||
| + | |||
| + | {{clear}} | ||
| + | Click LMB on the Scale Tool and move to either side to change the amount of space the texture will cover. Right to enlarge (“+”), left to minimize (“-”). | ||
| + | |||
| + | == [[File:Texture get.jpg]] Get texture == | ||
| + | {{clear}} | ||
| + | Click on the Get Texture (G) tool then Click LMB on | ||
| + | a texture already painted onto your terrain. The current texture windows will show the newly selected texture. | ||
| + | |||
| + | == [[File:Radius.jpg]] Radius Dial == | ||
| + | |||
| + | {{clear}} | ||
| + | The Radius Dial (“+” or “-”) changes the area of influence of | ||
| + | your cursor circle. | ||
| + | |||
| + | == [[File:Grid fill.jpg]] Fill Grid == | ||
| + | |||
| + | {{clear}} | ||
| + | The Fill Grid (L) will fill all unpainted areas of an | ||
| + | entire baseboard with one texture. This is useful | ||
| + | for finishing off an area where fine texturing is not | ||
| + | required. | ||
| + | |||
| + | == [[File:Area select.jpg]] Select Area == | ||
| + | |||
| + | {{clear}} | ||
| + | Click on Select Area (B). Click LMB and drag the mouse to make a large square as shown below. The size of the square (or rectangle) determines the area that will be affected by the next operation. | ||
| + | |||
| + | == [[File:Area fill.jpg]] Fill Area == | ||
| + | |||
| + | {{clear}} | ||
| + | Click LMB on a texture in the favorites box | ||
| + | and use the Fill Area (F) tool to texture the whole | ||
| + | rectangle. If you do not select an area first, Clicking | ||
| + | LMB on Fill Area (F) and Surveyor will fill all areas on which | ||
| + | there are no textures with the selected texture. | ||
| + | |||
| + | == [[File:Area cancel.jpg]] Cancel Selection == | ||
| + | |||
| + | Click LMB on Cancel Selection (D) to cancel the | ||
| + | selected area. | ||
[[Category:Help|Surveyor Tools Paint]] | [[Category:Help|Surveyor Tools Paint]] | ||
Revision as of 10:30, 23 February 2014
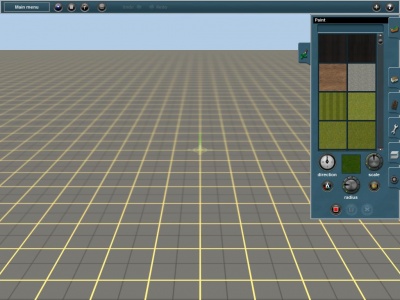
Click on the Paint Tab (F2) to open the Paint Menu. You will see a number of default textures, grouped by region. Use the slider button to scroll through the list. Click on one of the textures or write its name on the text box, and you will see a copy of it appear in the small current texture window. Click LMB on the terrain and use your mouse as a paintbrush to paint on the texture.
Contents |
 Direction Tool
Move the Direction Tool in the directon you wish the texture map to be put down on the baseboard.
 Scale tool
Click LMB on the Scale Tool and move to either side to change the amount of space the texture will cover. Right to enlarge (“+”), left to minimize (“-”).
 Get texture
Click on the Get Texture (G) tool then Click LMB on a texture already painted onto your terrain. The current texture windows will show the newly selected texture.
 Radius Dial
The Radius Dial (“+” or “-”) changes the area of influence of your cursor circle.
 Fill Grid
The Fill Grid (L) will fill all unpainted areas of an entire baseboard with one texture. This is useful for finishing off an area where fine texturing is not required.
 Select Area
Click on Select Area (B). Click LMB and drag the mouse to make a large square as shown below. The size of the square (or rectangle) determines the area that will be affected by the next operation.
 Fill Area
Click LMB on a texture in the favorites box and use the Fill Area (F) tool to texture the whole rectangle. If you do not select an area first, Clicking LMB on Fill Area (F) and Surveyor will fill all areas on which there are no textures with the selected texture.
 Cancel Selection
Click LMB on Cancel Selection (D) to cancel the selected area.
