HowTo/Create transparent windows in Blender
(First version) |
|||
| Line 44: | Line 44: | ||
| − | + | Return To | |
| + | [[HowTo|How To Guides]] | ||
| + | |||
[[Category:Blender]] | [[Category:Blender]] | ||
[[Category:How-to guides]] | [[Category:How-to guides]] | ||
Latest revision as of 22:50, 2 August 2018
This tutorial looks at making a transparent window in Blender for use in Trainz assets.
Contents |
[edit] Requirements
- Blender 2.69 or later. Earlier versions may work.
- Experience in using Blender is assumed.
[edit] Background
Trainz TS12 introduced a check for uniform coloured image files and the use of such files with a size greater than 64 pixels now produces an error. While it is still possible to use smaller files for a window texture this is unnecessary since the procedural colours within Blender can be used. If you want some variation in the colour used for the window then you will still need to use an image file. However, for most assets a single procedural colour is fine.
[edit] Model requirements
Model meshes used for windows should be separate from other meshes so a separate material can be used. If the window can be viewed from either side, such as windows used in steam locos with open cabs, then make the mesh double sided. Windows used in closed cabs or carriages can be single sided. However, remember that the Blender exporter will not allow the use of the same material for both single sided and double sided meshes.
[edit] The Material
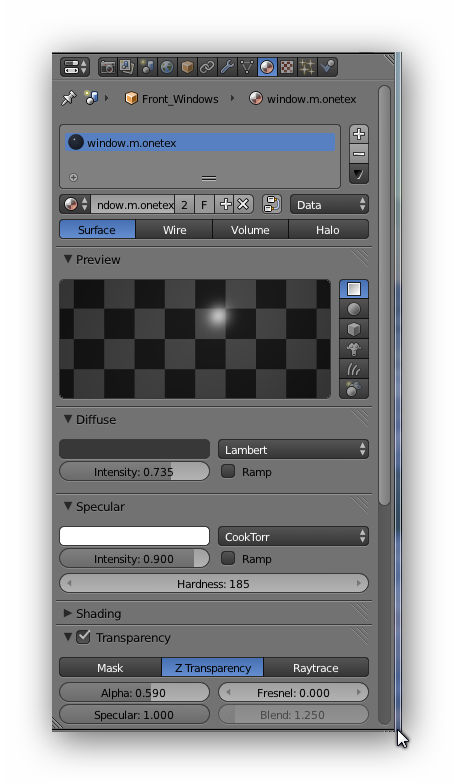
You can either use the notex or onetex notation. The exporter will not complain if an image file is not used. A suggested name is "window.m.onetex".
These are some material settings that will work for a transparent window:
[edit] Diffuse Section
- The colour is a dark grey (RGB 0.22, 0.22, 0.22). You can adjust this value to change the "tint" of the window.
- The Intensity can be adjusted.
- Ignore the shader values and ramp.
[edit] Specular Section
- Leave the colour as white.
- You can adjust the Intensity and Hardness values.
- Ignore the shader values and ramp.
[edit] Transparency
This is the section that makes this material work.
- Ensure Transparency is ticked otherwise the values in this section will be ignored.
- Z Transparency works well.
- The alpha value dictates how transparent the window will be. Somewhere around 0.5 should work for most.
- Ignore the other values.
[edit] Results
The material settings above produce a transparent window with a dark smoky tint. You could try blue tints and varying the amount of transparency.
Return To
How To Guides
