Help:Surveyor Track Track Mode
| Line 2: | Line 2: | ||
[[File:Tracks1.jpg|400px]] | [[File:Tracks1.jpg|400px]] | ||
{{clear}} | {{clear}} | ||
| + | === [[File:Track list.jpg|90px]] Track selection === | ||
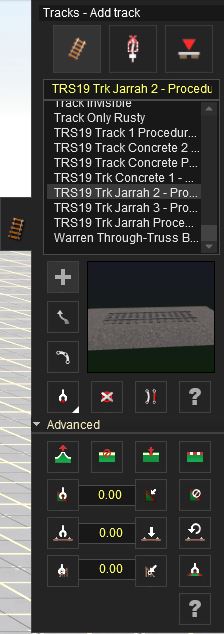
| + | To choose a track use the arrows pointing up and down to the right of the list to navigate it. Click LMB on a name and it will show the model on the screen below. Alternatively write the name of the particular track on the textbox over the list. | ||
=== [[File:Object add.jpg]] Add Track === | === [[File:Object add.jpg]] Add Track === | ||
{{clear}} | {{clear}} | ||
Revision as of 10:35, 24 February 2014
Contents |
Track mode
 Track selection
To choose a track use the arrows pointing up and down to the right of the list to navigate it. Click LMB on a name and it will show the model on the screen below. Alternatively write the name of the particular track on the textbox over the list.
 Add Track
Click on the Add Track (A) tool and then Click on the left or right arrows of the track selection dialogue to select the type of track you wish to lay, then Click LMB on the baseboard where you want to anchor your starting point. Click LMB again a short distance away to place another spline point. To extend the track further, Click LMB again on the last spline point (the white circle), then Click LMB once more nearby to extend the track. Unless all three spline points are exactly in a straight line, the track will be curved. To connect two sections of track, drag the end spline point of one on top of the end spline point of another and they will automatically connect.
 Move Track
To bend the track in any direction, select the Move Track (M) tool and then Click LMB and hold on one of the white spline point circles and drag it so it'll bend. The shape of the curve is affected by how close the spline point you are pulling is to the next spline points.
 Split Spline
Click on the Split Spline tool (Q) and click on a middle spline point (white circle) in the track. The track breaks in two at that point.
 Get Track
Click on Get Track (G) and then Click LMB on a track. Its image will appear on the Selection Window. Press “A” to change the mode to Add Track and you will be able to lay the same one.
 Delete Track
Click on Delete Track (D) then click on the bridge section to delete it. If there are any objects on the track, they will also be deleted.
 Straighten Track
Click on Straighten Track (B) and then Click LMB on a bent section of laid track. The section of track will straight between the two spline points, the next track segment will also affected (Double track cannot be straightened. Click again on the straightened track and it will return to a curved track.
 Edit properties
This can be used to name the track section and also set its layer.
Advanced
Click LMB on the Advanced button(Shift F4) to drop down the Advanced Track Menu.
 Spline Height
Click LMB the Adjust Spline Height (H) and Click LMB and hold on a track spline point. Drag your mouse forward and back to raise and lower the spline point.
 Delete Spline Point
Click LMB on the Delete Spline Point (X) and Click LMB on a track spline point . When a spline is removed the curvature of a track can be affected.
 Insert Spline Point
Click on Insert Spline Point (I) to add a new spline point.
 Smooth Spline
Smooth Spline (S) levels the track between two spline points, bringing the land up or down to match the leveled track.
 Get Gradient
Click Get Gradient (J) and Click LMB on a raised track section between two track spline points. The gradient between those points is shown in the Gradient Value box as a percentage slope.
 Apply Gradient
Enter a new gradient value in the Gradient Value text box, then click on Apply Gradient (K).
 Remove Gradient
Click LMB on remove Gradient and then Click on a track section to remove the gradient between two track points.
 Get Vertex Height
Click LMB on the Get Vertex Height and Click LMB on the highest spline point on your track. The height is displayed in the Height Value box.
 Apply Vertex Height
Click on Apply Vertex Height then Click LMB on another spline point. The spline point is raised to the same height as you first vertex.
 Show Curve Radius
Click on Show Curve Radius then move your mouse along a track segment. The curve radius is shown next to your mouse cursor. The number is the radius measured in meters so a low number means a tight curve and a high number means a straighter track.
- See Also
