CCG/Modelling: Chunky Mesh Track
m (Why "should be removed"? We definitely don't want to remove reference documentation even if it's obsolete. This will help creators update their content. Should not be used is better.) |
|||
| (One intermediate revision by one user not shown) | |||
| Line 1: | Line 1: | ||
| + | <font color=red>'''Note: This page describes obsolete asset formats (trainz-build prior to 2.9) and should not be used for any new asset. The current equivalent of this format is [[KIND Track]].'''</font> | ||
| + | |||
| + | |||
==Chunky Mesh Track== | ==Chunky Mesh Track== | ||
Chunky mesh track is an asset that uses a default inbuilt mesh. The creator does not have to construct a mesh in 3dsmax or gmax. | Chunky mesh track is an asset that uses a default inbuilt mesh. The creator does not have to construct a mesh in 3dsmax or gmax. | ||
Latest revision as of 18:46, 18 February 2019
Note: This page describes obsolete asset formats (trainz-build prior to 2.9) and should not be used for any new asset. The current equivalent of this format is KIND Track.
Contents |
[edit] Chunky Mesh Track
Chunky mesh track is an asset that uses a default inbuilt mesh. The creator does not have to construct a mesh in 3dsmax or gmax.
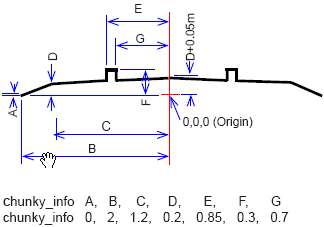
The cross sectional track and ballast shape of the mesh is pre-defined by the diagram below.
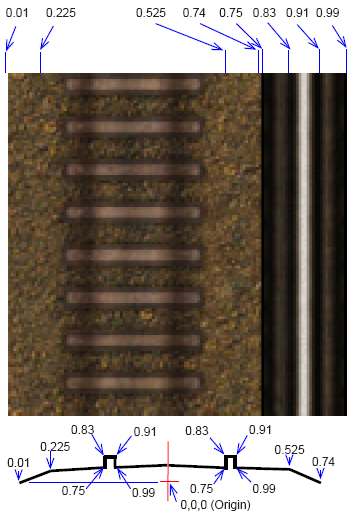
A 128 by 128 pixel tga file is used for the texture. This generally includes the ballast, ties and a larger rail section texture on the right of the graphic. Because the shape is defined by geometric proportions, the approximate equivalent dimensions measured in pixels is shown in the chunky_info texture file data shown below. This is approximate due to rounding of values to whole pixels. For additional information on using the Kind, refer to XXXXX.
[edit] chunky_info
These values (in metres) define the shape of the mesh created for the track. See drawing below:
[edit] chunky_info texture file
The texture file with the track texture on the left and a rail texture on the right is 128 x 128 uncompressed tga, and may have an alpha layer. The texture is mapped to the mesh shape above using the values in the drawing below, as fractions of the 128 pixel width.
| Fraction | 0.01 | 0.225 | 0.525 | 0.74 | 0.75 | 0.83 | 0.91 | 0.99 |
| Pixels | 1 | 29 | 67 | 95 | 96 | 106 | 117 | 127 |
[edit] SPLINES
Splines have a number of tags that have special effects in Trainz, and also need to be constructed in a certain way in 3DSMax (or GMax.)
For example, the effect of the following tags are explained in the diagrams:
[edit] upright
|
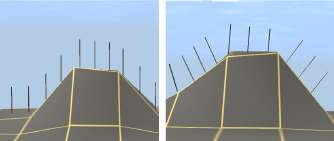
upright 0 This effects how vertical the objects in the spline, for example a row of poles:
|
[edit] bendy
|
bendy 1 Switches how track is bent on corners, set as 1 allows the mesh to be deformed as the spline is bent around corners. |
Notes: bendy and upright have a visible effect for Kind Track splines, as above. For Kind Bridge or Tunnel, the splines show as in bendy 1, bendy 0 has no visual effect. However, bendy 1 should always be entered in the config.txt file for bridge and tunnel as the tag improves handling of the spline and Trainz performance.
[edit] length and endlength
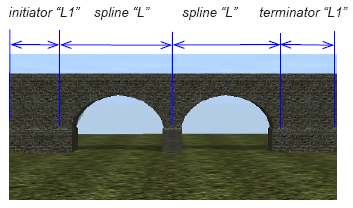
A spline may be made by specifying a length value in the config.txt file. To add a different model at the start or end of the spline, Initiators and Terminators are used.
[edit] initiator
Name of model to use at the end of the bridge, placed in a sub folder with same name.
[edit] terminator
Name of model to use at the end of the bridge, placed in a sub folder with same name.
[edit] length
Length of the main spline track segment in metres.
[edit] endlength
Length in metres of the initiator and terminator models.
The initiator or terminator is a fixed length and the main spline model repeats as in the diagram above.
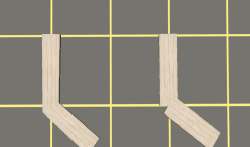
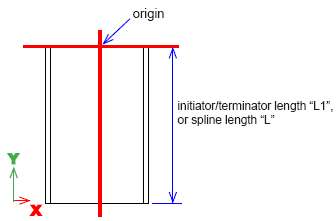
In 3dsmax/gmax, the initiator, terminator and spline models must be constructed starting on the origin and extending in the negative Y axis direction. The top view in the diagram shows the correct placement and dimensions L1 or L.
| 3DSMax Top View |
The initiator may be rotated 180 degrees to create a terminator model, if required.
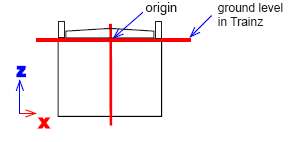
Attachment points will be automatically generated in Trainz at ground level. The model heights need to be adjusted in 3dsmax/gmax so a road or track will connect at the correct levels.
| 3DSMax Front View |
Previous Page . . . . Next Page
