HowTo/Adjust Post-Processing Effects
Tonyhilliam (Talk | contribs) |
(→Depth of Field) |
||
| Line 76: | Line 76: | ||
Note that d0 + d1 + d2 = 100% | Note that d0 + d1 + d2 = 100% | ||
Note that d0 + d1 +d2 = 100% | Note that d0 + d1 +d2 = 100% | ||
| + | |||
| + | Return To | ||
| + | [[HowTo|How To Guides]] | ||
[[Category:How-to guides]] | [[Category:How-to guides]] | ||
Latest revision as of 22:48, 2 August 2018
This page provides information for users to make their own adjustments to the post-processing effects that are included in T:ANE
Contents |
[edit] Post-processing Overview
T:ANE introduces a range of new features enabled by using graphic shaders to create post-processing effects similar to those used by photographers. These effects take data from a scene, modify it, and then renderer those modifications to the screen. A large range of effects are possible and the current range in T:ANE will be expanded over time.
We provide three options for post-processing in the Video Settings in-game, and an additional option to manually update the settings by activating the Advanced Tools
1. Launcher > Trainz Settings > Developer > Tick "Enable Advanced Debug Tools"
2. Restart the game
3. Launcher > Developer > Show Post-processing Effects
4. In the new window, choose Mode > Manual
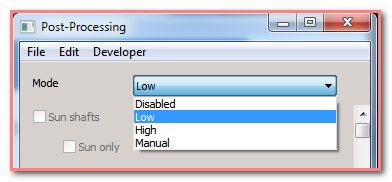
The "daytime high" settings are loaded by default for the manual settings (there are different defaults for nighttime). Note also that currently your changes are not saved after you exit the game.
It is safe to enter any values and experiment with the limits, and settings that do have a maximum will override attempts to exceed those limits.
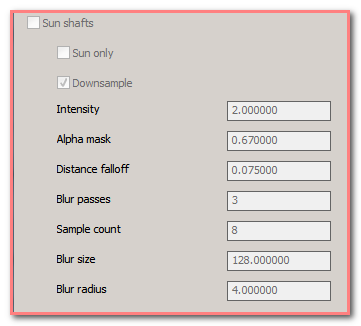
[edit] Sun Shafts
- Sun Only: On = render sun only (interacts with clouds), better performance ; Off = render sun and sun shafts, better visuals
- Downsample: whether to process the sun shafts at half the screen resolution (better performance, slightly diminished quality)
- Intensity: determines the visible strength of the sun
- Alpha Mask: multiplier applied to the sky luminosity before comparing it to the alpha channel. Impacts how the strong the sun is behind clouds when the skybox texture is setup appropriately (with cloud intensity in alpha channel).
- Distance falloff: radius of the sun
- Blur Passes: number of blur passes - will affect the length and appearance of the sun shafts
- Sample Count: number of samples taken per pixel for each blur pass (recommended to leave as default)
- Blur size: affects the spread of each blur pass (recommended to leave as default)
- Blur radius: directly affects the size of the sun rays (recommended to leave as default)
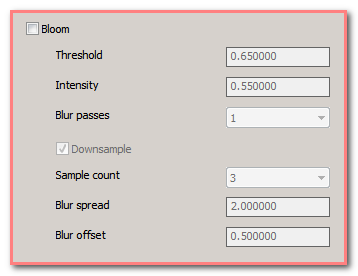
[edit] Bloom
- Threshold: only portions of the image that are brighter than this value will be bloomed
- Intensity: intensity of added brightness
- Blur Passes: defines the number of blur passes to create a “halo†effect around bright areas
- Downsample: determines whether to run the blur passes at half-resolution
- Sample count: width of the blur kernel in pixels
- Blur spread: space in pixels between blur samples (recommended to leave as default)
- Blur offset: recommended to leave as default
[edit] Convolution
Not currently used
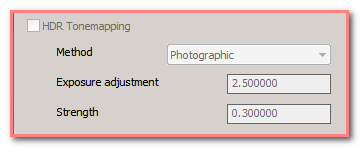
[edit] HDR Tonemapping
- Method: Determines the tone mapping method. We use Reinhard as this provides the best night lighting solution.
- Exposure Adjustment: determines the overall brightness of the image
- Strength: percentage of the tone mapped image to use, blended in with the original
[edit] Greyscale and Sepia
- Greyscale: simply provides a "black and white" image (great for steam era "photos")
- Sepia: creates a sepia tone (great for wild west images)
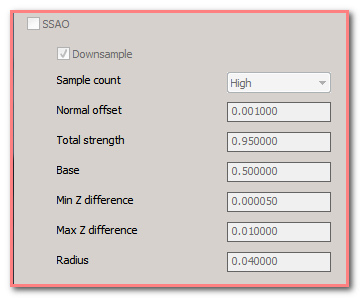
[edit] SSAO
- Downsample: determines whether to run the effect at half-resolution (recommended)
- Sample Count: impacts the overall quality of the effect
- Normal Offest: unused
- Total Strength: strength of the effect
- Base: recommended to leave as default
- Min Z difference: recommended to leave as default
- Min Z difference: recommended to leave as default
- Radius: recommended to leave as default
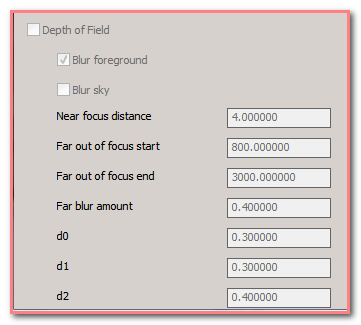
[edit] Depth of Field
- Blur Foreground: determines whether to defocus the foreground or not (additional performance cost)
- Blur Sky: determines whether to blur the sky as part of the background or not (no performance cost)
- Near Focus distance: when “blur foreground†is enabled, determines the distance from the camera that
- Far "out of focus" start: distance at which the background starts to be out of focus
- Far "out of focus" end: distance at which the background is completely out of focus
- Far blur amount: quantity of blur to apply to the background
- d0: determines the portion of out-of-focus foreground that uses a small blur (furthest from camera)
- d1: determines the portion of out-of-focus foreground that uses a medium blur
- d2: determines the portion of out-of-focus foreground that uses a large blur (closest to camera)
Note that d0 + d1 + d2 = 100% Note that d0 + d1 +d2 = 100%
Return To How To Guides
