SAR Nantabibbie
From TrainzOnline
(Difference between revisions)
m |
m |
||
| Line 1: | Line 1: | ||
[[Image:SAR_Nantabibbie.png|link=|alt=Nantabibbie]]<br> | [[Image:SAR_Nantabibbie.png|link=|alt=Nantabibbie]]<br> | ||
| − | Main Line with a Passing Loop. Unmanned location on the Peterborough to Paratoo section of the Port Pirie to Broken Hill line. | + | Main Line with a Passing Loop. Unmanned location on the '''Peterborough to Paratoo''' section of the '''Port Pirie to Broken Hill line'''. |
<table> | <table> | ||
<tr valign="top"> | <tr valign="top"> | ||
<td> | <td> | ||
| − | <table> | + | <table bgcolor="lightgrey" bordercolor="lightgrey"> |
<tr valign="middle"> | <tr valign="middle"> | ||
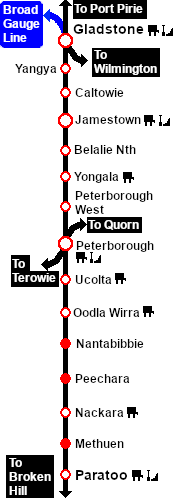
<td width=220 align="right">[[Image:SAR_PortPirie-BrokenHill_Line.png|link=SAR Port Pirie-Broken Hill Line|alt=PortPirie-BrokenHill Line|Show Port Pirie-Broken Hill Line]]</td> | <td width=220 align="right">[[Image:SAR_PortPirie-BrokenHill_Line.png|link=SAR Port Pirie-Broken Hill Line|alt=PortPirie-BrokenHill Line|Show Port Pirie-Broken Hill Line]]</td> | ||
| Line 22: | Line 22: | ||
<td align="center" width=50>'''From'''</td> | <td align="center" width=50>'''From'''</td> | ||
<td align="center" width=50>'''To'''</td> | <td align="center" width=50>'''To'''</td> | ||
| − | <td align="center" width= | + | <td align="center" width=275>'''Tower Paths (Down)'''</td> |
<td align="center" width=50>'''From'''</td> | <td align="center" width=50>'''From'''</td> | ||
<td align="center" width=50>'''To'''</td> | <td align="center" width=50>'''To'''</td> | ||
| − | <td align="center" width= | + | <td align="center" width=275>'''Tower Paths (Up)'''</td> |
</tr> | </tr> | ||
<tr valign="middle"> | <tr valign="middle"> | ||
Revision as of 16:25, 14 July 2019
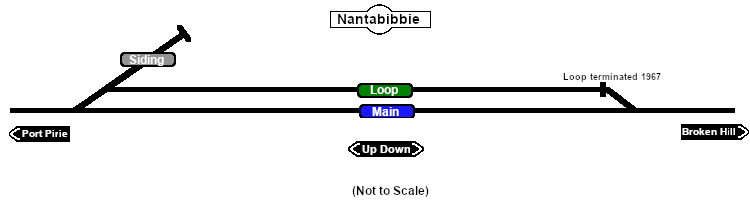
Main Line with a Passing Loop. Unmanned location on the Peterborough to Paratoo section of the Port Pirie to Broken Hill line.
|
 |
|||||||||||||||||||||||||||||||||||||||||||||||||||||
