How to Use Track Markers
m (→Route or Session?) |
m (→Adding a Track Marker) |
||
| Line 100: | Line 100: | ||
When placed, the properties window for the Track Marker will appear.<br> | When placed, the properties window for the Track Marker will appear.<br> | ||
[[file:TrackMarkProperties.png|link=]]<br><br> | [[file:TrackMarkProperties.png|link=]]<br><br> | ||
| − | </td> | + | Enter a name for the Track Marker and, if needed, select a layer.</td> |
</tr> | </tr> | ||
</table> | </table> | ||
Revision as of 07:29, 18 February 2020
The information in this Wiki Page applies to TANE, TRS19 and Trainz Plus.
Contents |
What are Track Markers?
| In Summary: | |
| Track Markers are red coloured track objects that are invisible in Driver Mode but visible in Surveyor Mode. They are used as destinations or waypoints for AI driver commands | |
| Track Markers only work on AI controlled trains. They have no effect on manually controlled trains | |
| The direction that a Track Marker faces has NO effect on its operation | |
Trainz relies heavily on Track Markers to direct trains around a layout under the control of the AI system.
Route or Session?
| Track Markers can be placed in a Route layer or in a Session layer |
Notes:
|
 |
Information on Route and Session layers can be found at:- |
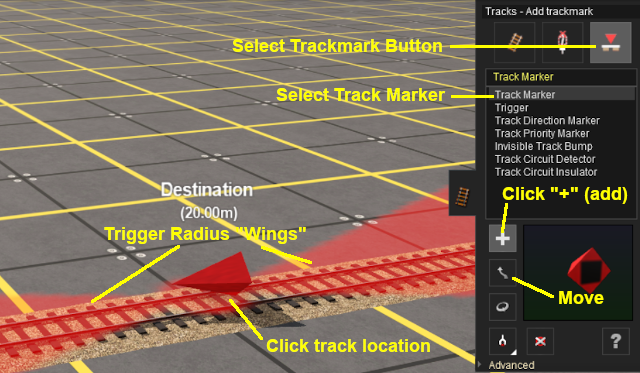
Adding a Track Marker
| Notes: A Track Marker has two important properties:-
|
 |
When placed, the properties window for the Track Marker will appear. |
||||||

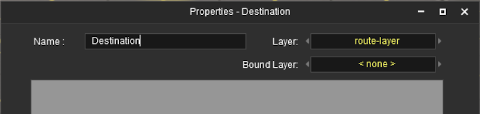
| Enter a useful name for each Track Marker - the name will be needed for driver commands. Most creators base the name on the location (e.g. "Maintown Track 1 North") |
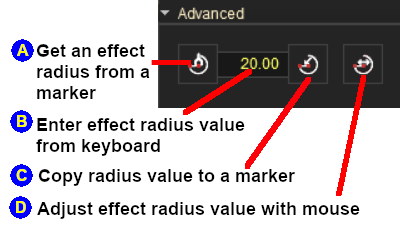
Setting the Trigger Radius
At the bottom of the Track Tools flyout menu is an Advanced button. Click this button to open the Track Marker advanced tool set.
 |
|
||||||
| Once you have a Trigger Radius entered in the value box, you can apply it to any number of Track Markers by using method |
Track Marker Operation
The most common use for Track Markers is as destinations for driver commands or as "way points" to direct a train to a destination via one or more intermediate places. They can also be used as the targets for Navigation Points and coupling operations.
|
Information on adding driver commands can be found at:- |
| Drive To Trackmark and Drive Via Trackmark commands will NOT force the AI to find a clear path to the Track Marker if the shortest path is blocked | |
| Navigate To Trackmark and Navigate Via Trackmark commands will force the AI to find a clear path to the Track Marker if the shortest path is blocked. The path chosen may not be prototypical |
 |
Drive To Trackmark Instructs the AI driver to Drive, via the shortest available path, to the designated Track Marker. The AI will noticeably slow the train as it approaches the Track Marker. Switches ahead of the train that are not locked against the AI will be set to allow the train to proceed and reset after the train has cleared the switch. The AI driver will NOT attempt to find a way around blockages when calculating the shortest path to the Track Marker. All signals and speed signs along the route are obeyed. |
 |
Drive Via Trackmark Instructs the AI driver to Drive, via the shortest available path, to and through the designated Track Marker. If there are no further navigation commands (e.g. Drive To, etc) then the AI will halt the train after passing the Track Marker. If there are further navigation commands then the AI will proceed through the Track Marker to the next Track Marker or Industry at normal speed. Switches ahead of the train that are not locked against the AI will be set to allow the train to proceed and reset after the train has cleared the switch. The AI driver will NOT attempt to find a way around blockages when calculating the shortest path to the Track Marker. All signals and speed signs along the route are obeyed. |
|
Navigate To Trackmark Instructs the AI driver to Drive, via the shortest available path, to the designated Track Marker. The AI will noticeably slow the train as it approaches the Track Marker. Switches ahead of the train that are not locked against the AI will be set to allow the train to proceed and reset after the train has cleared the switch. The AI driver will attempt to find a way around blockages when calculating the shortest path to the Track Marker. All signals and speed signs along the route are obeyed. |
|
Navigate Via Trackmark Instructs the AI driver to Drive, via the shortest available path, to and through the designated Track Marker. If there are no further navigation commands (e.g. Navigate To, etc) then the AI will halt the train after passing the Track Marker. If there are further navigation commands then the AI will proceed through the Track Marker to the next Track Marker or Industry at normal speed. Switches ahead of the train that are not locked against the AI will be set to allow the train to proceed and reset after the train has cleared the switch. The AI driver will attempt to find a way around blockages when calculating the shortest path to the Track Marker. All signals and speed signs along the route are obeyed. |
Navigation Points can be attached to Track Markers to provide users with session instructions.
|
Information on navigation points can be found at:- |
Coupling Operations
An AI controlled train can be issued with a driver command to couple with the consist located at a specified Track Marker.
 |
The AI driver moves the train (or just the locomotive if it is by itself) to couple with the wagon that is closest to a specified trackmark. More information on this command can be found at This command must be downloaded from the DLS and installed in Trainz |
|
Information on adding driver commands can be found at:- |
Related Links
|
Trainz Wiki
 |
More Tutorials and Guides to Using Trainz |