How to Use Environment Tools
m |
m (replaced all <font> and <u> tags with <span style=...> tags, removed all image hyperlinks) |
||
| Line 5: | Line 5: | ||
<table cellpadding="4" bgcolor=#ffffb0> | <table cellpadding="4" bgcolor=#ffffb0> | ||
<tr valign="top"> | <tr valign="top"> | ||
| − | <td>[[file:NotePad.PNG]]</td> | + | <td>[[file:NotePad.PNG|link=]]</td> |
| − | <td><font size | + | <td><span style="font-size: 17px;">'''Notes:'''</span><br> |
The Environment Tools are used to set:- | The Environment Tools are used to set:- | ||
*the '''skybox''' - to configure the cloud cover | *the '''skybox''' - to configure the cloud cover | ||
| Line 20: | Line 20: | ||
</tr> | </tr> | ||
<tr valign="top"> | <tr valign="top"> | ||
| − | <td>[[file:PencilTips.PNG]]</td> | + | <td>[[file:PencilTips.PNG|link=]]</td> |
| − | <td>The '''Time of Day''' is set using Session rules such as [[file:WikiLink.PNG]] '''[[Session_Rule_List_with_Parameters#Startup_Options_Rule|Startup Option Rule]]''' and [[file:WikiLink.PNG]] '''[[Session_Rule_List_with_Parameters#Time_and_Rate_Rule|Time and Rate Rule]]'''</td> | + | <td>The '''Time of Day''' is set using Session rules such as [[file:WikiLink.PNG|link=]] '''[[Session_Rule_List_with_Parameters#Startup_Options_Rule|Startup Option Rule]]''' and [[file:WikiLink.PNG|link=]] '''[[Session_Rule_List_with_Parameters#Time_and_Rate_Rule|Time and Rate Rule]]'''</td> |
</tr> | </tr> | ||
</table> | </table> | ||
| Line 27: | Line 27: | ||
<table cellpadding="4" bgcolor=#ffffb0> | <table cellpadding="4" bgcolor=#ffffb0> | ||
<tr valign="top"> | <tr valign="top"> | ||
| − | <td>[[file:NotePad.PNG]]</td> | + | <td>[[file:NotePad.PNG|link=]]</td> |
| − | <td><font size | + | <td><span style="font-size: 17px;">'''Notes:'''</span><br> |
There is no '''Save''' button on the Environment Tools Window. As soon as you enter or select a setting it will be saved. When finished editing simply click the window '''Off''' button.</td> | There is no '''Save''' button on the Environment Tools Window. As soon as you enter or select a setting it will be saved. When finished editing simply click the window '''Off''' button.</td> | ||
</tr> | </tr> | ||
| Line 35: | Line 35: | ||
<table cellpadding="4" bgcolor=#c1e7e7> | <table cellpadding="4" bgcolor=#c1e7e7> | ||
<tr valign="top"> | <tr valign="top"> | ||
| − | <td>[[file:DotPoint.JPG]]</td> | + | <td>[[file:DotPoint.JPG|link=]]</td> |
<td>The '''World Origin''' and '''Date''' settings are used to set the current season e.g. January = Summer in the Southern Hemisphere and Winter in the Northern Hemisphere</td> | <td>The '''World Origin''' and '''Date''' settings are used to set the current season e.g. January = Summer in the Southern Hemisphere and Winter in the Northern Hemisphere</td> | ||
</tr> | </tr> | ||
| Line 44: | Line 44: | ||
<table> | <table> | ||
<tr valign="top"> | <tr valign="top"> | ||
| − | <td>[[file:EnvironmentLaunch.PNG]]</td> | + | <td>[[file:EnvironmentLaunch.PNG|link=]]</td> |
<td>Open the '''Environment Tools Editor''' from the '''Surveyor Main Menu''' as shown on the left.<br><br> | <td>Open the '''Environment Tools Editor''' from the '''Surveyor Main Menu''' as shown on the left.<br><br> | ||
This will open the ''Environment Properties Window'' as shown below. | This will open the ''Environment Properties Window'' as shown below. | ||
| Line 50: | Line 50: | ||
<table> | <table> | ||
<tr valign="bottom"> | <tr valign="bottom"> | ||
| − | <td>[[file:EnvironmentControls.PNG]] | + | <td>[[file:EnvironmentControls.PNG|link=]] |
</td> | </td> | ||
<td> | <td> | ||
'''TRS19''' has an additional control that adjusts the lighting level, as shown below<br> | '''TRS19''' has an additional control that adjusts the lighting level, as shown below<br> | ||
| − | [[file:EnvironmentControlsTS19.PNG]] | + | [[file:EnvironmentControlsTS19.PNG|link=]] |
</td> | </td> | ||
</tr> | </tr> | ||
| Line 69: | Line 69: | ||
<table cellpadding="4" bgcolor=#c1e7e7> | <table cellpadding="4" bgcolor=#c1e7e7> | ||
<tr valign="top"> | <tr valign="top"> | ||
| − | <td>[[file:DotPoint.JPG]]</td> | + | <td>[[file:DotPoint.JPG|link=]]</td> |
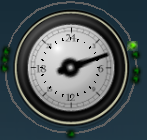
<td>The dial shown is a 24 hour clock that sets the lighting conditions at selected times of the day and night</td> | <td>The dial shown is a 24 hour clock that sets the lighting conditions at selected times of the day and night</td> | ||
</tr> | </tr> | ||
| Line 76: | Line 76: | ||
<table> | <table> | ||
<tr valign="top"> | <tr valign="top"> | ||
| − | <td>[[file:EnvironmentLighting.PNG]]</td> | + | <td>[[file:EnvironmentLighting.PNG|link=]]</td> |
<td> | <td> | ||
<table> | <table> | ||
<tr valign="top"> | <tr valign="top"> | ||
| − | <td>[[file:EnvironmentCycle.PNG]]</td> | + | <td>[[file:EnvironmentCycle.PNG|link=]]</td> |
<td> | <td> | ||
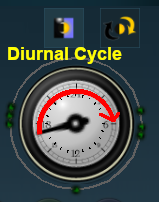
==='''The Diurnal Cycle'''=== | ==='''The Diurnal Cycle'''=== | ||
| Line 89: | Line 89: | ||
</tr> | </tr> | ||
<tr valign="top"> | <tr valign="top"> | ||
| − | <td>[[file:Steps.PNG]]</td> | + | <td>[[file:Steps.PNG|link=]]</td> |
| − | <td><font size | + | <td><span style="font-size: 17px;">'''Steps:'''</span><br> |
*Click the '''Diurnal Cycle''' button to set the clock running through the full 24 hour cycle in just 30 seconds | *Click the '''Diurnal Cycle''' button to set the clock running through the full 24 hour cycle in just 30 seconds | ||
*Click it again to stop the cycle | *Click it again to stop the cycle | ||
| Line 107: | Line 107: | ||
<table cellpadding="4" bgcolor=#c1e7e7> | <table cellpadding="4" bgcolor=#c1e7e7> | ||
<tr valign="top"> | <tr valign="top"> | ||
| − | <td>[[file:DotPoint.JPG]]</td> | + | <td>[[file:DotPoint.JPG|link=]]</td> |
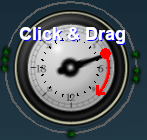
<td>You can select a specific time by dragging the clock pointer arm to the corresponding position on the clock dial.</td> | <td>You can select a specific time by dragging the clock pointer arm to the corresponding position on the clock dial.</td> | ||
</tr> | </tr> | ||
| Line 113: | Line 113: | ||
<table> | <table> | ||
<tr> | <tr> | ||
| − | <td>[[file:EnvironmentSetDial.PNG]]</td> | + | <td>[[file:EnvironmentSetDial.PNG|link=]]</td> |
<td>The scene shown in Surveyor will display the lighting conditions that correspond to the time shown on the clock</td> | <td>The scene shown in Surveyor will display the lighting conditions that correspond to the time shown on the clock</td> | ||
</tr> | </tr> | ||
| Line 128: | Line 128: | ||
<table cellpadding="4" bgcolor=#c1e7e7> | <table cellpadding="4" bgcolor=#c1e7e7> | ||
<tr valign="top"> | <tr valign="top"> | ||
| − | <td>[[file:DotPoint.JPG]]</td> | + | <td>[[file:DotPoint.JPG|link=]]</td> |
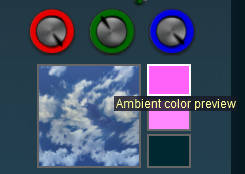
<td>Each dot is a '''Control Point''' that sets the specific '''Red''', '''Green''' and '''Blue''' colour values, and other lighting features, at the time shown on the clock</td> | <td>Each dot is a '''Control Point''' that sets the specific '''Red''', '''Green''' and '''Blue''' colour values, and other lighting features, at the time shown on the clock</td> | ||
</tr> | </tr> | ||
| Line 135: | Line 135: | ||
<table> | <table> | ||
<tr valign="top"> | <tr valign="top"> | ||
| − | <td>[[file:EnvironmentSelectPoint.PNG]]</td> | + | <td>[[file:EnvironmentSelectPoint.PNG|link=]]</td> |
<td> | <td> | ||
<table cellpadding="4" bgcolor=#ffffff> | <table cellpadding="4" bgcolor=#ffffff> | ||
| Line 143: | Line 143: | ||
</tr> | </tr> | ||
<tr valign="top"> | <tr valign="top"> | ||
| − | <td>[[file:Steps.PNG]]</td> | + | <td>[[file:Steps.PNG|link=]]</td> |
| − | <td><font size | + | <td><span style="font-size: 17px;">'''Steps:'''</span><br> |
*Select, by clicking, one of the green points around the ring | *Select, by clicking, one of the green points around the ring | ||
*The clock dial will immediately point to the selected dot and time | *The clock dial will immediately point to the selected dot and time | ||
| − | The ''control point'' will be highlighted and the '''RGB Wheels''' will display '''one set''' of '''< | + | The ''control point'' will be highlighted and the '''RGB Wheels''' will display '''one set''' of '''<span style="text-decoration: underline;">R</span>'''ed '''<span style="text-decoration: underline;">G</span>'''reen and '''<span style="text-decoration: underline;">B</span>'''lue values that have been set at that point |
<br> | <br> | ||
| − | [[file:EnvironmentShowRGB.PNG]]</td> | + | [[file:EnvironmentShowRGB.PNG|link=]]</td> |
</tr> | </tr> | ||
<tr> | <tr> | ||
| Line 162: | Line 162: | ||
<table cellpadding="4" bgcolor=#c1e7e7> | <table cellpadding="4" bgcolor=#c1e7e7> | ||
<tr valign="top"> | <tr valign="top"> | ||
| − | <td>[[file:DotPoint.JPG]]</td> | + | <td>[[file:DotPoint.JPG|link=]]</td> |
<td>'''Each colour value can be altered by dragging its needle point to a new position around the dial.''' Each new position will change the balance between the 3 colours and will alter the lighting displayed in the scene at that particular time.</td> | <td>'''Each colour value can be altered by dragging its needle point to a new position around the dial.''' Each new position will change the balance between the 3 colours and will alter the lighting displayed in the scene at that particular time.</td> | ||
</tr> | </tr> | ||
| Line 171: | Line 171: | ||
<table cellpadding="4" bgcolor=#ffffb0> | <table cellpadding="4" bgcolor=#ffffb0> | ||
<tr valign="top"> | <tr valign="top"> | ||
| − | <td>[[file:NotePad.PNG]]</td> | + | <td>[[file:NotePad.PNG|link=]]</td> |
| − | <td><font size | + | <td><span style="font-size: 17px;">'''Notes:'''</span><br> |
Each ''control point'' stores the '''RGB''' values for three different types of lighting in the scene. | Each ''control point'' stores the '''RGB''' values for three different types of lighting in the scene. | ||
*The '''Ambient Colour''' which is the ''directional lighting'' and mostly affects the ''hue'' of buildings and other scenery objects | *The '''Ambient Colour''' which is the ''directional lighting'' and mostly affects the ''hue'' of buildings and other scenery objects | ||
| Line 185: | Line 185: | ||
<table> | <table> | ||
<tr valign="top"> | <tr valign="top"> | ||
| − | <td>[[file:EnvironmentAmbientColour.PNG]]</td> | + | <td>[[file:EnvironmentAmbientColour.PNG|link=]]</td> |
<td> | <td> | ||
<table cellpadding="4" bgcolor=#ffffff> | <table cellpadding="4" bgcolor=#ffffff> | ||
| Line 193: | Line 193: | ||
</tr> | </tr> | ||
<tr valign="top"> | <tr valign="top"> | ||
| − | <td>[[file:Steps.PNG]]</td> | + | <td>[[file:Steps.PNG|link=]]</td> |
| − | <td><font size | + | <td><span style="font-size: 17px;">'''Steps:'''</span><br> |
*Click on the top box of the three. This is the '''Ambient Colour''' | *Click on the top box of the three. This is the '''Ambient Colour''' | ||
*The dials will show the '''RGB''' values for the '''Ambient Colour''' at the selected time | *The dials will show the '''RGB''' values for the '''Ambient Colour''' at the selected time | ||
| Line 212: | Line 212: | ||
<table> | <table> | ||
<tr valign="top"> | <tr valign="top"> | ||
| − | <td>[[file:EnvironmentSunColour.PNG]]</td> | + | <td>[[file:EnvironmentSunColour.PNG|link=]]</td> |
<td> | <td> | ||
<table cellpadding="4" bgcolor=#ffffff> | <table cellpadding="4" bgcolor=#ffffff> | ||
| Line 220: | Line 220: | ||
</tr> | </tr> | ||
<tr valign="top"> | <tr valign="top"> | ||
| − | <td>[[file:Steps.PNG]]</td> | + | <td>[[file:Steps.PNG|link=]]</td> |
| − | <td><font size | + | <td><span style="font-size: 17px;">'''Steps:'''</span><br> |
*Click on the middle box of the three. This is the '''Sun Colour''' | *Click on the middle box of the three. This is the '''Sun Colour''' | ||
*The dials will show the '''RGB''' values for the '''Sun Colour''' at the selected time | *The dials will show the '''RGB''' values for the '''Sun Colour''' at the selected time | ||
| Line 239: | Line 239: | ||
<table> | <table> | ||
<tr valign="top"> | <tr valign="top"> | ||
| − | <td>[[file:EnvironmentWaterColour.PNG]]</td> | + | <td>[[file:EnvironmentWaterColour.PNG|link=]]</td> |
<td> | <td> | ||
<table cellpadding="4" bgcolor=#fcbcbc> | <table cellpadding="4" bgcolor=#fcbcbc> | ||
<tr valign="top"> | <tr valign="top"> | ||
| − | <td>[[file:Stop.PNG]]</td> | + | <td>[[file:Stop.PNG|link=]]</td> |
<td>'''Water Colour values set for one ''control point'' become the values for ALL the ''control points''</td> | <td>'''Water Colour values set for one ''control point'' become the values for ALL the ''control points''</td> | ||
</tr> | </tr> | ||
| Line 253: | Line 253: | ||
</tr> | </tr> | ||
<tr valign="top"> | <tr valign="top"> | ||
| − | <td>[[file:Steps.PNG]]</td> | + | <td>[[file:Steps.PNG|link=]]</td> |
| − | <td><font size | + | <td><span style="font-size: 17px;">'''Steps:'''</span><br> |
*Click on the bottom box of the three. This is the '''Water Colour''' | *Click on the bottom box of the three. This is the '''Water Colour''' | ||
*The dials will show the '''RGB''' values for the '''Water Colour''' | *The dials will show the '''RGB''' values for the '''Water Colour''' | ||
| Line 273: | Line 273: | ||
<table cellpadding="4" bgcolor=#ffffb0> | <table cellpadding="4" bgcolor=#ffffb0> | ||
<tr valign="top"> | <tr valign="top"> | ||
| − | <td>[[file:NotePad.PNG]]</td> | + | <td>[[file:NotePad.PNG|link=]]</td> |
| − | <td><font size | + | <td><span style="font-size: 17px;">'''Notes:'''</span><br> |
Getting the "right colours" can be more of an art than a science. To set the exact colour you want means mixing the correct quantities of '''Red''', '''Green''' and '''Blue'''. Each of these colours has 256 different values from 0 to 255 that, when combined, produce over 16 million different possible colours - but many monitors and most eyeballs will not be able to tell the differences between many of those 16 million colours.</td> | Getting the "right colours" can be more of an art than a science. To set the exact colour you want means mixing the correct quantities of '''Red''', '''Green''' and '''Blue'''. Each of these colours has 256 different values from 0 to 255 that, when combined, produce over 16 million different possible colours - but many monitors and most eyeballs will not be able to tell the differences between many of those 16 million colours.</td> | ||
</tr> | </tr> | ||
| Line 281: | Line 281: | ||
<table cellpadding="4" bgcolor=#ffffb0 width="750"> | <table cellpadding="4" bgcolor=#ffffb0 width="750"> | ||
<tr valign="top"> | <tr valign="top"> | ||
| − | <td width="25">[[file:PencilTips.PNG]]</td> | + | <td width="25">[[file:PencilTips.PNG|link=]]</td> |
<td>Setting all three colours to the same values will produce monotones from '''Black''' to '''White''' with 254 different shades of gray between those two tones.<br><br> | <td>Setting all three colours to the same values will produce monotones from '''Black''' to '''White''' with 254 different shades of gray between those two tones.<br><br> | ||
<table cellpadding="4" bgcolor=#c1e7e7> | <table cellpadding="4" bgcolor=#c1e7e7> | ||
<tr valign="top"> | <tr valign="top"> | ||
| − | <td>[[file:DotPoint.JPG]]</td> | + | <td>[[file:DotPoint.JPG|link=]]</td> |
<td>You can quickly set all three dials to the exact same value by holding down the '''Shift key''' as you click on a dial position on ''any one of the three dials''.</td> | <td>You can quickly set all three dials to the exact same value by holding down the '''Shift key''' as you click on a dial position on ''any one of the three dials''.</td> | ||
</tr> | </tr> | ||
| Line 302: | Line 302: | ||
</tr> | </tr> | ||
<tr valign="top"> | <tr valign="top"> | ||
| − | <td>[[file:EnvironmentAmbientColour01.PNG]]</td> | + | <td>[[file:EnvironmentAmbientColour01.PNG|link=]]</td> |
| − | <td>[[file:EnvironmentAmbientColour02.PNG]]</td> | + | <td>[[file:EnvironmentAmbientColour02.PNG|link=]]</td> |
| − | <td>[[file:EnvironmentAmbientColour03.PNG]]</td> | + | <td>[[file:EnvironmentAmbientColour03.PNG|link=]]</td> |
</tr> | </tr> | ||
<tr valign="top"> | <tr valign="top"> | ||
| Line 319: | Line 319: | ||
<table cellpadding="4" bgcolor=#c1e7e7> | <table cellpadding="4" bgcolor=#c1e7e7> | ||
<tr valign="top"> | <tr valign="top"> | ||
| − | <td>[[file:DotPoint.JPG]]</td> | + | <td>[[file:DotPoint.JPG|link=]]</td> |
<td>Setting both the '''Ambient''' and '''Sun''' colours to different shades of grey for the clock control points can solve many brightness issues - as shown in the example below.</td> | <td>Setting both the '''Ambient''' and '''Sun''' colours to different shades of grey for the clock control points can solve many brightness issues - as shown in the example below.</td> | ||
</tr> | </tr> | ||
| Line 328: | Line 328: | ||
<table cellpadding="4" bgcolor=#ffffb0 width=600> | <table cellpadding="4" bgcolor=#ffffb0 width=600> | ||
<tr valign="top"> | <tr valign="top"> | ||
| − | <td>[[file:NotePad.PNG]] <font size | + | <td>[[file:NotePad.PNG|link=]] <span style="font-size: 17px;">'''Example 1: Setting Greys Scale Values for the Ambient and Sun Colours'''</span></td> |
</tr> | </tr> | ||
<tr valign="top"> | <tr valign="top"> | ||
| Line 345: | Line 345: | ||
<tr valign="top"> | <tr valign="top"> | ||
<td align="right"><br>'''Ambient'''<br><br>'''Sun'''</td> | <td align="right"><br>'''Ambient'''<br><br>'''Sun'''</td> | ||
| − | <td align="center">[[file:Environment0600.png]]</td> | + | <td align="center">[[file:Environment0600.png|link=]]</td> |
| − | <td align="center">[[file:Environment0700.png]]</td> | + | <td align="center">[[file:Environment0700.png|link=]]</td> |
| − | <td align="center">[[file:Environment1000.png]]</td> | + | <td align="center">[[file:Environment1000.png|link=]]</td> |
| − | <td align="center">[[file:Environment1200.png]]</td> | + | <td align="center">[[file:Environment1200.png|link=]]</td> |
| − | <td align="center">[[file:Environment1800.png]]</td> | + | <td align="center">[[file:Environment1800.png|link=]]</td> |
</tr> | </tr> | ||
<tr valign="top"> | <tr valign="top"> | ||
| Line 383: | Line 383: | ||
<table cellpadding="4" bgcolor=#ffffb0 width=500> | <table cellpadding="4" bgcolor=#ffffb0 width=500> | ||
<tr valign="top"> | <tr valign="top"> | ||
| − | <td>[[file:NotePad.PNG]] <font size | + | <td>[[file:NotePad.PNG|link=]] <span style="font-size: 17px;">'''Example 2: Setting a Water Colour'''</span></td> |
</tr> | </tr> | ||
<tr valign="top"> | <tr valign="top"> | ||
| Line 391: | Line 391: | ||
<table cellpadding="4" bgcolor=#ffffb0 width=500> | <table cellpadding="4" bgcolor=#ffffb0 width=500> | ||
<tr> | <tr> | ||
| − | <td>[[file:BlueMix01.PNG]]</td> | + | <td>[[file:BlueMix01.PNG|link=]]</td> |
<td colspan="2">Starting with pure Blue<br> | <td colspan="2">Starting with pure Blue<br> | ||
'''R = 0; G = 0; B = 255'''</td> | '''R = 0; G = 0; B = 255'''</td> | ||
</tr> | </tr> | ||
<tr> | <tr> | ||
| − | <td>[[file:BlueMix02.PNG]]</td> | + | <td>[[file:BlueMix02.PNG|link=]]</td> |
<td colspan="2">Add pure Green to make the colour Cyan<br> | <td colspan="2">Add pure Green to make the colour Cyan<br> | ||
'''R = 0; G = 255; B = 255'''</td> | '''R = 0; G = 255; B = 255'''</td> | ||
</tr> | </tr> | ||
<tr> | <tr> | ||
| − | <td>[[file:BlueMix03.PNG]]</td> | + | <td>[[file:BlueMix03.PNG|link=]]</td> |
<td colspan="2">Scale back (darken) the Green<br> | <td colspan="2">Scale back (darken) the Green<br> | ||
'''R = 0; G = 155; B = 255'''</td> | '''R = 0; G = 155; B = 255'''</td> | ||
</tr> | </tr> | ||
<tr> | <tr> | ||
| − | <td>[[file:BlueMix04.PNG]]</td> | + | <td>[[file:BlueMix04.PNG|link=]]</td> |
<td colspan="2">Scale back a bit more<br> | <td colspan="2">Scale back a bit more<br> | ||
'''R = 0; G = 128; B = 255'''</td> | '''R = 0; G = 128; B = 255'''</td> | ||
</tr> | </tr> | ||
<tr> | <tr> | ||
| − | <td>[[file:BlueMix05.PNG]]</td> | + | <td>[[file:BlueMix05.PNG|link=]]</td> |
<td colspan="2">Add some Red<br> | <td colspan="2">Add some Red<br> | ||
'''R = 75; G = 128; B = 255'''</td> | '''R = 75; G = 128; B = 255'''</td> | ||
| Line 425: | Line 425: | ||
<tr valign="top"> | <tr valign="top"> | ||
<td> | <td> | ||
| − | [[file:EnvironmentControlsTS19.PNG]] | + | [[file:EnvironmentControlsTS19.PNG|link=]] |
</td> | </td> | ||
<td> | <td> | ||
| Line 434: | Line 434: | ||
</tr> | </tr> | ||
<tr valign="top"> | <tr valign="top"> | ||
| − | <td>[[file:Steps.PNG]]</td> | + | <td>[[file:Steps.PNG|link=]]</td> |
| − | <td><font size | + | <td><span style="font-size: 17px;">'''Steps:'''</span><br> |
Select a control point, then:- | Select a control point, then:- | ||
*Move the slider to the '''BOTTOM''' to give '''maximum''' brightness level | *Move the slider to the '''BOTTOM''' to give '''maximum''' brightness level | ||
| Line 456: | Line 456: | ||
<table cellpadding="4" bgcolor=#c1e7e7> | <table cellpadding="4" bgcolor=#c1e7e7> | ||
<tr valign="top"> | <tr valign="top"> | ||
| − | <td>[[file:DotPoint.JPG]]</td> | + | <td>[[file:DotPoint.JPG|link=]]</td> |
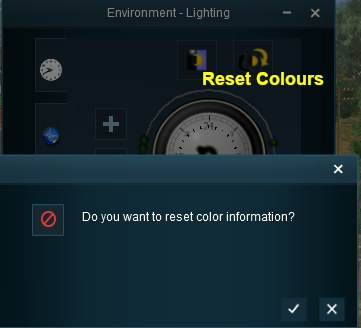
<td>All the lighting colour settings can be reset back to the '''TRS19/TANE''' default colours.</td> | <td>All the lighting colour settings can be reset back to the '''TRS19/TANE''' default colours.</td> | ||
</tr> | </tr> | ||
| Line 463: | Line 463: | ||
<table> | <table> | ||
<tr valign="top"> | <tr valign="top"> | ||
| − | <td>[[file:EnvironmentReset.PNG]]</td> | + | <td>[[file:EnvironmentReset.PNG|link=]]</td> |
<td> | <td> | ||
<table cellpadding="4" bgcolor=#ffffff> | <table cellpadding="4" bgcolor=#ffffff> | ||
| Line 471: | Line 471: | ||
</tr> | </tr> | ||
<tr valign="top"> | <tr valign="top"> | ||
| − | <td>[[file:Steps.PNG]]</td> | + | <td>[[file:Steps.PNG|link=]]</td> |
| − | <td><font size | + | <td><span style="font-size: 17px;">'''Steps:'''</span><br> |
*Click the '''Color Reset''' button, then either:- | *Click the '''Color Reset''' button, then either:- | ||
| − | **Click the [[file:Tick.PNG]] icon to accept the reset, or | + | **Click the [[file:Tick.PNG|link=]] icon to accept the reset, or |
| − | **Click the [[file:Cross.PNG]] icon to reject the reset</td> | + | **Click the [[file:Cross.PNG|link=]] icon to reject the reset</td> |
</tr> | </tr> | ||
<tr> | <tr> | ||
| Line 490: | Line 490: | ||
<table cellpadding="4" bgcolor=#c1e7e7> | <table cellpadding="4" bgcolor=#c1e7e7> | ||
<tr valign="top"> | <tr valign="top"> | ||
| − | <td>[[file:DotPoint.JPG]]</td> | + | <td>[[file:DotPoint.JPG|link=]]</td> |
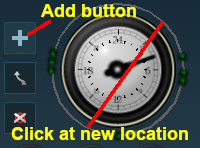
<td>New ''control points'' can be added to the clock dial</td> | <td>New ''control points'' can be added to the clock dial</td> | ||
</tr> | </tr> | ||
| Line 497: | Line 497: | ||
<table> | <table> | ||
<tr valign="top"> | <tr valign="top"> | ||
| − | <td>[[file:EnvironmentAddControlPoint.PNG]]</td> | + | <td>[[file:EnvironmentAddControlPoint.PNG|link=]]</td> |
<td> | <td> | ||
<table cellpadding="4" bgcolor=#ffffff> | <table cellpadding="4" bgcolor=#ffffff> | ||
| Line 505: | Line 505: | ||
</tr> | </tr> | ||
<tr valign="top"> | <tr valign="top"> | ||
| − | <td>[[file:Steps.PNG]]</td> | + | <td>[[file:Steps.PNG|link=]]</td> |
| − | <td><font size | + | <td><span style="font-size: 17px;">'''Steps:'''</span><br> |
| − | #Click the '''Add''' button [[file:EnvironmentAddPointButton.PNG]] | + | #Click the '''Add''' button [[file:EnvironmentAddPointButton.PNG|link=]] |
#Click on the ring at the place where the new ''control point'' is to be located | #Click on the ring at the place where the new ''control point'' is to be located | ||
</td> | </td> | ||
| Line 515: | Line 515: | ||
<table cellpadding="4" bgcolor=#ffffb0> | <table cellpadding="4" bgcolor=#ffffb0> | ||
<tr valign="top"> | <tr valign="top"> | ||
| − | <td>[[file:NotePad.PNG]]</td> | + | <td>[[file:NotePad.PNG|link=]]</td> |
| − | <td><font size | + | <td><span style="font-size: 17px;">'''Notes:'''</span><br> |
The '''Add''' button will remain active (selected) until it is deactivated so clicking on the ring again will add another control point. The button can be deactivated by clicking on it or by selecting another button</td> | The '''Add''' button will remain active (selected) until it is deactivated so clicking on the ring again will add another control point. The button can be deactivated by clicking on it or by selecting another button</td> | ||
</tr> | </tr> | ||
| Line 528: | Line 528: | ||
<table cellpadding="4" bgcolor=#ffffb0> | <table cellpadding="4" bgcolor=#ffffb0> | ||
<tr valign="top"> | <tr valign="top"> | ||
| − | <td>[[file:NotePad.PNG]]</td> | + | <td>[[file:NotePad.PNG|link=]]</td> |
| − | <td><font size | + | <td><span style="font-size: 17px;">'''Notes:'''</span><br> |
During the running of a Session the lighting will "morph" or "transform" at a steady rate from the set of colour values at one control point to the set of colour values at the next control point. Click the '''Diurnal Cycle''' button for a demonstration. | During the running of a Session the lighting will "morph" or "transform" at a steady rate from the set of colour values at one control point to the set of colour values at the next control point. Click the '''Diurnal Cycle''' button for a demonstration. | ||
*If the ''control points'' are far apart then the transition will be gradual | *If the ''control points'' are far apart then the transition will be gradual | ||
| Line 544: | Line 544: | ||
<table cellpadding="4" bgcolor=#c1e7e7> | <table cellpadding="4" bgcolor=#c1e7e7> | ||
<tr valign="top"> | <tr valign="top"> | ||
| − | <td>[[file:DotPoint.JPG]]</td> | + | <td>[[file:DotPoint.JPG|link=]]</td> |
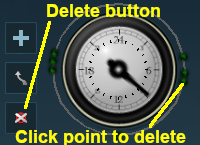
<td>Existing ''control points'' can be deleted</td> | <td>Existing ''control points'' can be deleted</td> | ||
</tr> | </tr> | ||
| Line 551: | Line 551: | ||
<table> | <table> | ||
<tr valign="top"> | <tr valign="top"> | ||
| − | <td>[[file:EnvironmentDeletePoint.PNG]]</td> | + | <td>[[file:EnvironmentDeletePoint.PNG|link=]]</td> |
<td> | <td> | ||
<table cellpadding="4" bgcolor=#ffffff> | <table cellpadding="4" bgcolor=#ffffff> | ||
| Line 559: | Line 559: | ||
</tr> | </tr> | ||
<tr valign="top"> | <tr valign="top"> | ||
| − | <td>[[file:Steps.PNG]]</td> | + | <td>[[file:Steps.PNG|link=]]</td> |
| − | <td><font size | + | <td><span style="font-size: 17px;">'''Steps:'''</span><br> |
| − | #Click the '''Delete''' button [[file:EnvironmentDeletePointButton.PNG]] | + | #Click the '''Delete''' button [[file:EnvironmentDeletePointButton.PNG|link=]] |
#Click on the ''control point'' to be deleted | #Click on the ''control point'' to be deleted | ||
</td> | </td> | ||
| Line 569: | Line 569: | ||
<table cellpadding="4" bgcolor=#ffffb0> | <table cellpadding="4" bgcolor=#ffffb0> | ||
<tr valign="top"> | <tr valign="top"> | ||
| − | <td>[[file:NotePad.PNG]]</td> | + | <td>[[file:NotePad.PNG|link=]]</td> |
| − | <td><font size | + | <td><span style="font-size: 17px;">'''Notes:'''</span><br> |
The '''Delete''' button will remain active (selected) until it is deactivated so clicking on another control point will also delete that point. The button can be deactivated by clicking on it or by selecting another button</td> | The '''Delete''' button will remain active (selected) until it is deactivated so clicking on another control point will also delete that point. The button can be deactivated by clicking on it or by selecting another button</td> | ||
</tr> | </tr> | ||
| Line 585: | Line 585: | ||
<table cellpadding="4" bgcolor=#c1e7e7> | <table cellpadding="4" bgcolor=#c1e7e7> | ||
<tr valign="top"> | <tr valign="top"> | ||
| − | <td>[[file:DotPoint.JPG]]</td> | + | <td>[[file:DotPoint.JPG|link=]]</td> |
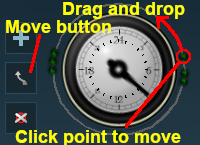
<td>Existing ''control points'' can be moved</td> | <td>Existing ''control points'' can be moved</td> | ||
</tr> | </tr> | ||
| Line 592: | Line 592: | ||
<table> | <table> | ||
<tr valign="top"> | <tr valign="top"> | ||
| − | <td>[[file:EnvironmentMoveControlPoint.PNG]]</td> | + | <td>[[file:EnvironmentMoveControlPoint.PNG|link=]]</td> |
<td> | <td> | ||
<table cellpadding="4" bgcolor=#ffffff> | <table cellpadding="4" bgcolor=#ffffff> | ||
| Line 600: | Line 600: | ||
</tr> | </tr> | ||
<tr valign="top"> | <tr valign="top"> | ||
| − | <td>[[file:Steps.PNG]]</td> | + | <td>[[file:Steps.PNG|link=]]</td> |
| − | <td><font size | + | <td><span style="font-size: 17px;">'''Steps:'''</span><br> |
| − | #Click the '''Move''' button [[file:EnvironmentMovePointButton.PNG]] | + | #Click the '''Move''' button [[file:EnvironmentMovePointButton.PNG|link=]] |
#Click on the ''control point'' to be moved and either:- | #Click on the ''control point'' to be moved and either:- | ||
::*hold the mouse button down and drag the point to its new position around the ring, or | ::*hold the mouse button down and drag the point to its new position around the ring, or | ||
| Line 611: | Line 611: | ||
<table cellpadding="4" bgcolor=#ffffb0> | <table cellpadding="4" bgcolor=#ffffb0> | ||
<tr valign="top"> | <tr valign="top"> | ||
| − | <td>[[file:NotePad.PNG]]</td> | + | <td>[[file:NotePad.PNG|link=]]</td> |
| − | <td><font size | + | <td><span style="font-size: 17px;">'''Notes:'''</span><br> |
The '''Move''' button will remain active (selected) until it is deactivated so clicking again on the ring will move the selected control point again. The button can be deactivated by clicking on it or by selecting another button</td> | The '''Move''' button will remain active (selected) until it is deactivated so clicking again on the ring will move the selected control point again. The button can be deactivated by clicking on it or by selecting another button</td> | ||
</tr> | </tr> | ||
| Line 627: | Line 627: | ||
<table cellpadding="4" bgcolor=#c1e7e7> | <table cellpadding="4" bgcolor=#c1e7e7> | ||
<tr valign="top"> | <tr valign="top"> | ||
| − | <td>[[file:DotPoint.JPG]]</td> | + | <td>[[file:DotPoint.JPG|link=]]</td> |
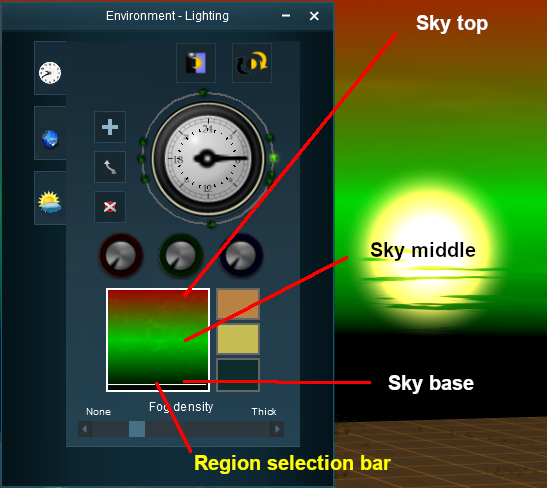
<td>The Skybox sets the sky colours in three different regions of the sky at the selected time of day, as shown in the extreme example below</td> | <td>The Skybox sets the sky colours in three different regions of the sky at the selected time of day, as shown in the extreme example below</td> | ||
</tr> | </tr> | ||
| Line 634: | Line 634: | ||
<table> | <table> | ||
<tr valign="top"> | <tr valign="top"> | ||
| − | <td>[[file:EnvironmentSkyColours.PNG]]</td> | + | <td>[[file:EnvironmentSkyColours.PNG|link=]]</td> |
<td> | <td> | ||
<table cellpadding="4" bgcolor=#ffffb0> | <table cellpadding="4" bgcolor=#ffffb0> | ||
<tr valign="top"> | <tr valign="top"> | ||
| − | <td>[[file:NotePad.PNG]]</td> | + | <td>[[file:NotePad.PNG|link=]]</td> |
| − | <td><font size | + | <td><span style="font-size: 17px;">'''Notes:'''</span><br> |
Each ''control point'' also stores the Skybox settings for that particular time.</td> | Each ''control point'' also stores the Skybox settings for that particular time.</td> | ||
</tr> | </tr> | ||
| Line 650: | Line 650: | ||
</tr> | </tr> | ||
<tr valign="top"> | <tr valign="top"> | ||
| − | <td>[[file:Steps.PNG]]</td> | + | <td>[[file:Steps.PNG|link=]]</td> |
| − | <td><font size | + | <td><span style="font-size: 17px;">'''Steps:'''</span><br> |
#Select a ''control point'' for a specific time of day | #Select a ''control point'' for a specific time of day | ||
#Click in a region of the Skybox (top, middle, bottom) - a while line or bar will appear across the selected region | #Click in a region of the Skybox (top, middle, bottom) - a while line or bar will appear across the selected region | ||
| Line 667: | Line 667: | ||
<table cellpadding="4" bgcolor=#ffffb0> | <table cellpadding="4" bgcolor=#ffffb0> | ||
<tr valign="top"> | <tr valign="top"> | ||
| − | <td>[[file:PencilTips.PNG]]</td> | + | <td>[[file:PencilTips.PNG|link=]]</td> |
<td>Do you need an '''Overcast Sky''' for your scene? | <td>Do you need an '''Overcast Sky''' for your scene? | ||
#For each daylight control point set each '''Skybox''' region (top, middle, bottom) to shades of gray (see '''Mixing Colours''' above). | #For each daylight control point set each '''Skybox''' region (top, middle, bottom) to shades of gray (see '''Mixing Colours''' above). | ||
| Line 681: | Line 681: | ||
<table cellpadding="4" bgcolor=#c1e7e7> | <table cellpadding="4" bgcolor=#c1e7e7> | ||
<tr valign="top"> | <tr valign="top"> | ||
| − | <td>[[file:DotPoint.JPG]]</td> | + | <td>[[file:DotPoint.JPG|link=]]</td> |
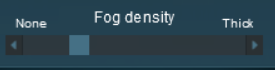
<td>This controls the level of "fog" in the scene</td> | <td>This controls the level of "fog" in the scene</td> | ||
</tr> | </tr> | ||
| Line 695: | Line 695: | ||
</tr> | </tr> | ||
<tr valign="top"> | <tr valign="top"> | ||
| − | <td>[[file:Gears.PNG]]</td> | + | <td>[[file:Gears.PNG|link=]]</td> |
| − | <td><font size | + | <td><span style="font-size: 17px;">'''Settings:'''</span><br> |
| − | [[file:EnvironmentFogSlider.PNG]]<br> | + | [[file:EnvironmentFogSlider.PNG|link=]]<br> |
#Select a ''control point'' for a specific time of day | #Select a ''control point'' for a specific time of day | ||
#Move the slider to the required position | #Move the slider to the required position | ||
| Line 710: | Line 710: | ||
<table cellpadding="4" bgcolor=#ffffb0> | <table cellpadding="4" bgcolor=#ffffb0> | ||
<tr valign="top"> | <tr valign="top"> | ||
| − | <td>[[file:NotePad.PNG]]</td> | + | <td>[[file:NotePad.PNG|link=]]</td> |
| − | <td><font size | + | <td><span style="font-size: 17px;">'''Notes:'''</span><br> |
Each ''control point'' also stores the Fog setting for that particular time.</td> | Each ''control point'' also stores the Fog setting for that particular time.</td> | ||
</tr> | </tr> | ||
| Line 717: | Line 717: | ||
<table cellpadding="4" bgcolor=#fcbcbc> | <table cellpadding="4" bgcolor=#fcbcbc> | ||
<tr valign="top"> | <tr valign="top"> | ||
| − | <td>[[file:Stop.PNG]]</td> | + | <td>[[file:Stop.PNG|link=]]</td> |
<td>Increasing the fog level can also increase the brightness level (fog does scatter light). In '''TANE''' you may need to reduce the RGB levels to compensate. In '''TRS19''' you can reduce the brightness level to compensate</td> | <td>Increasing the fog level can also increase the brightness level (fog does scatter light). In '''TANE''' you may need to reduce the RGB levels to compensate. In '''TRS19''' you can reduce the brightness level to compensate</td> | ||
</tr> | </tr> | ||
| Line 729: | Line 729: | ||
<table cellpadding="4" bgcolor=#c1e7e7> | <table cellpadding="4" bgcolor=#c1e7e7> | ||
<tr valign="top"> | <tr valign="top"> | ||
| − | <td>[[file:DotPoint.JPG]]</td> | + | <td>[[file:DotPoint.JPG|link=]]</td> |
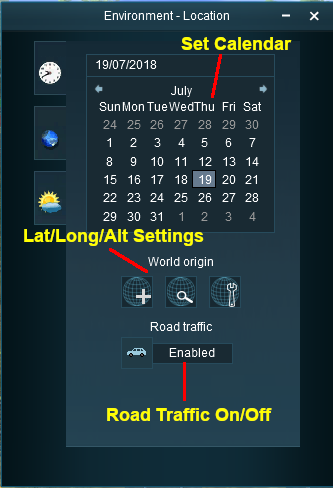
<td>The '''Location Tools''' control the geographic and date (season) data for the Route and Session</td> | <td>The '''Location Tools''' control the geographic and date (season) data for the Route and Session</td> | ||
</tr> | </tr> | ||
| Line 736: | Line 736: | ||
<table> | <table> | ||
<tr valign="top"> | <tr valign="top"> | ||
| − | <td>[[file:EnvironmentLocation.PNG]]</td> | + | <td>[[file:EnvironmentLocation.PNG|link=]]</td> |
<td> | <td> | ||
==Set Date== | ==Set Date== | ||
| Line 748: | Line 748: | ||
<table cellpadding="4" bgcolor=#c1e7e7> | <table cellpadding="4" bgcolor=#c1e7e7> | ||
<tr valign="top"> | <tr valign="top"> | ||
| − | <td>[[file:DotPoint.JPG]]</td> | + | <td>[[file:DotPoint.JPG|link=]]</td> |
<td>Setting the '''World Origin''' does NOT set regional features such as which side of the road the cars drive on. Use the '''Route Editor - Region''' setting for that</td> | <td>Setting the '''World Origin''' does NOT set regional features such as which side of the road the cars drive on. Use the '''Route Editor - Region''' setting for that</td> | ||
</tr> | </tr> | ||
<tr valign="top"> | <tr valign="top"> | ||
| − | <td>[[file:DotPoint.JPG]]</td> | + | <td>[[file:DotPoint.JPG|link=]]</td> |
<td>The '''World Origin''' is always part of a Route, not part of a Session</td> | <td>The '''World Origin''' is always part of a Route, not part of a Session</td> | ||
</tr> | </tr> | ||
| Line 759: | Line 759: | ||
<table width="740"> | <table width="740"> | ||
<tr valign="top"> | <tr valign="top"> | ||
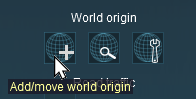
| − | <td>[[file:EnvironmentOriginAdd.PNG]]</td> | + | <td>[[file:EnvironmentOriginAdd.PNG|link=]]</td> |
<td> | <td> | ||
<table cellpadding="4" bgcolor=#ffffff> | <table cellpadding="4" bgcolor=#ffffff> | ||
| Line 767: | Line 767: | ||
</tr> | </tr> | ||
<tr valign="top"> | <tr valign="top"> | ||
| − | <td>[[file:Steps.PNG]]</td> | + | <td>[[file:Steps.PNG|link=]]</td> |
| − | <td><font size | + | <td><span style="font-size: 17px;">'''Steps:'''</span><br> |
#Move the Surveyor view to the location where you want the marker to be placed | #Move the Surveyor view to the location where you want the marker to be placed | ||
#Click on the '''Add world origin''' button | #Click on the '''Add world origin''' button | ||
| Line 780: | Line 780: | ||
</tr> | </tr> | ||
</table></td> | </table></td> | ||
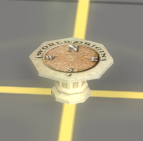
| − | <td>[[file:EnvironmentWorldOrigin.PNG]]<br>The '''World Origin''' marker</td> | + | <td>[[file:EnvironmentWorldOrigin.PNG|link=]]<br>The '''World Origin''' marker</td> |
</tr> | </tr> | ||
</table> | </table> | ||
| Line 789: | Line 789: | ||
<table> | <table> | ||
<tr valign="top"> | <tr valign="top"> | ||
| − | <td>[[file:EnvironmentOriginGo.PNG]]</td> | + | <td>[[file:EnvironmentOriginGo.PNG|link=]]</td> |
<td>Click the '''Go to world origin''' icon to move the Surveyor screen so that it is centred on the '''World Origin''' marker.</td> | <td>Click the '''Go to world origin''' icon to move the Surveyor screen so that it is centred on the '''World Origin''' marker.</td> | ||
</tr> | </tr> | ||
| Line 795: | Line 795: | ||
<table> | <table> | ||
<tr valign="top"> | <tr valign="top"> | ||
| − | <td>[[file:EnvironmentOriginEdit.PNG]]</td> | + | <td>[[file:EnvironmentOriginEdit.PNG|link=]]</td> |
<td>Click the '''Edit world origin''' icon to set or edit the '''World Origin''' data. See '''Editing the World Origin''' below.</td> | <td>Click the '''Edit world origin''' icon to set or edit the '''World Origin''' data. See '''Editing the World Origin''' below.</td> | ||
</tr> | </tr> | ||
| Line 805: | Line 805: | ||
<table> | <table> | ||
<tr valign="top"> | <tr valign="top"> | ||
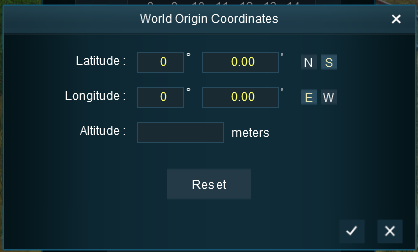
| − | <td>[[file:EnvironmentOriginEditData.PNG]]</td> | + | <td>[[file:EnvironmentOriginEditData.PNG|link=]]</td> |
<td>Enter the geographic data for the world origin. | <td>Enter the geographic data for the world origin. | ||
*Latitude and Longitude in degrees and minutes (with seconds added as the decimal fraction of the minutes - '''10'30"''' would be entered as '''10.50''') | *Latitude and Longitude in degrees and minutes (with seconds added as the decimal fraction of the minutes - '''10'30"''' would be entered as '''10.50''') | ||
| Line 813: | Line 813: | ||
<table cellpadding="4" bgcolor=#c1e7e7> | <table cellpadding="4" bgcolor=#c1e7e7> | ||
<tr valign="top"> | <tr valign="top"> | ||
| − | <td>[[file:DotPoint.JPG]]</td> | + | <td>[[file:DotPoint.JPG|link=]]</td> |
<td>Setting a high latitude value North or South will NOT change the times of sunrise or sunset. They are fixed at 06:00 and 18:00.</td> | <td>Setting a high latitude value North or South will NOT change the times of sunrise or sunset. They are fixed at 06:00 and 18:00.</td> | ||
</tr> | </tr> | ||
| Line 820: | Line 820: | ||
The '''Reset''' button sets all values to their defaults. | The '''Reset''' button sets all values to their defaults. | ||
<br> | <br> | ||
| − | Click the [[file:Tick.PNG]] icon to accept the entered data<br> | + | Click the [[file:Tick.PNG|link=]] icon to accept the entered data<br> |
| − | Click the [[file:Cross.PNG]] icon to reject the entered data | + | Click the [[file:Cross.PNG|link=]] icon to reject the entered data |
</td> | </td> | ||
</tr> | </tr> | ||
| Line 831: | Line 831: | ||
<table cellpadding="4" bgcolor=#c1e7e7> | <table cellpadding="4" bgcolor=#c1e7e7> | ||
<tr valign="top"> | <tr valign="top"> | ||
| − | <td>[[file:DotPoint.JPG]]</td> | + | <td>[[file:DotPoint.JPG|link=]]</td> |
<td>There is no delete button for the '''World Origin''' marker, but you can still delete it</td> | <td>There is no delete button for the '''World Origin''' marker, but you can still delete it</td> | ||
</tr> | </tr> | ||
| Line 842: | Line 842: | ||
</tr> | </tr> | ||
<tr valign="top"> | <tr valign="top"> | ||
| − | <td>[[file:Steps.PNG]]</td> | + | <td>[[file:Steps.PNG|link=]]</td> |
| − | <td><font size | + | <td><span style="font-size: 17px;">'''Steps:'''</span><br> |
#Open the '''Objects Tool''' in the Surveyor screen | #Open the '''Objects Tool''' in the Surveyor screen | ||
#Select the '''Delete''' tool | #Select the '''Delete''' tool | ||
| Line 857: | Line 857: | ||
<table cellpadding="4" bgcolor=#ffffb0> | <table cellpadding="4" bgcolor=#ffffb0> | ||
<tr valign="top"> | <tr valign="top"> | ||
| − | <td>[[file:NotePad.PNG]]</td> | + | <td>[[file:NotePad.PNG|link=]]</td> |
| − | <td><font size | + | <td><span style="font-size: 17px;">'''Notes:'''</span><br> |
All routes MUST have a '''World Origin'''. If you delete the marker then the '''World Origin''' will be hidden and will take the default coordinates of latitude 52.45 N, longitude 13.3 E, altitude 0 metres - which places it in Berlin(??).</td> | All routes MUST have a '''World Origin'''. If you delete the marker then the '''World Origin''' will be hidden and will take the default coordinates of latitude 52.45 N, longitude 13.3 E, altitude 0 metres - which places it in Berlin(??).</td> | ||
</tr> | </tr> | ||
| Line 868: | Line 868: | ||
<table cellpadding="4" bgcolor=#c1e7e7> | <table cellpadding="4" bgcolor=#c1e7e7> | ||
<tr valign="top"> | <tr valign="top"> | ||
| − | <td>[[file:DotPoint.JPG]]</td> | + | <td>[[file:DotPoint.JPG|link=]]</td> |
<td>This tool simply turns the road traffic '''ON''' and '''OFF'''</td> | <td>This tool simply turns the road traffic '''ON''' and '''OFF'''</td> | ||
</tr> | </tr> | ||
| Line 874: | Line 874: | ||
<table cellpadding="4" bgcolor=#ffffb0> | <table cellpadding="4" bgcolor=#ffffb0> | ||
<tr valign="top"> | <tr valign="top"> | ||
| − | <td>[[file:NotePad.PNG]]</td> | + | <td>[[file:NotePad.PNG|link=]]</td> |
| − | <td><font size | + | <td><span style="font-size: 17px;">'''Notes:'''</span><br> |
This road traffic tool:- | This road traffic tool:- | ||
*only works on roads that have been designed to use road traffic (not ''all'' roads support traffic) | *only works on roads that have been designed to use road traffic (not ''all'' roads support traffic) | ||
| Line 884: | Line 884: | ||
<table> | <table> | ||
<tr valign="top"> | <tr valign="top"> | ||
| − | <td>[[file:EnvironmentTrafficOn.PNG]]<br><br> | + | <td>[[file:EnvironmentTrafficOn.PNG|link=]]<br><br> |
| − | [[file:EnvironmentTrafficOff.PNG]]</td> | + | [[file:EnvironmentTrafficOff.PNG|link=]]</td> |
<td> | <td> | ||
<table cellpadding="4" bgcolor=#eeeeee> | <table cellpadding="4" bgcolor=#eeeeee> | ||
| Line 893: | Line 893: | ||
</tr> | </tr> | ||
<tr valign="top"> | <tr valign="top"> | ||
| − | <td>[[file:Gears.PNG]]</td> | + | <td>[[file:Gears.PNG|link=]]</td> |
| − | <td><font size | + | <td><span style="font-size: 17px;">'''Settings:'''</span><br> |
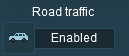
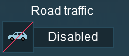
*Click the car icon to ''enable'' and ''disable'' traffic</td> | *Click the car icon to ''enable'' and ''disable'' traffic</td> | ||
</tr> | </tr> | ||
| Line 910: | Line 910: | ||
='''Weather and Water'''= | ='''Weather and Water'''= | ||
| − | To set the water colour, refer to the [[file:PageLink.PNG]] '''[[#Setting the Lighting Conditions|Setting the Lighting Conditions]]''' section above.<br> | + | To set the water colour, refer to the [[file:PageLink.PNG|link=]] '''[[#Setting the Lighting Conditions|Setting the Lighting Conditions]]''' section above.<br> |
<table> | <table> | ||
<tr valign="top"> | <tr valign="top"> | ||
| − | <td>[[file:EnvironmentEnvironment.PNG]]</td> | + | <td>[[file:EnvironmentEnvironment.PNG|link=]]</td> |
<td> | <td> | ||
==Set the Sky== | ==Set the Sky== | ||
<table cellpadding="4" bgcolor=#c1e7e7> | <table cellpadding="4" bgcolor=#c1e7e7> | ||
<tr valign="top"> | <tr valign="top"> | ||
| − | <td>[[file:DotPoint.JPG]]</td> | + | <td>[[file:DotPoint.JPG|link=]]</td> |
<td>This sets the basic sky and cloud characteristics</td> | <td>This sets the basic sky and cloud characteristics</td> | ||
</tr> | </tr> | ||
| Line 926: | Line 926: | ||
<table> | <table> | ||
<tr valign="top"> | <tr valign="top"> | ||
| − | <td>[[file:EnvironmentSkyType.PNG]]</td> | + | <td>[[file:EnvironmentSkyType.PNG|link=]]</td> |
<td> | <td> | ||
<table cellpadding="4" bgcolor=#eeeeee> | <table cellpadding="4" bgcolor=#eeeeee> | ||
| Line 934: | Line 934: | ||
</tr> | </tr> | ||
<tr valign="top"> | <tr valign="top"> | ||
| − | <td>[[file:Gears.PNG]]</td> | + | <td>[[file:Gears.PNG|link=]]</td> |
| − | <td><font size | + | <td><span style="font-size: 17px;">'''Settings:'''</span><br> |
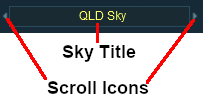
*Click the '''Sky Title''' (Cloud Cover) to select from a drop down list of sky types, or | *Click the '''Sky Title''' (Cloud Cover) to select from a drop down list of sky types, or | ||
*Scroll through the list by using the '''Scroll''' icons | *Scroll through the list by using the '''Scroll''' icons | ||
| Line 952: | Line 952: | ||
<table cellpadding="4" bgcolor=#c1e7e7> | <table cellpadding="4" bgcolor=#c1e7e7> | ||
<tr valign="top"> | <tr valign="top"> | ||
| − | <td>[[file:DotPoint.JPG]]</td> | + | <td>[[file:DotPoint.JPG|link=]]</td> |
<td>This sets some very basic weather conditions. The set conditions will be constant throughout the running of a Session.</td> | <td>This sets some very basic weather conditions. The set conditions will be constant throughout the running of a Session.</td> | ||
</tr> | </tr> | ||
| Line 963: | Line 963: | ||
</tr> | </tr> | ||
<tr valign="top"> | <tr valign="top"> | ||
| − | <td>[[file:Gears.PNG]]</td> | + | <td>[[file:Gears.PNG|link=]]</td> |
| − | <td><font size | + | <td><span style="font-size: 17px;">'''Settings:'''</span><br> |
| − | [[file:EnvironmentWeatherType.PNG]]<br> | + | [[file:EnvironmentWeatherType.PNG|link=]]<br> |
Move the slider to set the weather between '''Rain''' and '''Snow'''</td> | Move the slider to set the weather between '''Rain''' and '''Snow'''</td> | ||
</tr> | </tr> | ||
| Line 976: | Line 976: | ||
<table cellpadding="4" bgcolor=#ffffb0> | <table cellpadding="4" bgcolor=#ffffb0> | ||
<tr valign="top"> | <tr valign="top"> | ||
| − | <td>[[file:NotePad.PNG]]</td> | + | <td>[[file:NotePad.PNG|link=]]</td> |
| − | <td>< | + | <td><span style="font-size: 17px;">'''Notes:'''</span><br> |
| − | There are Session rules that also control the weather, including changeable weather conditions. Check the Trainz Wiki Session Rules list at [[file:WikiLink.PNG]] '''[[Session_Rules_By_Categories_With_Properties#Weather_Rules|Session Rules - Weather]]'''</td> | + | There are Session rules that also control the weather, including changeable weather conditions. Check the Trainz Wiki Session Rules list at [[file:WikiLink.PNG|link=]] '''[[Session_Rules_By_Categories_With_Properties#Weather_Rules|Session Rules - Weather]]'''</td> |
</tr> | </tr> | ||
</table></td> | </table></td> | ||
| Line 988: | Line 988: | ||
<table cellpadding="4" bgcolor=#c1e7e7> | <table cellpadding="4" bgcolor=#c1e7e7> | ||
<tr valign="top"> | <tr valign="top"> | ||
| − | <td>[[file:DotPoint.JPG]]</td> | + | <td>[[file:DotPoint.JPG|link=]]</td> |
<td>This setting only effects '''SpeedTrees'''</td> | <td>This setting only effects '''SpeedTrees'''</td> | ||
</tr> | </tr> | ||
| Line 998: | Line 998: | ||
</tr> | </tr> | ||
<tr valign="top"> | <tr valign="top"> | ||
| − | <td>[[file:Gears.PNG]]</td> | + | <td>[[file:Gears.PNG|link=]]</td> |
| − | <td><font size | + | <td><span style="font-size: 17px;">'''Settings:'''</span><br> |
| − | [[file:EnvironmentWindType.PNG]]<br> | + | [[file:EnvironmentWindType.PNG|link=]]<br> |
Move the slider to set the wind strength between zero (left) and maximum (right) | Move the slider to set the wind strength between zero (left) and maximum (right) | ||
</td> | </td> | ||
| Line 1,014: | Line 1,014: | ||
<table cellpadding="4" bgcolor=#c1e7e7> | <table cellpadding="4" bgcolor=#c1e7e7> | ||
<tr valign="top"> | <tr valign="top"> | ||
| − | <td>[[file:DotPoint.JPG]]</td> | + | <td>[[file:DotPoint.JPG|link=]]</td> |
<td>This sets the water surface effects</td> | <td>This sets the water surface effects</td> | ||
</tr> | </tr> | ||
| Line 1,021: | Line 1,021: | ||
<table> | <table> | ||
<tr valign="top"> | <tr valign="top"> | ||
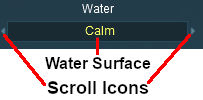
| − | <td>[[file:EnvironmentWaterType.PNG]]</td> | + | <td>[[file:EnvironmentWaterType.PNG|link=]]</td> |
<td> | <td> | ||
<table cellpadding="4" bgcolor=#eeeeee> | <table cellpadding="4" bgcolor=#eeeeee> | ||
| Line 1,029: | Line 1,029: | ||
</tr> | </tr> | ||
<tr valign="top"> | <tr valign="top"> | ||
| − | <td>[[file:Gears.PNG]]</td> | + | <td>[[file:Gears.PNG|link=]]</td> |
| − | <td><font size | + | <td><span style="font-size: 17px;">'''Settings:'''</span><br> |
*Click the '''Water Surface''' to select from a drop down list of surface effects, or | *Click the '''Water Surface''' to select from a drop down list of surface effects, or | ||
*Scroll through the list by using the '''Scroll''' icons | *Scroll through the list by using the '''Scroll''' icons | ||
| Line 1,047: | Line 1,047: | ||
<table cellpadding="4" bgcolor=#c1e7e7> | <table cellpadding="4" bgcolor=#c1e7e7> | ||
<tr valign="top"> | <tr valign="top"> | ||
| − | <td>[[file:DotPoint.JPG]]</td> | + | <td>[[file:DotPoint.JPG|link=]]</td> |
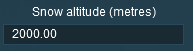
<td>This sets the altitude at which objects with snow effects will display those effects. It has no effect on objects created without this feature</td> | <td>This sets the altitude at which objects with snow effects will display those effects. It has no effect on objects created without this feature</td> | ||
</tr> | </tr> | ||
| Line 1,058: | Line 1,058: | ||
</tr> | </tr> | ||
<tr valign="top"> | <tr valign="top"> | ||
| − | <td>[[file:Gears.PNG]]</td> | + | <td>[[file:Gears.PNG|link=]]</td> |
| − | <td><font size | + | <td><span style="font-size: 17px;">'''Settings:'''</span><br> |
| − | [[file:EnvironmentSnowAltitude.PNG]]<br> | + | [[file:EnvironmentSnowAltitude.PNG|link=]]<br> |
Enter the altitude, in metres, at which snow can appear.</td> | Enter the altitude, in metres, at which snow can appear.</td> | ||
</tr> | </tr> | ||
| Line 1,076: | Line 1,076: | ||
<table cellpadding="4" bgcolor=#ffffff> | <table cellpadding="4" bgcolor=#ffffff> | ||
<tr valign="top"> | <tr valign="top"> | ||
| − | <td>[[file:TrainzWiki.png]]</td> | + | <td>[[file:TrainzWiki.png|link=]]</td> |
<td> | <td> | ||
| − | <font size | + | <span style="font-size: 17px;">'''More Tutorials and Guides to Using Trainz'''</span><br> |
*'''<span class="plainlinks">[http://online.ts2009.com/mediaWiki/index.php/HowTo How to Guides]</span>''' | *'''<span class="plainlinks">[http://online.ts2009.com/mediaWiki/index.php/HowTo How to Guides]</span>''' | ||
*'''[[Driver Commands List]]''' | *'''[[Driver Commands List]]''' | ||
Revision as of 20:53, 6 September 2019
The information in this Wiki Page applies to both TANE and TRS19. A video tutorial specific to setting the environmental controls in TRS19 can be found at TRS19 Environment and Lighting Tutorial
Contents |
| Notes: The Environment Tools are used to set:-
|
|
| The Time of Day is set using Session rules such as |
| Notes: There is no Save button on the Environment Tools Window. As soon as you enter or select a setting it will be saved. When finished editing simply click the window Off button. |
| The World Origin and Date settings are used to set the current season e.g. January = Summer in the Southern Hemisphere and Winter in the Northern Hemisphere |
The Environment Tool
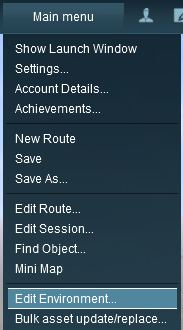 |
Open the Environment Tools Editor from the Surveyor Main Menu as shown on the left. This will open the Environment Properties Window as shown below.
|
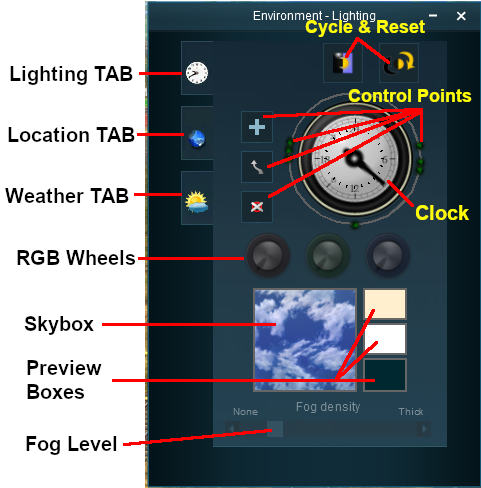
Lighting
The Lighting Tools control the ambient, sun and water colours. This tool tab is opened by default whenever the Environmental Editor is opened.
Light and Time
| The dial shown is a 24 hour clock that sets the lighting conditions at selected times of the day and night |
 |
The Time of Day
|
||||||||||||
Setting the Lighting Conditions
Colour Control Points
The ring around the dial contains a number of green dots.
| Each dot is a Control Point that sets the specific Red, Green and Blue colour values, and other lighting features, at the time shown on the clock |
 |
|
||||||

| Each colour value can be altered by dragging its needle point to a new position around the dial. Each new position will change the balance between the 3 colours and will alter the lighting displayed in the scene at that particular time. |
Types of Lighting
| Notes: Each control point stores the RGB values for three different types of lighting in the scene.
|
The 3 boxes below the colour wheels and next to the Sky box show the colour effects created for each type of lighting at the selected time.
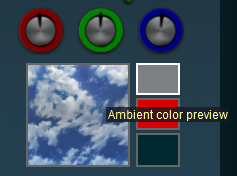
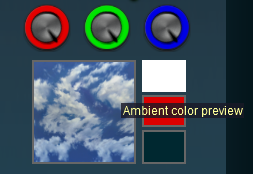
Ambient Colour
 |
|
||||||
Sun Colour
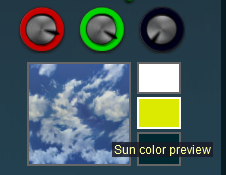 |
|
||||||
Water Colour
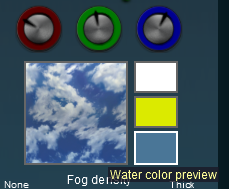 |
|
||||||||
Mixing Colours
| Notes: Getting the "right colours" can be more of an art than a science. To set the exact colour you want means mixing the correct quantities of Red, Green and Blue. Each of these colours has 256 different values from 0 to 255 that, when combined, produce over 16 million different possible colours - but many monitors and most eyeballs will not be able to tell the differences between many of those 16 million colours. |
Setting all three colours to the same values will produce monotones from Black to White with 254 different shades of gray between those two tones.
|
| R = 0; G = 0; B = 0 | R = 128; G = 128; B = 128 | R = 255; G = 255; B = 255 | ||
 |
 |
 |
||
| Black | 50% Gray | White | ||
| All other colours are made by mixing different quantities of the three colours. | ||||
|
||||
| This is an example only |
| Time | 06:00 | 07:00 | 10:00 | 12:00 | 18:00 |
Ambient Sun |
 |
 |
 |
 |
 |
RGB values (all dials set equally)
|
128 |
192 |
224 |
255 |
128 |
| Brightness (TRS19) | 40% | 50% | 50% | 50% | 40% |
| Creating a colour suitable for water (RGB values are approximate) |
 |
Starting with pure Blue R = 0; G = 0; B = 255 |
|
 |
Add pure Green to make the colour Cyan R = 0; G = 255; B = 255 |
|
 |
Scale back (darken) the Green R = 0; G = 155; B = 255 |
|
 |
Scale back a bit more R = 0; G = 128; B = 255 |
|
 |
Add some Red R = 75; G = 128; B = 255 |
|
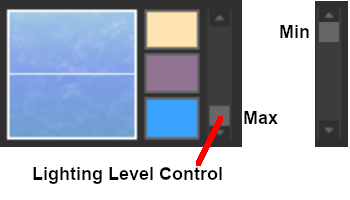
TRS19 Lighting Level Control
TRS19 users have an additional control that is placed next to the Ambient, Sun and Water colour boxes. This sets the overall brightness or lighting level for each control point.
|
|
|
||||||
Resetting the Lighting Conditions
| All the lighting colour settings can be reset back to the TRS19/TANE default colours. |
 |
|
||||||
Adding a New Control Point
| New control points can be added to the clock dial |
 |
|
||||||||
| Notes: During the running of a Session the lighting will "morph" or "transform" at a steady rate from the set of colour values at one control point to the set of colour values at the next control point. Click the Diurnal Cycle button for a demonstration.
The places where you would need faster dramatic transitions would be at dawn (around 06:00) and dusk (around 18:00) |
Deleting a Control point
| Existing control points can be deleted |
 |
|
||||||||
Moving a Control point
| Existing control points can be moved |
 |
|
||||||||
The Skybox
| The Skybox sets the sky colours in three different regions of the sky at the selected time of day, as shown in the extreme example below |
 |
|
||||||||||
Fog Control
| This controls the level of "fog" in the scene |
|
|
||||||||||
Location
| The Location Tools control the geographic and date (season) data for the Route and Session |
 |
Set DateThe top section is a standard calendar selection tool that allows you to set the month and the day of the month. The only effect this has in TRS19/TANE is to set, with the geographic coordinates, the season of the year.
Set World OriginThe middle section is the World Origin Tool and sets the geographic location, including the altitude, of the route using a World Origin marker that is only visible in Surveyor.
|
|||||||||||||
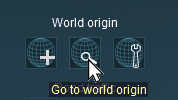 |
Click the Go to world origin icon to move the Surveyor screen so that it is centred on the World Origin marker. |
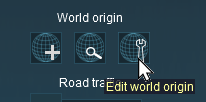 |
Click the Edit world origin icon to set or edit the World Origin data. See Editing the World Origin below. |
Editing the World Origin
 |
Enter the geographic data for the world origin.
|
Deleting the World Origin
| There is no delete button for the World Origin marker, but you can still delete it |
|
|
|
 |
Steps:
|
|
|
|
| Notes: All routes MUST have a World Origin. If you delete the marker then the World Origin will be hidden and will take the default coordinates of latitude 52.45 N, longitude 13.3 E, altitude 0 metres - which places it in Berlin(??). |
Traffic Control
| This tool simply turns the road traffic ON and OFF |
| Notes: This road traffic tool:-
|
  |
|
||||||
Weather and Water
To set the water colour, refer to the ![]() Setting the Lighting Conditions section above.
Setting the Lighting Conditions section above.
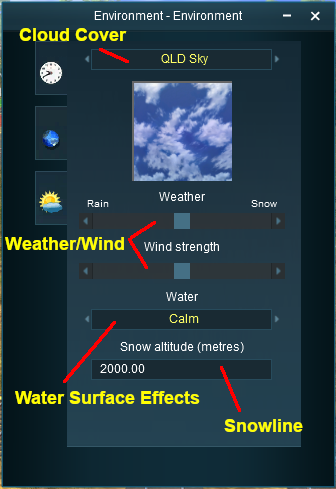 |
Set the Sky
The box below the sky title will give a preview of the selected sky. Set the Weather
|
||||||||||||||||||||
Wind Strength
| This setting only effects SpeedTrees |
|
|
|
| Settings:
|
|
|
|
|
Set the Water Surface
| This sets the water surface effects |
 |
|
||||||
Set the Snow Altitude
| This sets the altitude at which objects with snow effects will display those effects. It has no effect on objects created without this feature |
|
|
|
| Settings:
|
|
|
|
|
Trainz Wiki
 |
More Tutorials and Guides to Using Trainz |