How to Create a Message Popup Icon
m (→The Texture File) |
m (replaced <font> and <u> tags with <span style=...> tags, removed all image hyperlinks) |
||
| Line 8: | Line 8: | ||
<table cellpadding="4" bgcolor=#c1e7e7> | <table cellpadding="4" bgcolor=#c1e7e7> | ||
<tr valign="top"> | <tr valign="top"> | ||
| − | <td>[[file:DotPoint.JPG]]</td> | + | <td>[[file:DotPoint.JPG|link=]]</td> |
<td>The icons used in '''Custom Message Popups''' belong to the class of '''Textures - Not Environmental'''<td> | <td>The icons used in '''Custom Message Popups''' belong to the class of '''Textures - Not Environmental'''<td> | ||
</tr> | </tr> | ||
| Line 14: | Line 14: | ||
Information on '''Message Popups''' can be found at the Trainz Wiki pages:-<br> | Information on '''Message Popups''' can be found at the Trainz Wiki pages:-<br> | ||
| − | [[file:WikiLink.PNG]] '''[[How to Use Message Popup Rule|Using the Message Popup Rule]]'''<br> | + | [[file:WikiLink.PNG|link=]] '''[[How to Use Message Popup Rule|Using the Message Popup Rule]]'''<br> |
| − | [[file:WikiLink.PNG]] '''[[How to Use Message Popup Rule (Applications)|Using the Message Popup Rule (Applications)]]'''<br> | + | [[file:WikiLink.PNG|link=]] '''[[How to Use Message Popup Rule (Applications)|Using the Message Popup Rule (Applications)]]'''<br> |
| − | [[file:WikiLink.PNG]] '''[[How to Create a HTML Asset|How to Create a HTML Asset]]'''<br> | + | [[file:WikiLink.PNG|link=]] '''[[How to Create a HTML Asset|How to Create a HTML Asset]]'''<br> |
| − | [[file:WikiLink.PNG]] '''[[Session Rule List with Parameters#Message Popup Rule|Message Popup Rule (description)]]'''<br> | + | [[file:WikiLink.PNG|link=]] '''[[Session Rule List with Parameters#Message Popup Rule|Message Popup Rule (description)]]'''<br> |
<br> | <br> | ||
| Line 24: | Line 24: | ||
<table cellpadding="4" bgcolor=#ffffff> | <table cellpadding="4" bgcolor=#ffffff> | ||
<tr valign="top"> | <tr valign="top"> | ||
| − | <td>[[file:Steps.PNG]]</td> | + | <td>[[file:Steps.PNG|link=]]</td> |
| − | <td><font size | + | <td><span style="font-size: 17px;">'''Step 1: Create the Asset'''</span><br> |
<table> | <table> | ||
<tr valign="top"> | <tr valign="top"> | ||
| − | <td>[[file:NewAsset.PNG]]<br><br> | + | <td>[[file:NewAsset.PNG|link=]]<br><br> |
| − | [[file:NewAssetCreated.PNG]]</td> | + | [[file:NewAssetCreated.PNG|link=]]</td> |
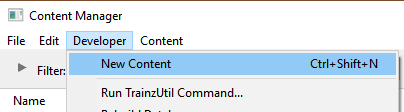
<td>From the '''TANE/TRS19''' Launcher | <td>From the '''TANE/TRS19''' Launcher | ||
#select '''Manage Content''' | #select '''Manage Content''' | ||
| Line 50: | Line 50: | ||
</tr> | </tr> | ||
<tr valign="top"> | <tr valign="top"> | ||
| − | <td>[[file:Steps.PNG]]</td> | + | <td>[[file:Steps.PNG|link=]]</td> |
| − | <td><font size | + | <td><span style="font-size: 17px;">'''Step 2: Find the New Asset'''</span><br> |
<table> | <table> | ||
<tr valign="top"> | <tr valign="top"> | ||
| − | <td>[[file:NewAssetSelectOpen.PNG]]</td> | + | <td>[[file:NewAssetSelectOpen.PNG|link=]]</td> |
<td> | <td> | ||
*Set the CM Search Filter to '''Open for Editing''' | *Set the CM Search Filter to '''Open for Editing''' | ||
| Line 70: | Line 70: | ||
</tr> | </tr> | ||
<tr valign="top"> | <tr valign="top"> | ||
| − | <td>[[file:Steps.PNG]]</td> | + | <td>[[file:Steps.PNG|link=]]</td> |
| − | <td><font size | + | <td><span style="font-size: 17px;">'''Step 3: Open the Asset in Windows Explorer'''</span><br> |
<table> | <table> | ||
<tr valign="top"> | <tr valign="top"> | ||
| − | <td>[[file:NewAssetShowExplorer.PNG]]</td> | + | <td>[[file:NewAssetShowExplorer.PNG|link=]]</td> |
<td> | <td> | ||
#Right mouse click on the entry '''New Asset''' | #Right mouse click on the entry '''New Asset''' | ||
| Line 91: | Line 91: | ||
</tr> | </tr> | ||
<tr valign="top"> | <tr valign="top"> | ||
| − | <td>[[file:Steps.PNG]]</td> | + | <td>[[file:Steps.PNG|link=]]</td> |
| − | <td><font size | + | <td><span style="font-size: 17px;">'''Step 4: Open File in Notepad'''</span><br> |
<table> | <table> | ||
<tr valign="top"> | <tr valign="top"> | ||
| − | <td>[[file:NewAssetOpenExplorer.PNG]]</td> | + | <td>[[file:NewAssetOpenExplorer.PNG|link=]]</td> |
<td>There will only be a single item in the asset, its config.txt file | <td>There will only be a single item in the asset, its config.txt file | ||
*Double click on the file to open it in Notepad</td> | *Double click on the file to open it in Notepad</td> | ||
| Line 109: | Line 109: | ||
</tr> | </tr> | ||
<tr valign="top"> | <tr valign="top"> | ||
| − | <td>[[file:Steps.PNG]]</td> | + | <td>[[file:Steps.PNG|link=]]</td> |
| − | <td><font size | + | <td><span style="font-size: 17px;">'''Step 5: Edit the File'''</span><br> |
<table> | <table> | ||
<tr valign="top"> | <tr valign="top"> | ||
| − | <td>[[file:NewAssetOpenNotepad.PNG]]</td> | + | <td>[[file:NewAssetOpenNotepad.PNG|link=]]</td> |
<td>You will need to edit the contents of this file. | <td>You will need to edit the contents of this file. | ||
| − | *The next section, [[file:PageLink.PNG]] '''[[#The Config.txt File|The Config.txt File]]''', identifies the changes you will need to make. | + | *The next section, [[file:PageLink.PNG|link=]] '''[[#The Config.txt File|The Config.txt File]]''', identifies the changes you will need to make. |
*The new name you give to the asset will not take effect until after it has been committed. | *The new name you give to the asset will not take effect until after it has been committed. | ||
*After editing, save the changes and exit Notepad. | *After editing, save the changes and exit Notepad. | ||
| Line 123: | Line 123: | ||
<table cellpadding="4" bgcolor=#fcbcbc> | <table cellpadding="4" bgcolor=#fcbcbc> | ||
<tr valign="top"> | <tr valign="top"> | ||
| − | <td colspan=2><font size | + | <td colspan=2><span style="font-size: 17px;"><b>Warning:</b></span></td> |
</tr> | </tr> | ||
<tr valign="top"> | <tr valign="top"> | ||
| − | <td>[[file:Stop.PNG]]</td> | + | <td>[[file:Stop.PNG|link=]]</td> |
| − | <td>Unless you know '''exactly''' what you are doing, '''< | + | <td>Unless you know '''exactly''' what you are doing, '''<span style="text-decoration: underline;">DO NOT ALTER THE KUID NUMBER</span>''' that has been added to the file</td> |
</tr> | </tr> | ||
</table></td> | </table></td> | ||
| Line 139: | Line 139: | ||
</tr> | </tr> | ||
<tr valign="top"> | <tr valign="top"> | ||
| − | <td>[[file:Steps.PNG]]</td> | + | <td>[[file:Steps.PNG|link=]]</td> |
| − | <td><font size | + | <td><span style="font-size: 17px;">'''Step 6: Add Any "Extras"'''</span><br> |
You will need to add three additional files (possibly more depending on how the icon is created) to the asset folder:-<br> | You will need to add three additional files (possibly more depending on how the icon is created) to the asset folder:-<br> | ||
| − | *a thumbnail image as described in the section [[file:PageLink.PNG]] '''[[#The Thumbnail Image|The Thumbnail Image]]''' | + | *a thumbnail image as described in the section [[file:PageLink.PNG|link=]] '''[[#The Thumbnail Image|The Thumbnail Image]]''' |
| − | *the icon image as described in the section [[file:PageLink.PNG]] '''[[#The Icon Image|The Icon Image]]''' | + | *the icon image as described in the section [[file:PageLink.PNG|link=]] '''[[#The Icon Image|The Icon Image]]''' |
| − | *a texture text file as described in the section [[file:PageLink.PNG]] '''[[#The Texture File|The Texture File]]''' | + | *a texture text file as described in the section [[file:PageLink.PNG|link=]] '''[[#The Texture File|The Texture File]]''' |
<br> | <br> | ||
These file do not have to be added immediately but must be present before the new asset can be used. You can reopen the asset for editing later to add the files before it is committed.</td> | These file do not have to be added immediately but must be present before the new asset can be used. You can reopen the asset for editing later to add the files before it is committed.</td> | ||
| Line 152: | Line 152: | ||
<table> | <table> | ||
<tr> | <tr> | ||
| − | <td>[[file:TexturePopupFiles.PNG]]</td> | + | <td>[[file:TexturePopupFiles.PNG|link=]]</td> |
| − | <td><font size | + | <td><span style="font-size: 17px;">'''THIS IS AN EXAMPLE ONLY'''</span><br><br> |
This is the '''minimum''' number of files needed in a '''Texture asset'''</td> | This is the '''minimum''' number of files needed in a '''Texture asset'''</td> | ||
</tr> | </tr> | ||
| Line 164: | Line 164: | ||
</tr> | </tr> | ||
<tr valign="top"> | <tr valign="top"> | ||
| − | <td>[[file:Steps.PNG]]</td> | + | <td>[[file:Steps.PNG|link=]]</td> |
| − | <td><font size | + | <td><span style="font-size: 17px;">'''Step 7: Finish Up'''</span> |
<table> | <table> | ||
<tr valign="top"> | <tr valign="top"> | ||
| − | <td>[[file:NewAssetSubmit.PNG]]</td> | + | <td>[[file:NewAssetSubmit.PNG|link=]]</td> |
<td> | <td> | ||
*Close the Asset window | *Close the Asset window | ||
| Line 177: | Line 177: | ||
<table cellpadding="4" bgcolor=#ffffb0> | <table cellpadding="4" bgcolor=#ffffb0> | ||
<tr valign="top"> | <tr valign="top"> | ||
| − | <td>[[file:NotePad.PNG]]</td> | + | <td>[[file:NotePad.PNG|link=]]</td> |
| − | <td><font size | + | <td><span style="font-size: 17px;">'''Notes:'''</span><br> |
Because you still have the Filter '''Open for Editing''' in operation, the now closed and committed asset will vanish from the window display. To check that your asset has been correctly created and renamed, set the CM Search Filter to "Today".</td> | Because you still have the Filter '''Open for Editing''' in operation, the now closed and committed asset will vanish from the window display. To check that your asset has been correctly created and renamed, set the CM Search Filter to "Today".</td> | ||
</tr> | </tr> | ||
| Line 187: | Line 187: | ||
<table cellpading="4" bgcolor=#ffffff> | <table cellpading="4" bgcolor=#ffffff> | ||
<tr valign="top"> | <tr valign="top"> | ||
| − | <td>[[file:Bug.png]]</td> | + | <td>[[file:Bug.png|link=]]</td> |
<td>Some of the most common errors that can occur when creating and committing a new asset are:- | <td>Some of the most common errors that can occur when creating and committing a new asset are:- | ||
*no '''''thumbnail image''''' in the asset | *no '''''thumbnail image''''' in the asset | ||
| Line 207: | Line 207: | ||
='''The Config.txt File'''= | ='''The Config.txt File'''= | ||
| − | This file should follow the same (or a similar) format as the example below. Entries in < | + | This file should follow the same (or a similar) format as the example below. Entries in <span style="color: blue;">'''blue'''</span> will be different for each asset. The order of the "tags" is not important:- |
| − | '''kuid''' <kuid:< | + | '''kuid''' <kuid:<span style="color: blue;">'''this is an auto-generated number'''</span>> |
'''kind "texture"''' | '''kind "texture"''' | ||
| − | '''texture''' "< | + | '''texture''' "<span style="color: blue;">'''asset_name</span>.texture'''" |
| − | username "< | + | username "<span style="color: blue;">'''place your selected asset name here'''</span>" |
'''category-class''' "JI" | '''category-class''' "JI" | ||
'''trainz-build''' '''4.3''' | '''trainz-build''' '''4.3''' | ||
| Line 222: | Line 222: | ||
width 240 | width 240 | ||
height 180 | height 180 | ||
| − | image "'''< | + | image "'''<span style="color: blue;">name_of_thumbnail</span>.jpg'''" |
} | } | ||
'''1''' | '''1''' | ||
| Line 228: | Line 228: | ||
width 64 | width 64 | ||
height 64 | height 64 | ||
| − | image "< | + | image "<span style="color: blue;">'''asset_name</span>.texture'''" |
} | } | ||
} | } | ||
| − | description "< | + | description "<span style="color: blue;">'''Place your description of what the icon represents here'''</span>" |
<table cellpadding="4" bgcolor=#eeeeee> | <table cellpadding="4" bgcolor=#eeeeee> | ||
| Line 239: | Line 239: | ||
</tr> | </tr> | ||
<tr valign="top"> | <tr valign="top"> | ||
| − | <td>[[file:Gears.PNG]]</td> | + | <td>[[file:Gears.PNG|link=]]</td> |
| − | <td><font size | + | <td><span style="font-size: 17px;">'''Settings:'''</span><br> |
'''For the above example:'''<br> | '''For the above example:'''<br> | ||
*The '''<kuid>''' is unique to every asset so it is '''not advisable to choose your own'''. This will be automatically generated by the '''Content Manager''' program when a new asset is created | *The '''<kuid>''' is unique to every asset so it is '''not advisable to choose your own'''. This will be automatically generated by the '''Content Manager''' program when a new asset is created | ||
| − | *The '''kind''' identifies the ''type'' of asset and the types of files that '''TANE/TRS19''' will expect to find in the asset. It also tells '''TANE/TRS19''' how to render and error check the asset. A list of asset kinds can be found at [[file:WikiLink.PNG]] '''[[KIND_TrainzBaseSpec#KIND_Hierarchy|KIND Hierarchy]]''' | + | *The '''kind''' identifies the ''type'' of asset and the types of files that '''TANE/TRS19''' will expect to find in the asset. It also tells '''TANE/TRS19''' how to render and error check the asset. A list of asset kinds can be found at [[file:WikiLink.PNG|link=]] '''[[KIND_TrainzBaseSpec#KIND_Hierarchy|KIND Hierarchy]]''' |
| − | *The '''texture''' is the name of the assets '''texture''' file. This will be a simple text file and will have the name '''< | + | *The '''texture''' is the name of the assets '''texture''' file. This will be a simple text file and will have the name '''<span style="color: blue;">asset_name</span>.texture''' where '''<span style="color: blue;">asset_name</span>''' will be a name you have selected for this asset - e.g. "ashpit.texture". The actual texture file itself will be named '''<span style="color: blue;">asset_name</span>.texture.txt''' (e.g. "ashpit.texture.txt") but the filename ending ".txt" is not added to the name in the '''texture''' tag |
*The '''username''' is your name for the asset and the name that other users will see. It is a good idea to make it compact and meaningful. | *The '''username''' is your name for the asset and the name that other users will see. It is a good idea to make it compact and meaningful. | ||
| − | *The '''category-class''' identifies the ''intent'' of the asset and is important in classifying it for filtering and searching. A list of category classes can be found at [[file:WikiLink.PNG]] '''[[Category-class]]''' | + | *The '''category-class''' identifies the ''intent'' of the asset and is important in classifying it for filtering and searching. A list of category classes can be found at [[file:WikiLink.PNG|link=]] '''[[Category-class]]''' |
| − | *The '''trainz-build''' identifies the ''minimum'' Trainz version for this asset. A list of asset trainz-build numbers and their corresponding Trainz versions can be found at [[file:WikiLink.PNG]] '''[["Trainz-build"_number]]''' | + | *The '''trainz-build''' identifies the ''minimum'' Trainz version for this asset. A list of asset trainz-build numbers and their corresponding Trainz versions can be found at [[file:WikiLink.PNG|link=]] '''[["Trainz-build"_number]]''' |
| − | *The '''thumbnails''' container holds the ''preview'' images of the asset shown by the '''Content Manager''' program, the Web version of the ''DLS'' and the '''Message Popup Rule'''. It also contains the icon image. Information on thumbnails can be found at [[file:WikiLink.PNG]] '''[[Thumbnails]]''' | + | *The '''thumbnails''' container holds the ''preview'' images of the asset shown by the '''Content Manager''' program, the Web version of the ''DLS'' and the '''Message Popup Rule'''. It also contains the icon image. Information on thumbnails can be found at [[file:WikiLink.PNG|link=]] '''[[Thumbnails]]''' |
**The first thumbnail (size 240 x 180) is the thumbnail image used by '''CM''' and the '''Web DLS Page''' for this asset. The thumbnail image container value "'''0'''" is simply a ''placeholder'' for the thumbnail image, its exact value does not matter | **The first thumbnail (size 240 x 180) is the thumbnail image used by '''CM''' and the '''Web DLS Page''' for this asset. The thumbnail image container value "'''0'''" is simply a ''placeholder'' for the thumbnail image, its exact value does not matter | ||
***The '''image''' is the name of the thumbnail image - it '''must''' be a JPG format image | ***The '''image''' is the name of the thumbnail image - it '''must''' be a JPG format image | ||
| Line 254: | Line 254: | ||
***The '''height''' of the image must be '''180 pixels''' | ***The '''height''' of the image must be '''180 pixels''' | ||
**The second thumbnail (size 64 x 64) is the icon image used by the Message Popup Rule for this asset. The icon image container value "'''1'''" is simply a ''placeholder'' for the icon image, its exact value does not matter but it must be different from the thumbnail image container | **The second thumbnail (size 64 x 64) is the icon image used by the Message Popup Rule for this asset. The icon image container value "'''1'''" is simply a ''placeholder'' for the icon image, its exact value does not matter but it must be different from the thumbnail image container | ||
| − | ***The '''image''' is the assets '''< | + | ***The '''image''' is the assets '''<span style="color: blue;">asset_name</span>.texture.txt''' file (but without the ".txt" at the end) |
***The '''width''' of the image must be '''64 pixels''' | ***The '''width''' of the image must be '''64 pixels''' | ||
***The '''height''' of the image must be '''64 pixels''' | ***The '''height''' of the image must be '''64 pixels''' | ||
| Line 271: | Line 271: | ||
<table cellpadding="4" bgcolor=#c1e7e7> | <table cellpadding="4" bgcolor=#c1e7e7> | ||
<tr valign="top"> | <tr valign="top"> | ||
| − | <td>[[file:DotPoint.JPG]]</td> | + | <td>[[file:DotPoint.JPG|link=]]</td> |
<td>You will need image editing software to create the icon image or to change an existing image to the required dimensions and format.</td> | <td>You will need image editing software to create the icon image or to change an existing image to the required dimensions and format.</td> | ||
</tr> | </tr> | ||
| Line 278: | Line 278: | ||
<table> | <table> | ||
<tr valign="top"> | <tr valign="top"> | ||
| − | <td>[[file:Texture64Pixels.PNG]]<br> | + | <td>[[file:Texture64Pixels.PNG|link=]]<br> |
(not to scale)</td> | (not to scale)</td> | ||
<td> | <td> | ||
| Line 287: | Line 287: | ||
</tr> | </tr> | ||
<tr valign="top"> | <tr valign="top"> | ||
| − | <td>[[file:Gears.PNG]]</td> | + | <td>[[file:Gears.PNG|link=]]</td> |
| − | <td><font size | + | <td><span style="font-size: 17px;">'''Settings:'''</span><br> |
The image must meet the following specifications:- | The image must meet the following specifications:- | ||
*64 pixels wide and 64 pixels tall | *64 pixels wide and 64 pixels tall | ||
| Line 308: | Line 308: | ||
<table cellpadding="4" bgcolor=#ffffb0> | <table cellpadding="4" bgcolor=#ffffb0> | ||
<tr valign="top"> | <tr valign="top"> | ||
| − | <td>[[file:PencilTips.PNG]]</td> | + | <td>[[file:PencilTips.PNG|link=]]</td> |
<td>If your image will have a transparency, such as a transparent background, it is usually a lot easier to save the image in a format that supports an '''alpha channel''' ('''bmp''', '''png''' or '''tga''') and either | <td>If your image will have a transparency, such as a transparent background, it is usually a lot easier to save the image in a format that supports an '''alpha channel''' ('''bmp''', '''png''' or '''tga''') and either | ||
*convert the background to a transparency or | *convert the background to a transparency or | ||
*remove the background and add a transparent layer to the image as its background | *remove the background and add a transparent layer to the image as its background | ||
| − | than it is to use a format that does not support an '''alpha channel''' and have to create a second image for the '''alpha channel'''. See [[file:PageLink.PNG]] '''[[#The Texture File|The Texture File]]''' below.</td> | + | than it is to use a format that does not support an '''alpha channel''' and have to create a second image for the '''alpha channel'''. See [[file:PageLink.PNG|link=]] '''[[#The Texture File|The Texture File]]''' below.</td> |
</tr> | </tr> | ||
</table> | </table> | ||
| Line 321: | Line 321: | ||
<table cellpadding="4" bgcolor=#c1e7e7> | <table cellpadding="4" bgcolor=#c1e7e7> | ||
<tr valign="top"> | <tr valign="top"> | ||
| − | <td>[[file:DotPoint.JPG]]</td> | + | <td>[[file:DotPoint.JPG|link=]]</td> |
<td>The '''.texture.txt''' file controls how an image icon is displayed, particularly its '''Alpha Channel''' (or transparency) data. The file must be present even if no transparency is used in the icon.</td> | <td>The '''.texture.txt''' file controls how an image icon is displayed, particularly its '''Alpha Channel''' (or transparency) data. The file must be present even if no transparency is used in the icon.</td> | ||
</tr> | </tr> | ||
| Line 332: | Line 332: | ||
</tr> | </tr> | ||
<tr valign="top"> | <tr valign="top"> | ||
| − | <td>[[file:Gears.PNG]]</td> | + | <td>[[file:Gears.PNG|link=]]</td> |
| − | <td><font size | + | <td><span style="font-size: 17px;">'''Settings:'''</span><br> |
*the '''Texture File''' is a standard '''text''' file | *the '''Texture File''' is a standard '''text''' file | ||
*the filename is composed of:- | *the filename is composed of:- | ||
| Line 361: | Line 361: | ||
</tr> | </tr> | ||
<tr valign="top"> | <tr valign="top"> | ||
| − | <td>[[file:Gears.PNG]]</td> | + | <td>[[file:Gears.PNG|link=]]</td> |
| − | <td><font size | + | <td><span style="font-size: 17px;">'''Settings:'''</span><br> |
*'''primary''' - this is the name of the icon image file that contains the '''RGB''' colour image. Any '''alpha channel''' in this file will be ignored | *'''primary''' - this is the name of the icon image file that contains the '''RGB''' colour image. Any '''alpha channel''' in this file will be ignored | ||
*'''alpha''' - this is the name of the icon image file that contains the '''Alpha Channel''' (transparency) image (see '''Notes:''' below) | *'''alpha''' - this is the name of the icon image file that contains the '''Alpha Channel''' (transparency) image (see '''Notes:''' below) | ||
| Line 377: | Line 377: | ||
<table cellpadding="4" bgcolor=#ffffb0> | <table cellpadding="4" bgcolor=#ffffb0> | ||
<tr valign="top"> | <tr valign="top"> | ||
| − | <td>[[file:NotePad.PNG]]</td> | + | <td>[[file:NotePad.PNG|link=]]</td> |
| − | <td><font size | + | <td><span style="font-size: 17px;">'''Notes:'''</span><br> |
There are 3 general "scenarios" for the structure of the '''Texture File''' in a '''Texture Non Environmental''' asset.<br> | There are 3 general "scenarios" for the structure of the '''Texture File''' in a '''Texture Non Environmental''' asset.<br> | ||
<table> | <table> | ||
<tr valign="top"> | <tr valign="top"> | ||
| − | <td>[[file:DotPoint1.JPG]]</td> | + | <td>[[file:DotPoint1.JPG|link=]]</td> |
<td>If the icon has a transparency (an '''alpha channel''') and is saved in a format that supports the '''alpha channel'''</td> | <td>If the icon has a transparency (an '''alpha channel''') and is saved in a format that supports the '''alpha channel'''</td> | ||
</tr> | </tr> | ||
| Line 396: | Line 396: | ||
<td><br> | <td><br> | ||
*the '''primary''' and '''alpha''' images are the same file, as in the example shown left | *the '''primary''' and '''alpha''' images are the same file, as in the example shown left | ||
| − | *the image must contain '''< | + | *the image must contain '''<span style="text-decoration: underline;">both</span>''' the '''RGB''' colour data and the '''Alpha Channel''' (transparency) data (it must have a '''depth''' of '''32 bits''')</td> |
</tr> | </tr> | ||
</table> | </table> | ||
| Line 402: | Line 402: | ||
<table> | <table> | ||
<tr valign="top"> | <tr valign="top"> | ||
| − | <td>[[file:DotPoint2.JPG]]</td> | + | <td>[[file:DotPoint2.JPG|link=]]</td> |
<td>If the icon needs to have transparency (an '''alpha channel''') but an '''alpha channel''' is not available (e.g. it is saved in the jpg file format) or is not suitable</td> | <td>If the icon needs to have transparency (an '''alpha channel''') but an '''alpha channel''' is not available (e.g. it is saved in the jpg file format) or is not suitable</td> | ||
</tr> | </tr> | ||
| Line 424: | Line 424: | ||
<table> | <table> | ||
<tr valign="top"> | <tr valign="top"> | ||
| − | <td>[[file:DotPoint3.JPG]]</td> | + | <td>[[file:DotPoint3.JPG|link=]]</td> |
<td>If the icon image does not have a transparency and no '''alpha channel''' is needed</td> | <td>If the icon image does not have a transparency and no '''alpha channel''' is needed</td> | ||
</tr> | </tr> | ||
| Line 451: | Line 451: | ||
<table cellpadding="4" bgcolor="Aquamarine"> | <table cellpadding="4" bgcolor="Aquamarine"> | ||
<tr valign="top"> | <tr valign="top"> | ||
| − | <td>[[file:WikiLink.PNG]]</td> | + | <td>[[file:WikiLink.PNG|link=]]</td> |
<td>A detailed description of the '''.texture''' file format can be found on the '''Trainz Wiki''' at<br> | <td>A detailed description of the '''.texture''' file format can be found on the '''Trainz Wiki''' at<br> | ||
* '''[[Texture_file|Texture File]]'''</td> | * '''[[Texture_file|Texture File]]'''</td> | ||
| Line 464: | Line 464: | ||
<table> | <table> | ||
<tr valign="top"> | <tr valign="top"> | ||
| − | <td>[[file:TextureAssetList.PNG]]</td> | + | <td>[[file:TextureAssetList.PNG|link=]]</td> |
<td> | <td> | ||
<table cellpadding="4" bgcolor=#ffffff> | <table cellpadding="4" bgcolor=#ffffff> | ||
| Line 472: | Line 472: | ||
</tr> | </tr> | ||
<tr valign="top"> | <tr valign="top"> | ||
| − | <td>[[file:Steps.PNG]]</td> | + | <td>[[file:Steps.PNG|link=]]</td> |
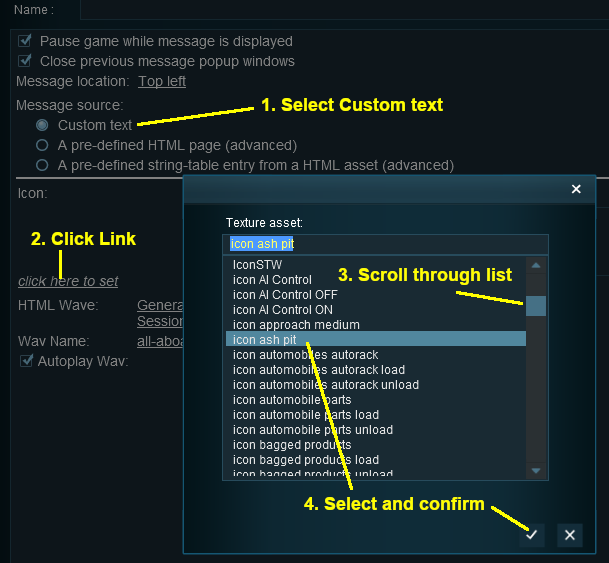
| − | <td><font size | + | <td><span style="font-size: 17px;">'''Steps:'''</span><br> |
In the '''Session Editor''' add a '''Message Popup Rule''' and open it for editing. | In the '''Session Editor''' add a '''Message Popup Rule''' and open it for editing. | ||
| − | #Select [[file:PortalOptionButtonFilled.PNG]] '''Custom Text''' | + | #Select [[file:PortalOptionButtonFilled.PNG|link=]] '''Custom Text''' |
| − | #Click the icon link '''< | + | #Click the icon link '''<span style="text-decoration: underline;">Click to select</span>''' |
#Scroll through the list of Texture Icons | #Scroll through the list of Texture Icons | ||
#Select the required icon | #Select the required icon | ||
| − | #Click the [[file:Tick.PNG]] icon to accept the selection</td> | + | #Click the [[file:Tick.PNG|link=]] icon to accept the selection</td> |
</tr> | </tr> | ||
<tr> | <tr> | ||
| Line 495: | Line 495: | ||
<table cellpadding="4" bgcolor=#ffffff> | <table cellpadding="4" bgcolor=#ffffff> | ||
<tr valign="top"> | <tr valign="top"> | ||
| − | <td>[[file:TrainzWiki.png]]</td> | + | <td>[[file:TrainzWiki.png|link=]]</td> |
<td> | <td> | ||
| − | <font size | + | <span style="font-size: 17px;">'''More Tutorials and Guides to Using Trainz'''</span><br> |
*'''<span class="plainlinks">[http://online.ts2009.com/mediaWiki/index.php/HowTo How to Guides]</span>''' | *'''<span class="plainlinks">[http://online.ts2009.com/mediaWiki/index.php/HowTo How to Guides]</span>''' | ||
*'''[[Driver Commands List]]''' | *'''[[Driver Commands List]]''' | ||
Revision as of 16:51, 7 September 2019
The information in this Wiki Page applies to both TANE and TRS19.
Contents |
Message Popup Icons
Message Popup Icons are small graphic icons that can be placed in browser message windows in Driver mode. The browser windows are created by the Message Popup Rule.
| The icons used in Custom Message Popups belong to the class of Textures - Not Environmental |
Information on Message Popups can be found at the Trainz Wiki pages:-
![]() Using the Message Popup Rule
Using the Message Popup Rule
![]() Using the Message Popup Rule (Applications)
Using the Message Popup Rule (Applications)
![]() How to Create a HTML Asset
How to Create a HTML Asset
![]() Message Popup Rule (description)
Message Popup Rule (description)
How to Create a New Non-Environmental Texture Asset
 |
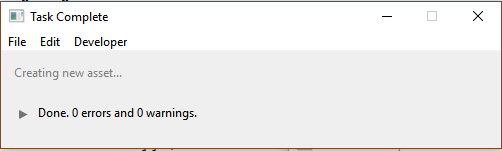
Step 1: Create the Asset
|
|
|
|||
|
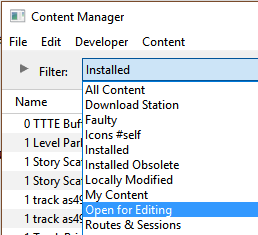
Step 2: Find the New Asset
|
||
|
|
|||
|
Step 3: Open the Asset in Windows Explorer
|
||
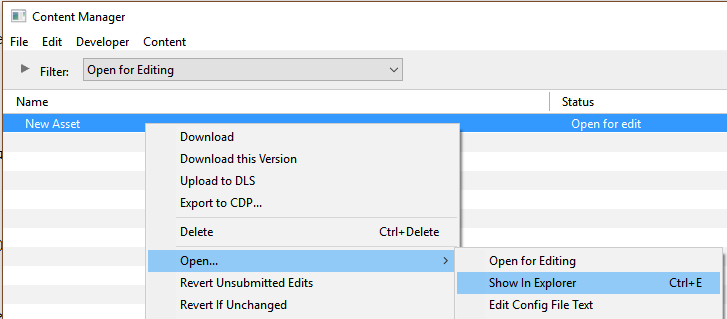
|
|
|||
|
Step 4: Open File in Notepad
|
||

|
|
|||||||
|
Step 5: Edit the File
|
||||||
|
|
|
|
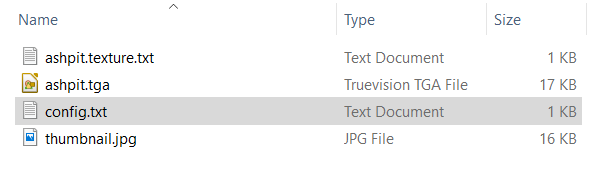
Step 6: Add Any "Extras" You will need to add three additional files (possibly more depending on how the icon is created) to the asset folder:-
|
 |
THIS IS AN EXAMPLE ONLY This is the minimum number of files needed in a Texture asset |
|
|
||||||||
|
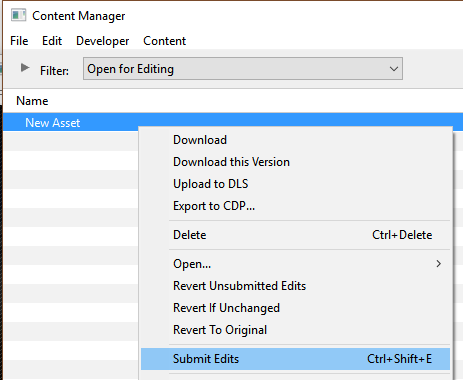
Step 7: Finish Up
|
|||||||
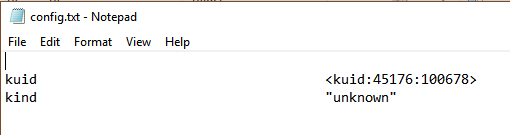
The Config.txt File
This file should follow the same (or a similar) format as the example below. Entries in blue will be different for each asset. The order of the "tags" is not important:-
kuid                                    <kuid:this is an auto-generated number>
kind                                    "texture"
texture                                 "asset_name.texture"
username                                "place your selected asset name here"
category-class                          "JI"
trainz-build                            4.3

thumbnails
{
  0
  {
    width                               240
    height                              180
    image                               "name_of_thumbnail.jpg"
  }
  1
  {
    width                               64
    height                              64
    image                               "asset_name.texture"
  }
}
description                             "Place your description of what the icon represents here"
|
|
|
| Settings: For the above example:
|
|
|
|
|
The Icon Image
| You will need image editing software to create the icon image or to change an existing image to the required dimensions and format. |
(not to scale) |
|
||||||
If your image will have a transparency, such as a transparent background, it is usually a lot easier to save the image in a format that supports an alpha channel (bmp, png or tga) and either
|
The Texture File
| The .texture.txt file controls how an image icon is displayed, particularly its Alpha Channel (or transparency) data. The file must be present even if no transparency is used in the icon. |
|
|
|
Settings:
|
|
|
|
|
A sample Texture File, "ashpit.texture.txt", is shown below:-
primary=ashpit.jpg alpha=ashpit.bmp tile=st |
|
||||||
| Notes: There are 3 general "scenarios" for the structure of the Texture File in a Texture Non Environmental asset.
Then:-
Then:-
Then:-
Image file formats supported by TANE/TRS19 that have an alpha channel are:-
Image file formats supported by TANE/TRS19 that DO NOT have an alpha channel are:-
|
| A detailed description of the .texture file format can be found on the Trainz Wiki at |
Using the Asset
Once the new asset has been committed it will be available for use in a Message Popup Rule. It will appear as a Texture Asset in the rule icon list.
 |
|
||||||
Trainz Wiki
 |
More Tutorials and Guides to Using Trainz |